
Festive Grinch Oreo Balls Recipe: Jolly Holiday Treats
Magical grinch oreo balls sparkle with festive cheer and playful holiday spirit.
Crushing cookies creates a smooth, delightful base for these whimsical treats.
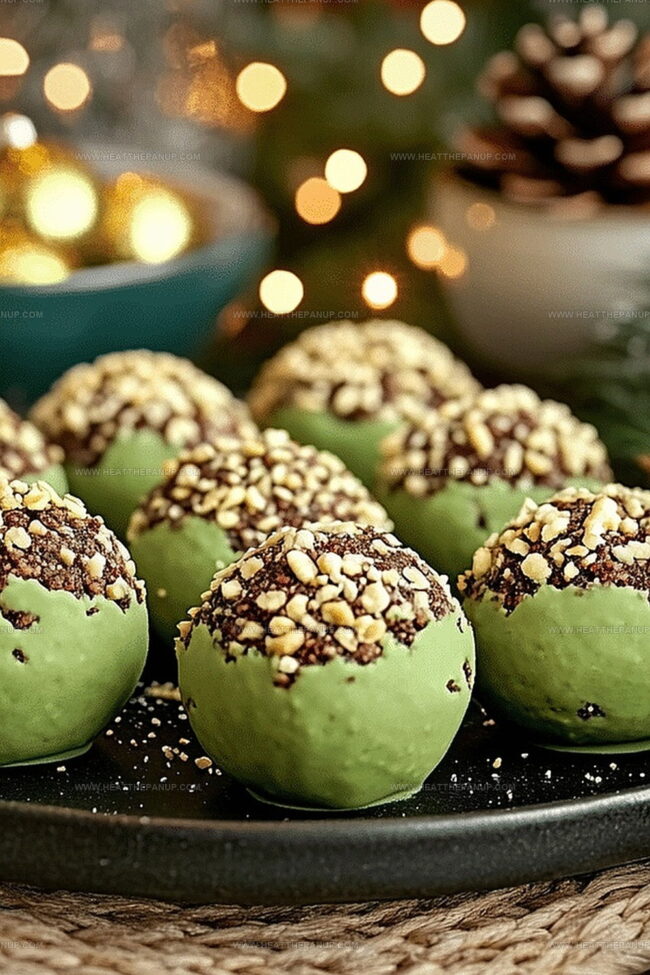
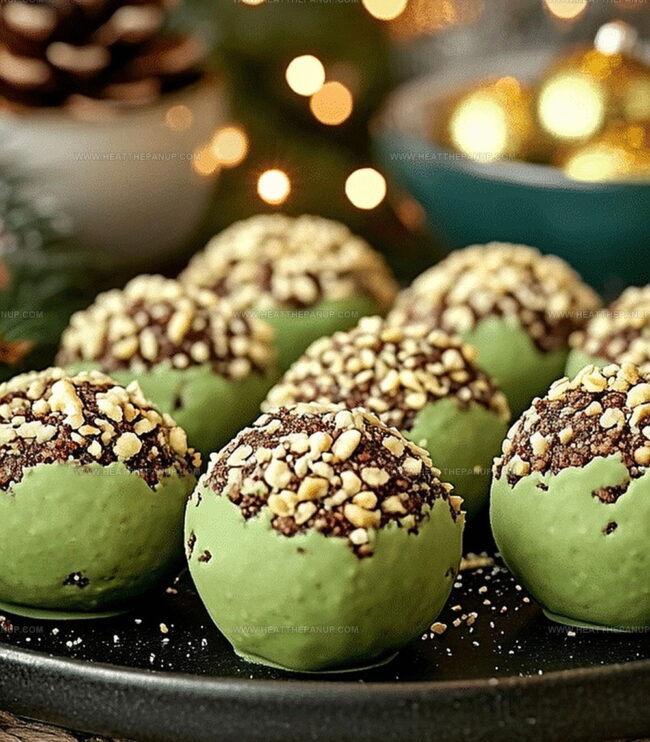
Green-tinted white chocolate gives these little bites their charming character.
Cream cheese adds rich, creamy texture that melts in your mouth.
Kids and adults alike will adore the cheerful emerald coating.
Each bite brings a delightful crunch and sweet nostalgia.
Crafting these delectable morsels promises fun and memorable moments during the holiday season.
You’ll want to make these adorable grinch oreo balls for every celebration.
Why Grinch Oreo Balls Bring Joy to Every Bite
Everything You Need for Grinch Oreo Balls
For the Core Ingredients:For the Coating and Decoration:For the Finishing Touches:Fun Steps to Make Grinch Oreo Balls
Step 1: Pulverize Oreo Cookies
Grab your favorite Oreo cookies and transform them into super fine crumbs using a food processor or rolling pin. Crush until no big chunks remain, creating a smooth, consistent texture.
Step 2: Blend Creamy Mixture
Combine softened cream cheese with the Oreo crumbs. Mix thoroughly until the ingredients merge into a moldable, cohesive blend that holds together perfectly.
Step 3: Chill and Firm
Pop the mixture into the refrigerator for 15-20 minutes. This cooling period helps the mixture become more manageable and easier to shape into delightful bite-sized spheres.
Step 4: Shape Oreo Balls
Roll the chilled mixture into small, uniform balls. Arrange them carefully on a parchment-lined baking sheet, ensuring even spacing.
Step 5: Quick Freeze
Place the Oreo balls in the freezer for 15 minutes. This quick freeze helps maintain their shape during the chocolate coating process.
Step 6: Create Grinch Green Chocolate
Melt white chocolate wafers in a microwave-safe bowl. Heat in short 30-second bursts, stirring between each interval to prevent burning. Add green food coloring and mix until you achieve a vibrant Grinch-like shade.
Step 7: Coat with Green Chocolate
Dip each frozen Oreo ball into the green-tinted chocolate. Use a fork to ensure complete and smooth coverage, gently tapping the fork on the bowl’s edge to remove excess chocolate.
Step 8: Add Santa Hat Details
Melt red candy melts separately. Once the green chocolate sets, drizzle red candy melts in a playful zigzag pattern to create the Grinch’s iconic Santa hat look. Sprinkle green sprinkles along the red drizzle for extra festive flair.
Step 9: Final Chill
Refrigerate the completed Grinch Oreo Balls for 10 minutes to solidify the decorative elements and ensure a perfect finish.
Step 10: Store and Serve
Keep the Grinch Oreo Balls in an airtight container in the refrigerator until you’re ready to enjoy these festive treats. They’ll maintain their shape and delicious flavor, ready to bring holiday cheer!
Grinch Oreo Balls Tips for Festive Perfection
Different Ways to Style Your Grinch Oreo Balls
What to Pair with Grinch Oreo Balls
How to Store Grinch Oreo Balls Without Mess
Grinch Oreo Balls FAQ Guide
They’re super easy! Even beginners can create these festive treats with basic baking skills and simple ingredients.
No special tools required. A food processor or rolling pin works for crushing cookies, and basic kitchen items like mixing bowls and a microwave are sufficient.
Absolutely! You can prepare them 2-3 days in advance and store them in the refrigerator, which actually helps the flavors meld together.
Yes, you can skip the green food coloring and keep them white, or experiment with other festive colors like red or blue for different holiday themes.
Print
Whimsical Grinch Oreo Balls Recipe
- Total Time: 50-55 minutes
- Yield: 24 1x
Description
Mischievous Grinch Oreo Balls bring holiday cheer with their festive green coating and whimsical charm. Rich chocolate and cream cheese blend perfectly, creating a playful dessert that delights both kids and adults at Christmas gatherings.
Ingredients
Oreo Base:
- 1 package oreo cookies
- 8 oz cream cheese, softened
Coating and Decoration:
- 16 oz white chocolate melting wafers
- Green food coloring
- 1/4 cup red candy melts
- 1/4 cup green sprinkles
Finishing Touches:
- 1 tsp vanilla extract
- 1 pinch salt
Instructions
- Crush Oreo cookies into fine, uniform crumbs using a food processor or rolling pin, ensuring no large chunks remain.
- Blend softened cream cheese with Oreo crumbs, mixing thoroughly until a cohesive, moldable mixture forms.
- Refrigerate the mixture for 15-20 minutes to firm up, making it easier to shape into consistent bite-sized spheres.
- Roll the chilled mixture into small, even balls, placing them on a parchment-lined baking sheet.
- Freeze the Oreo balls for 15 minutes to maintain their shape during coating.
- Melt white chocolate wafers in a microwave-safe bowl, heating in 30-second intervals and stirring between each interval to prevent burning.
- Add green food coloring to the melted white chocolate, stirring until a vibrant Grinch-like shade is achieved.
- Carefully dip each frozen Oreo ball into the green-tinted chocolate, using a fork to ensure complete and smooth coverage.
- Tap the fork gently on the bowl’s edge to remove excess chocolate, then place the coated balls back on the parchment paper.
- Melt red candy melts separately, preparing for decorative details.
- Once the green chocolate sets, drizzle red candy melts in a zigzag pattern to create the Grinch’s Santa hat effect.
- Sprinkle green sprinkles along the red drizzle for added festive texture and visual interest.
- Refrigerate the completed Grinch Oreo Balls for 10 minutes to solidify the decorative elements.
- Store in an airtight container in the refrigerator until ready to serve, maintaining their shape and flavor.
Notes
- Crush Oreos meticulously to prevent lumpy texture, ensuring smooth and consistent coating.
- Chill mixture before shaping to make rolling easier and maintain perfect round ball shape.
- Use room temperature cream cheese for smoother blending and easier mixing with Oreo crumbs.
- Freeze Oreo balls briefly before coating to prevent chocolate from melting during dipping process.
- Microwave white chocolate in short bursts to avoid burning and maintain silky consistency.
- Add food coloring gradually to achieve desired Grinch-green shade without diluting chocolate.
- Use fork for precise chocolate coating, allowing excess to drip for clean, professional appearance.
- Keep workspace cool to help chocolate set quickly and maintain crisp decorative details.
- Store in refrigerator to preserve texture and prevent chocolate from becoming soft.
- Prep Time: 35-40 minutes
- Cook Time: 15 minutes
- Category: Snacks, Desserts
- Method: Rolling
- Cuisine: American
Nutrition
- Serving Size: 24
- Calories: 150
- Sugar: 12 g
- Sodium: 50 mg
- Fat: 8 g
- Saturated Fat: 5 g
- Unsaturated Fat: 3 g
- Trans Fat: 0 g
- Carbohydrates: 19 g
- Fiber: 1 g
- Protein: 2 g
- Cholesterol: 10 mg
James Hambly
Founder & Recipe Creator
Expertise
Recipe Development, Culinary Education, Farm-to-Table Cooking, Southern Cuisine
Education
Asheville-Buncombe Technical Community College
Certificate in Culinary Arts
Focus: Hands-on training in professional cooking techniques, emphasizing farm-to-table practices and Southern cuisine.
The Chef’s Academy
Associate Degree in Culinary Arts
Focus: Comprehensive culinary education covering global cuisines, kitchen management, and food safety.
James grew up surrounded by the smells of cast-iron skillets and slow-cooked Southern meals in Asheville, North Carolina.
He sharpened his skills with a Certificate in Culinary Arts from Asheville-Buncombe Technical Community College, and later leveled up with an Associate Degree from The Chef’s Academy.
James’s philosophy is simple: the best meals don’t need fancy tricks, just fresh ingredients, a hot pan, and a little bit of heart. His favorite days are spent testing one-pan wonders, chasing bold flavors, and creating recipes that feel easy, even on a busy night.