
Bewitchingly Fun Rice Krispie Treat Pumpkins Recipe
Crafting adorable rice krispie treat pumpkins brings whimsy to your autumn dessert lineup.
Kids absolutely adore these festive orange-hued sweets shaped like miniature pumpkins.
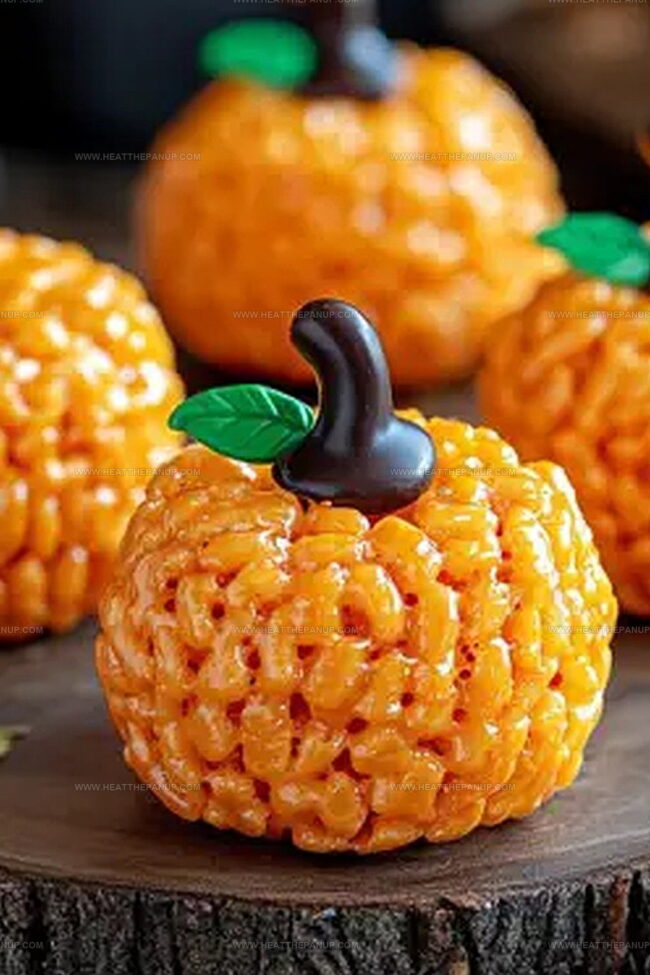
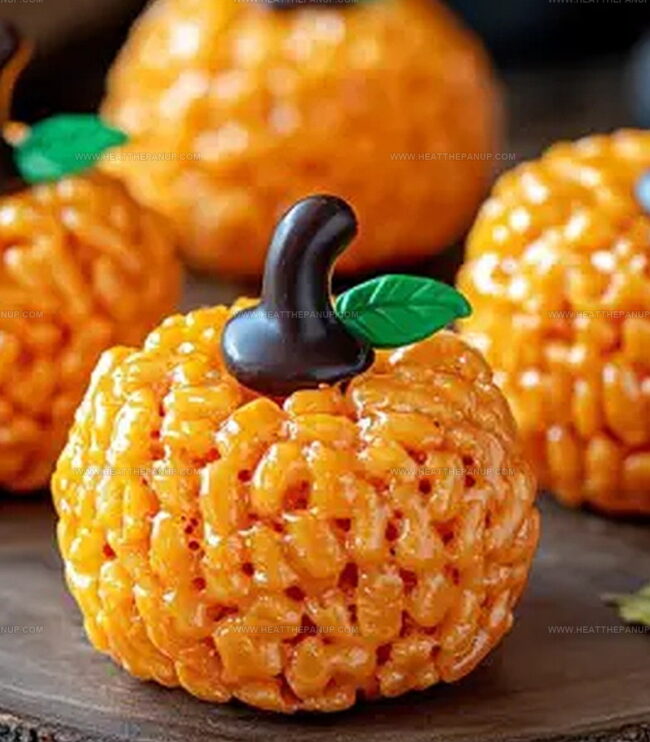
Orange food coloring and creative molding transform classic marshmallow squares into charming seasonal delights.
Small hands love helping press and shape each delectable treat into perfect rounded forms.
Pretzel stems add realistic touches that make these confections pop with personality.
Halloween parties or fall gatherings become extra special when you present these playful orange snacks.
Sculpting these delightful treats promises sweet memories and giggles with your favorite little helpers.
What’s Fun About Rice Krispie Treat Pumpkins
What You’ll Need for Rice Krispie Treat Pumpkins
Main Ingredients:Decoration Ingredients:Color and Preparation Ingredients:Easy Instructions for Rice Krispie Treat Pumpkins
Step 1: Melt the Butter
Grab a large pot and gently melt the butter over low heat, allowing it to transform into a smooth, golden liquid.
Step 2: Create Marshmallow Magic
Add marshmallows to the melted butter and stir continuously until they completely dissolve and blend into a creamy mixture.
Step 3: Develop Pumpkin Color
Remove the pot from heat and add food coloring:Blend carefully, adding drops gradually until you achieve a vibrant orange shade that resembles a perfect pumpkin.
Step 4: Mix in Crispy Goodness
Pour Rice Krispies into the colored marshmallow mixture and stir thoroughly, ensuring every cereal piece gets coated with the sweet mixture.
Step 5: Shape Adorable Pumpkins
Prepare your hands:Step 6: Create Pumpkin Details
While treats are still warm:Pro Tip: If treats cool before decorating, use a marker or apple corer to create an indent for the chocolate stem.
Step 7: Let Treats Set
Allow pumpkin-shaped treats to cool completely until they become firm and hold their shape.
Rice Krispie Treat Pumpkin Tips
How to Keep Rice Krispie Treat Pumpkins Fresh
What to Serve with Rice Krispie Treat Pumpkins
Creative Styles for Rice Krispie Treat Pumpkins
FAQs
Coating your hands prevents the sticky marshmallow mixture from clinging to your skin, making it easier to shape the pumpkins smoothly and preventing a messy cleanup.
Yes, you can substitute Mini Rolos with Rolo Minis, chocolate kisses, or pretzel stems, and use green candy-coated chocolates or fondant for the leaf.
Add yellow food coloring first, then gradually mix in red food coloring, one drop at a time, until you reach your desired shade of orange. Start with fewer drops and build up the color slowly.
Gently reheat the mixture over low heat, stirring constantly, to restore its malleability and make it easier to form into pumpkin shapes.
Print
Rice Krispie Treat Pumpkins Recipe
- Total Time: 30 minutes
- Yield: 12 1x
Description
Seasonal Rice Krispie Treat Pumpkins bring autumn’s sweetness to classic marshmallow desserts, creating adorable orange-hued treats perfect for fall gatherings. Halloween parties and family celebrations will delight in these charming, festive confections you cannot resist.
Ingredients
Main Ingredients:
- 1 bag large marshmallows (approximately 40 marshmallows)
- 6 cups Rice Krispies
- 1/4 cup (56 grams) butter
Decorative Ingredients:
- Red liquid food coloring
- Yellow liquid food coloring
- Mini Rolos
- Green M&Ms
Preparation Ingredients:
- 1/4 cup (60 milliliters) cooking oil or melted butter (for preventing sticking)
Instructions
- Prepare a large pot and melt butter thoroughly over low, gentle heat.
- Gradually incorporate marshmallows, stirring continuously until they completely dissolve and integrate with the melted butter.
- Carefully remove pot from heat source and introduce food coloring. Add yellow drops first, then incrementally introduce red, blending meticulously between each addition until achieving a rich, warm orange hue.
- Fold Rice Krispies into the colored marshmallow mixture, ensuring uniform coating of each cereal piece.
- Liberally coat hands with cooking oil or butter to prevent sticking. Gently shape the mixture into rounded spheres, placing each delicately on parchment paper.
- Reapply oil or butter between forming each pumpkin to maintain smooth surfaces.
- While pumpkin shapes remain warm and pliable, delicately nestle a Mini Rolo into the top center as a stem. Position a green M&M adjacent to create a leaf accent.
- If pumpkins cool before decoration, use a marker end or apple corer to create a small indentation for the chocolate stem.
- Allow treats to set and firm completely at room temperature before serving or storing.
Notes
- Ensure butter and marshmallows are melted slowly to prevent burning and maintain smooth texture.
- Use precise food coloring technique by adding drops gradually to achieve perfect pumpkin-orange shade without overwhelming the mixture.
- Keep hands generously coated with oil or butter while shaping to prevent sticky mixture from clinging and create smooth, round pumpkin shapes.
- Work quickly while mixture is warm to easily embed Rolo stems and M&M leaves, using a tool to create indent if treats cool too fast.
- Prep Time: 20 minutes
- Cook Time: 10 minutes
- Category: Snacks, Desserts
- Method: Simmering
- Cuisine: American
Nutrition
- Serving Size: 12
- Calories: 150
- Sugar: 10 g
- Sodium: 70 mg
- Fat: 6 g
- Saturated Fat: 3 g
- Unsaturated Fat: 2 g
- Trans Fat: 0 g
- Carbohydrates: 22 g
- Fiber: 0 g
- Protein: 1 g
- Cholesterol: 15 mg
Angelina Wiles
Content Editor & Culinary Enthusiast
Expertise
Food Writing and Editing, Vegetarian and Vegan Cuisine, Baking and Pastry Arts, Sustainable Cooking Practices
Education
Portland Community College
Certificate in Culinary Arts
Focus: Emphasis on sustainable cooking practices, vegetarian cuisine, and food writing.
Oregon Culinary Institute
Diploma in Baking and Pastry Arts
Focus: Specialized training in artisanal baking, pastry techniques, and dessert presentation.
Angelina’s love for cooking started with handwritten family recipes and weekend trips to farmers’ markets around Portland. She followed her passion with a Certificate in Culinary Arts from Portland Community College, then perfected her sweet side with a Diploma in Baking and Pastry Arts at Oregon Culinary Institute.
Angelina believes recipes should feel like a conversation, not a science project. She’s all about helping readers trust themselves in the kitchen with simple steps, fresh ideas, and easy twists on classic meals.
When she’s not editing recipes, she’s baking bread, sipping coffee, or getting inspired by the changing seasons.