
Heavenly Pineapple Bliss Bars Recipe: Sweet Tropical Escape
My latest kitchen adventure with these delectable pineapple bliss bars surprised even my skeptical taste buds.
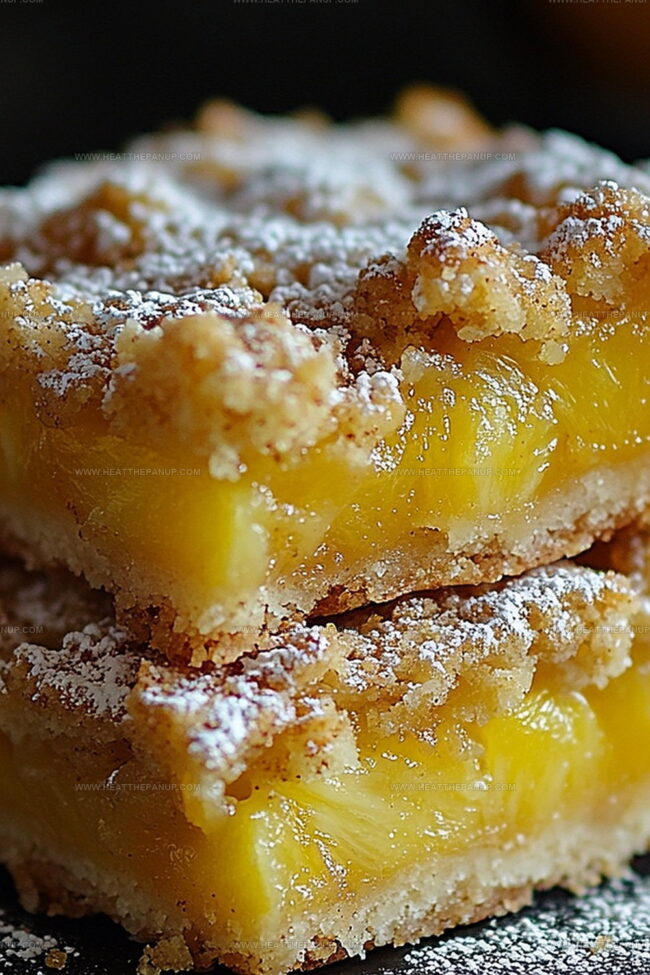
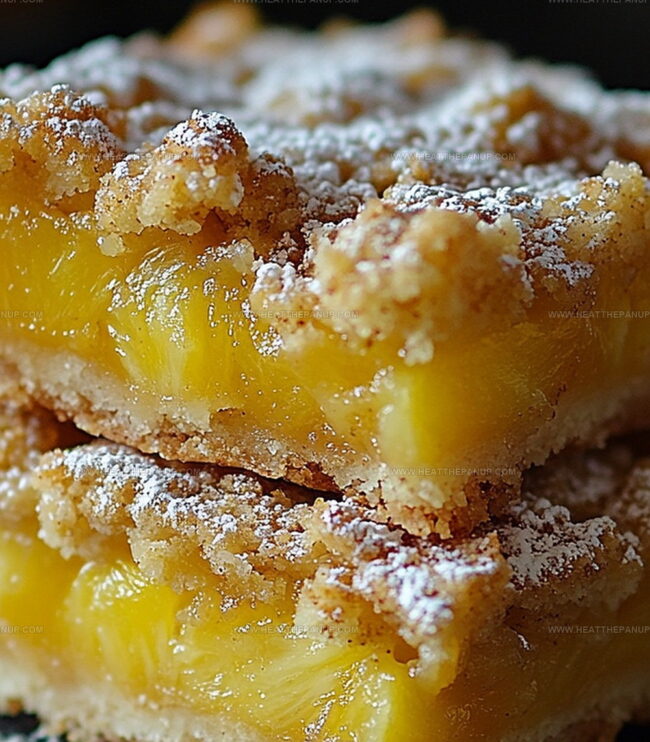
Sweet tropical notes dance across a buttery crust that crumbles perfectly with each bite.
Sunshine-inspired desserts always spark joy in my culinary experiments.
Layers of creamy filling and bright fruit create a magical combination that feels like a mini vacation.
Coconut and pineapple weave together in a delightful harmony that makes you want to close your eyes and savor.
Smooth textures and vibrant flavors promise an escape from ordinary desserts.
Grab a fork and let these bars transport you to a blissful paradise of pure deliciousness.
Why Pineapple Bliss Bars Are So Tempting
Ingredients for Pineapple Bliss Bars
Crust Ingredients:Filling Ingredients:Finishing Ingredient:Baking Instructions for Pineapple Bliss Bars
Step 1: Warm Up the Oven
Crank your oven to a toasty 350°F and grab a 9×13 baking pan.
Line it with parchment paper, letting the edges hang over for easy lifting later.
Step 2: Create the Crumbly Crust
Grab a mixing bowl and toss in:Slice in cold butter and work it with your fingers until the mixture looks like sandy crumbs.
Press this magical mixture evenly into the prepared pan, creating a smooth foundation.
Step 3: Bake the Crust Base
Slide the pan into the preheated oven and bake for 15 minutes.
You’re looking for a delicate golden color.
Once done, pull it out and let it cool down a bit.
Step 4: Whip Up the Tropical Filling
In a fresh bowl, whisk eggs and sugar until they become silky smooth.
Stir in:Gently fold in the drained crushed pineapple, distributing those sweet fruit bits throughout.
Step 5: Layer and Bake the Filling
Pour the pineapple mixture evenly over the golden crust.
Return to the oven and bake for 25-30 minutes until the edges look set and slightly firm.
Step 6: Cool and Decorate
Let the bars cool completely in the pan.
Once they’ve reached room temperature, dust generously with powdered sugar.
Slice into squares and serve your tropical treasure.
Tips to Perfect Your Pineapple Bliss Bars
Storage and Reheating for Pineapple Bliss Bars
What Goes Well with Pineapple Bliss Bars
Pineapple Bliss Bar Flavor Options
FAQs
The crushed pineapple provides a tropical, tangy sweetness that makes these bars refreshing and bright, while the vanilla adds depth and warmth to the overall taste.
These Pineapple Bliss Bars work perfectly as both a dessert and a delightful afternoon snack, offering a perfect balance of sweet and fruity flavors that appeal to all ages.
The bars are done when the edges are set and look slightly golden, and the center is no longer jiggly when you gently shake the pan. This typically takes 25-30 minutes in the oven.
While canned crushed pineapple works best for this recipe due to its consistent texture and moisture content, you can use fresh pineapple if you drain it thoroughly to prevent excess liquid from making the bars soggy.
Print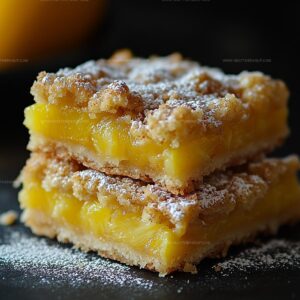
Pineapple Bliss Bars Recipe
- Total Time: 1 hour 5 minutes
- Yield: 12 1x
Description
Sweet Hawaiian pineapple bliss bars bring tropical paradise to your dessert table. Creamy coconut layers mingle with tangy pineapple, creating a refreshing escape you’ll crave with each delightful bite.
Ingredients
Main Ingredients:
- 2 large eggs
- 1 cup crushed pineapple, well-drained
- 1 1/2 cups (180 grams) all-purpose flour
- 1 1/2 cups (300 grams) granulated sugar
- 3/4 cup (170 grams) cold unsalted butter, cubed
Dry Ingredients:
- 1/4 cup (30 grams) all-purpose flour
- 1/2 teaspoon baking powder
- 1/4 teaspoon salt
Flavoring and Finishing:
- 1 teaspoon vanilla extract
- Powdered sugar for dusting
Instructions
- Prepare the oven environment by heating to 350°F and creating a non-stick surface in a 9×13 baking pan using parchment paper.
- Craft the foundational crust by combining flour, sugar, and salt in a mixing vessel. Incorporate cold butter until the mixture achieves a delicate, crumbly texture.
- Distribute the crust mixture evenly across the prepared pan, ensuring a uniform layer that will serve as the base for the dessert.
- Transfer the pan to the preheated oven and bake the crust for approximately 15 minutes, watching for a delicate golden hue to develop.
- Remove the crust and allow it to cool momentarily while maintaining a warm temperature.
- Create the tropical pineapple filling by whisking eggs and sugar until they transform into a smooth, homogeneous mixture.
- Integrate flour, baking powder, and vanilla into the egg mixture, stirring carefully to maintain a consistent texture.
- Gently fold the drained crushed pineapple into the filling, distributing the fruit evenly throughout the liquid base.
- Carefully pour the pineapple filling over the prepared crust, ensuring complete and uniform coverage.
- Return the pan to the oven and bake for 25-30 minutes, monitoring until the edges appear set and firm.
- Extract from the oven and allow the bars to cool completely within the pan, enabling them to solidify.
- Once thoroughly cooled, generously dust the surface with powdered sugar, creating a delicate, sweet finish.
- Slice into square portions, revealing the layers of crust and vibrant pineapple filling.
Notes
- Ensure butter is cold and cut into small pieces for a flakier, more tender crust texture that crumbles perfectly when mixed.
- Drain pineapple thoroughly to prevent excess moisture from making the bars soggy and compromising the filling’s consistency.
- Use room temperature eggs for smoother integration into the filling, helping achieve a silky, even texture throughout the bars.
- For a gluten-free version, substitute all-purpose flour with almond flour or a gluten-free baking blend to accommodate dietary restrictions.
- Prep Time: 20 minutes
- Cook Time: 40-45 minutes
- Category: Desserts, Snacks
- Method: Baking
- Cuisine: American
Nutrition
- Serving Size: 12
- Calories: 220
- Sugar: 16 g
- Sodium: 50 mg
- Fat: 10 g
- Saturated Fat: 6 g
- Unsaturated Fat: 4 g
- Trans Fat: 0 g
- Carbohydrates: 30 g
- Fiber: 1 g
- Protein: 3 g
- Cholesterol: 40 mg
Angelina Wiles
Content Editor & Culinary Enthusiast
Expertise
Food Writing and Editing, Vegetarian and Vegan Cuisine, Baking and Pastry Arts, Sustainable Cooking Practices
Education
Portland Community College
Certificate in Culinary Arts
Focus: Emphasis on sustainable cooking practices, vegetarian cuisine, and food writing.
Oregon Culinary Institute
Diploma in Baking and Pastry Arts
Focus: Specialized training in artisanal baking, pastry techniques, and dessert presentation.
Angelina’s love for cooking started with handwritten family recipes and weekend trips to farmers’ markets around Portland. She followed her passion with a Certificate in Culinary Arts from Portland Community College, then perfected her sweet side with a Diploma in Baking and Pastry Arts at Oregon Culinary Institute.
Angelina believes recipes should feel like a conversation, not a science project. She’s all about helping readers trust themselves in the kitchen with simple steps, fresh ideas, and easy twists on classic meals.
When she’s not editing recipes, she’s baking bread, sipping coffee, or getting inspired by the changing seasons.