
Gooey Peanut Butter S’mores Sandwich Cookies Recipe
Crafting a mouthwatering peanut butter s’mores sandwich cookies recipe brings pure childhood nostalgia mixed with gourmet excitement.
Graham crackers become magical platforms for decadent layers of sweet indulgence.
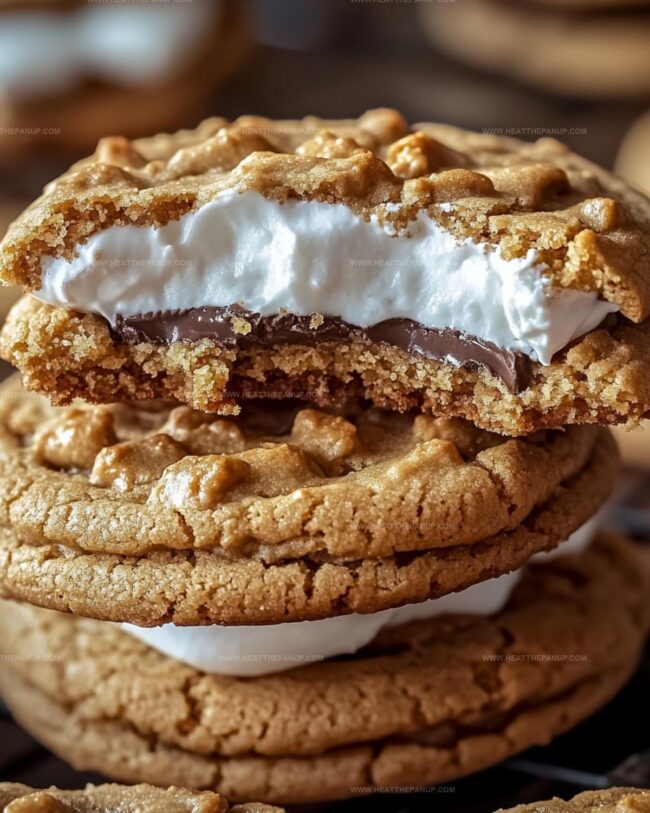
Marshmallow fluff and rich chocolate chips dance between crisp, buttery cookie edges.
Melted peanut butter creates a smooth, creamy backdrop that connects all these incredible flavors.
Crumbly textures contrast with silky spread, making each bite an adventure for your taste buds.
Simple ingredients transform into an irresistible dessert that sparks joy and memories.
Jump into this delightful baking journey and create something extraordinary that will make everyone smile.
Peanut Butter S’mores Sandwich Cookies Everyone Craves

Peanut Butter Smores Sandwich Cookies What You’ll Need
Main Ingredients:
Peanut Butter Cookies:Binding and Leavening Ingredients:Filling and Topping Ingredients:Peanut Butter S’mores Cookie Sandwich Instructions
Step 1: Warm Up The Oven
Set your oven to 350°F and prepare a baking sheet with parchment paper for easy cookie removal.
Step 2: Create Creamy Cookie Base
In a spacious mixing bowl, whip together:Blend until the mixture becomes light and fluffy.
Add egg and vanilla extract, stirring until completely combined.
Step 3: Mix Dry Ingredients
In a separate bowl, combine:Slowly fold dry ingredients into the wet mixture, stirring until a smooth dough forms.
Step 4: Form Cookie Rounds
Roll dough into small balls and place on the prepared baking sheet.
Use a fork to create classic crisscross patterns on each cookie.
Step 5: Bake To Golden Perfection
Slide the baking sheet into the oven and bake for 10-12 minutes.
Cookies should turn a beautiful golden brown.
Transfer to a wire rack and let cool completely.
Step 6: Construct Gooey Sandwiches
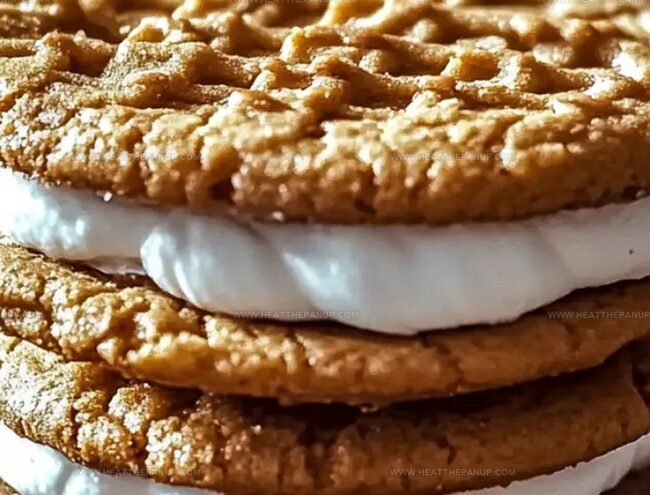
Once cookies are cool, spread chocolate on one cookie.
Place a marshmallow half on top and microwave briefly to create a melty center.
Top with a second cookie and press gently.
Step 7: Indulge In Sweet Delight
Allow sandwiches to rest for a few minutes so the chocolate and marshmallow set.
Grab a cookie and enjoy the delicious combination of flavors!
Sandwich Cookie Tips for PB & S’mores Perfection
Reheat Peanut Butter S’mores Sandwich Cookies
Snacks to Pair with Peanut Butter S’mores Cookies
Peanut Butter S’mores Sandwich Edits
FAQs
Absolutely! The rich, nutty flavor of peanut butter provides a delicious twist to the classic campfire treat, creating a unique and indulgent dessert experience.
Yes, you can swap milk, dark, or even white chocolate based on your preference. Each type of chocolate will bring a slightly different flavor profile to the cookie sandwich.
Definitely! Kids will love helping to assemble the cookies and enjoy the gooey marshmallow and chocolate combination. Just supervise during the marshmallow melting and oven steps.
Make sure your butter is softened but not melted, and chill the dough for 15-20 minutes before baking. This helps maintain the cookie’s shape and prevents excessive spreading during baking.
Print
Peanut Butter Smores Sandwich Cookies Recipe
- Total Time: 25 minutes
- Yield: 12 1x
Description
Sweet, gooey peanut butter s’mores sandwich cookies combine classic campfire flavors with irresistible homemade charm. Crisp graham crackers, melted chocolate, and creamy peanut butter create an indulgent treat you’ll crave again and again.
Ingredients
Main Ingredients:
- 1 cup creamy peanut butter
- 1/2 cup unsalted butter (softened)
- 1 large egg
Sweeteners:
- 1/2 cup granulated sugar
- 1/2 cup brown sugar (packed)
Dry Ingredients and Others:
- 1 1/4 cups all-purpose flour
- 1/2 teaspoon baking soda
- 1 teaspoon vanilla extract
- Pinch of salt
- Large marshmallows (halved)
- Chocolate bars or chocolate spread (for filling)
Instructions
- Preheat the oven to 350°F (175°C) and cover a baking sheet with parchment paper, creating a non-stick surface for your cookies.
- In a spacious mixing bowl, whip together peanut butter, softened butter, granulated sugar, and brown sugar until the mixture becomes creamy and light in texture.
- Incorporate the egg and vanilla extract, stirring until the ingredients are thoroughly blended and smooth.
- In a separate bowl, sift together flour, baking soda, and salt to ensure even distribution of dry ingredients.
- Gradually fold the dry mixture into the wet ingredients, stirring gently until a cohesive dough forms.
- Roll the dough into small, uniform spheres and arrange them on the prepared baking sheet.
- Use a fork to gently press down on each dough ball, creating a distinctive crisscross pattern that adds texture and visual appeal.
- Transfer the baking sheet to the preheated oven and bake for 10-12 minutes, watching for a golden-brown color that indicates perfect doneness.
- Remove the cookies from the oven and let them cool completely on a wire rack, allowing them to firm up and develop a crisp exterior.
- Once cooled, spread a layer of chocolate onto one cookie surface.
- Position a halved marshmallow on top of the chocolate and briefly microwave for 10-15 seconds to create a soft, slightly melted texture.
- Carefully place a second cookie on top, gently pressing to form a sandwich.
- Allow the assembled cookies to rest for a few minutes, letting the marshmallow and chocolate set and cool into a delightful, gooey treat.
Notes
- Swap peanut butter with almond or sunflower seed butter for nut-free diets, ensuring everyone can enjoy these delightful treats.
- Chill dough for 30 minutes before baking to prevent excessive spreading and maintain a perfectly shaped cookie.
- Use dark chocolate or dairy-free chocolate chips for a richer flavor profile and to accommodate lactose-intolerant guests.
- Create mini versions by using smaller dough portions, perfect for portion control or kid-friendly snacking.
- Prep Time: 15 minutes
- Cook Time: 10 minutes
- Category: Desserts, Snacks
- Method: Baking
- Cuisine: American
Nutrition
- Serving Size: 12
- Calories: 210
- Sugar: 8 g
- Sodium: 150 mg
- Fat: 12 g
- Saturated Fat: 3 g
- Unsaturated Fat: 8 g
- Trans Fat: 0 g
- Carbohydrates: 24 g
- Fiber: 1 g
- Protein: 5 g
- Cholesterol: 20 mg
Angelina Wiles
Content Editor & Culinary Enthusiast
Expertise
Food Writing and Editing, Vegetarian and Vegan Cuisine, Baking and Pastry Arts, Sustainable Cooking Practices
Education
Portland Community College
Certificate in Culinary Arts
Focus: Emphasis on sustainable cooking practices, vegetarian cuisine, and food writing.
Oregon Culinary Institute
Diploma in Baking and Pastry Arts
Focus: Specialized training in artisanal baking, pastry techniques, and dessert presentation.
Angelina’s love for cooking started with handwritten family recipes and weekend trips to farmers’ markets around Portland. She followed her passion with a Certificate in Culinary Arts from Portland Community College, then perfected her sweet side with a Diploma in Baking and Pastry Arts at Oregon Culinary Institute.
Angelina believes recipes should feel like a conversation, not a science project. She’s all about helping readers trust themselves in the kitchen with simple steps, fresh ideas, and easy twists on classic meals.
When she’s not editing recipes, she’s baking bread, sipping coffee, or getting inspired by the changing seasons.