
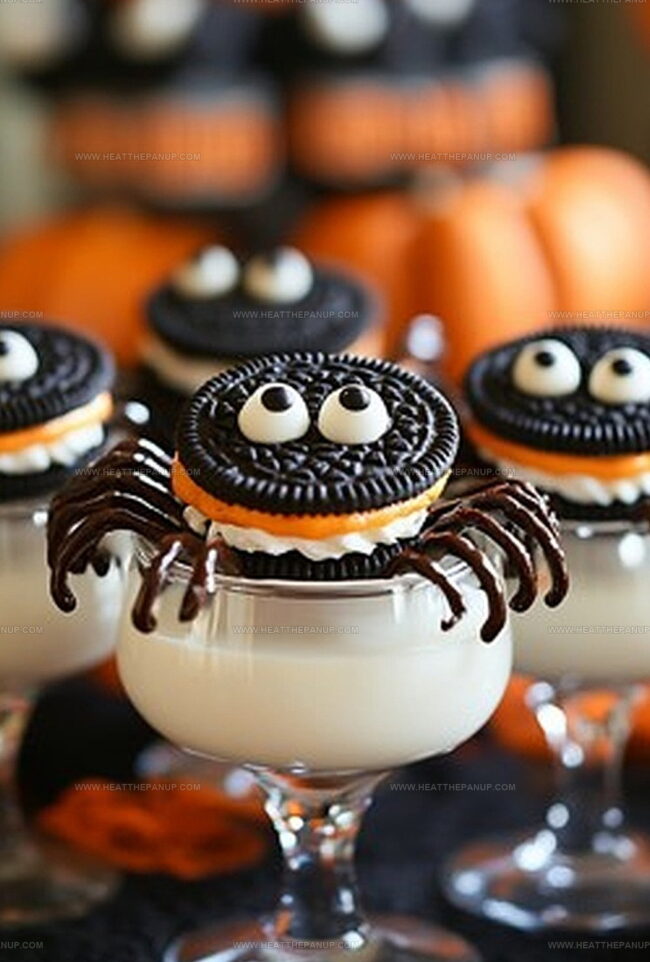
Spooky Oreo Spiders Recipe: Fun & Crispy Halloween Treats
Halloween transforms ordinary oreo spiders into a delightful creepy-crawly treat that sparks imagination.
Every kid wants a scary snack they can brag about to classmates.
Crafting these edible eight-legged creatures requires minimal ingredients and maximum fun.
Chocolate lovers will appreciate the simple yet wickedly cool design.
Dark chocolate and pretzels create legs that look surprisingly realistic.
Wiggling spiders made from cookies become the ultimate party conversation starter.
Step into a world of spooky sweet creativity that brings Halloween magic right to your plate.
Why Oreo Spiders Make a Great Snack
Ingredients in Oreo Spiders
Main Ingredients:Decorative Elements:Optional Binding/Melting Ingredient:How to Assemble Oreo Spiders

Step 1: Gather Spider-Making Materials
You’ll need Oreo cookies, pretzel rods, chocolate chips, and googly eye candies for this spooky treat.
Step 2: Prepare Pretzel Legs
Break pretzel rods into smaller segments, creating eight pieces per spider.
Aim for roughly equal lengths to make symmetrical spider legs.
Step 3: Melt Chocolate Coating
Warm chocolate chips using a microwave or double boiler method.
Stir gently until completely smooth and glossy, creating a perfect binding agent.
Step 4: Position Spider Base
Place an Oreo cookie on a clean, flat surface as the spider’s body.
Carefully insert four pretzel rod pieces into each side of the cookie’s cream filling.
Step 5: Secure Pretzel Legs
Gently press down on the Oreo to ensure pretzel legs are firmly attached.
Make sure legs are evenly spaced and balanced.
Step 6: Create Spooky Eyes
Dab a small amount of melted chocolate onto designated eye spots on the Oreo.
Carefully press googly eye candies into the chocolate dots.
Step 7: Chill and Set
Transfer spider creations to the refrigerator.
Allow 10-15 minutes for chocolate to harden and stabilize the spider structure.
Step 8: Serve Spooky Treats
Remove chilled Oreo spiders from refrigerator.
Arrange on a festive Halloween platter and watch guests delight in these creepy-crawly desserts.
Tips to Make Oreo Spiders Look Cute
Store Oreo Spiders the Right Way
What Pairs Nicely with Oreo Spiders
Oreo Spider Recipe Variants
FAQs
Yes! Kids can help with most steps like inserting pretzel legs and adding googly eyes, but adults should handle melting chocolate and using heat.
Absolutely! White chocolate, milk chocolate, or dark chocolate work great. Just ensure you melt them carefully to avoid burning.
Press the pretzels gently but firmly into the Oreo cream filling. If needed, add a small dab of melted chocolate to help them stick securely.
Not necessarily. You can use white chocolate chips, royal icing, or even small round candies as eyes if you don’t have googly candy eyes available.
Print
Oreo Spiders Recipe
- Total Time: 15 minutes
- Yield: 12 1x
Description
Creepy-crawly Oreo Spiders spin web-like magic onto Halloween party platters, weaving whimsy and deliciousness into spooky seasonal treats. Delightful chocolate cookie legs and marshmallow eyes invite guests to devour these playful dessert creatures with gleeful Halloween spirit.
Ingredients
Main Ingredients:
- 1 package oreos
- 1/4 cup (4 tablespoons) chocolate chips
Decorative Ingredients:
- 1 package googly eye candy
Structural Ingredients:
- 1 package pretzel rods
Instructions
- Gather all necessary ingredients and equipment for crafting creepy-crawly Oreo spider treats.
- Break pretzel rods into varied segments, creating eight leg-like pieces per arachnid-inspired cookie.
- Prepare a chocolate melting station using either a double boiler or microwave, ensuring smooth, glossy chocolate for assembly.
- Position an Oreo cookie on a clean, flat workspace as the spider’s body foundation.
- Insert four pretzel rod segments into the cream filling on opposite sides of the Oreo, carefully arranging them to resemble spider legs.
- Gently press the Oreo to stabilize the pretzel leg placement, ensuring they remain securely embedded.
- Warm the chocolate until fully liquefied, maintaining a consistent melting temperature.
- Use a small utensil to delicately apply tiny chocolate dots where spider eyes will be positioned.
- Carefully place googly eye candies onto the melted chocolate spots, allowing them to adhere seamlessly.
- Transfer the assembled Oreo spiders to a refrigerated area, letting them chill for approximately 10-15 minutes to solidify the chocolate connections.
- Remove the spooky treats from the refrigerator once the chocolate has completely set.
- Arrange the Oreo spiders on a festive Halloween serving platter, ready to delight and frighten party guests.
Notes
- Pretzel Placement Perfection: Carefully break pretzel rods into even segments to create balanced spider legs that look natural and symmetric.
- Chocolate Melting Magic: Use low, gentle heat when melting chocolate to prevent burning and ensure smooth, glossy coating for your spooky treats.
- Kid-Friendly Adaptation: Let children help assemble the spiders by guiding them to carefully insert pretzel legs and place candy eyes for a fun Halloween activity.
- Dietary Flexibility: Swap regular Oreos with gluten-free or vegan alternatives to accommodate different dietary needs without compromising the spooky spider design.
- Prep Time: 15 minutes
- Cook Time: 0 minutes
- Category: Snacks, Desserts
- Method: None
- Cuisine: American
Nutrition
- Serving Size: 12
- Calories: 150
- Sugar: 8 g
- Sodium: 100 mg
- Fat: 7 g
- Saturated Fat: 3.5 g
- Unsaturated Fat: 2.5 g
- Trans Fat: 0 g
- Carbohydrates: 20 g
- Fiber: 1 g
- Protein: 1 g
- Cholesterol: 0 mg
Angelina Wiles
Content Editor & Culinary Enthusiast
Expertise
Food Writing and Editing, Vegetarian and Vegan Cuisine, Baking and Pastry Arts, Sustainable Cooking Practices
Education
Portland Community College
Certificate in Culinary Arts
Focus: Emphasis on sustainable cooking practices, vegetarian cuisine, and food writing.
Oregon Culinary Institute
Diploma in Baking and Pastry Arts
Focus: Specialized training in artisanal baking, pastry techniques, and dessert presentation.
Angelina’s love for cooking started with handwritten family recipes and weekend trips to farmers’ markets around Portland. She followed her passion with a Certificate in Culinary Arts from Portland Community College, then perfected her sweet side with a Diploma in Baking and Pastry Arts at Oregon Culinary Institute.
Angelina believes recipes should feel like a conversation, not a science project. She’s all about helping readers trust themselves in the kitchen with simple steps, fresh ideas, and easy twists on classic meals.
When she’s not editing recipes, she’s baking bread, sipping coffee, or getting inspired by the changing seasons.