Dreamy Oreo Balls Recipe: Bite-Sized Bliss in Every Truffle
Sweet moments of childhood memories flood back when mixing these delectable oreo balls that promise pure indulgence.
Chocolate crumbs dance with creamy textures in this simple yet irresistible treat.
Mom’s kitchen always felt magical during dessert preparations like these.
Childhood favorites can quickly become adult obsessions with such an easy recipe.
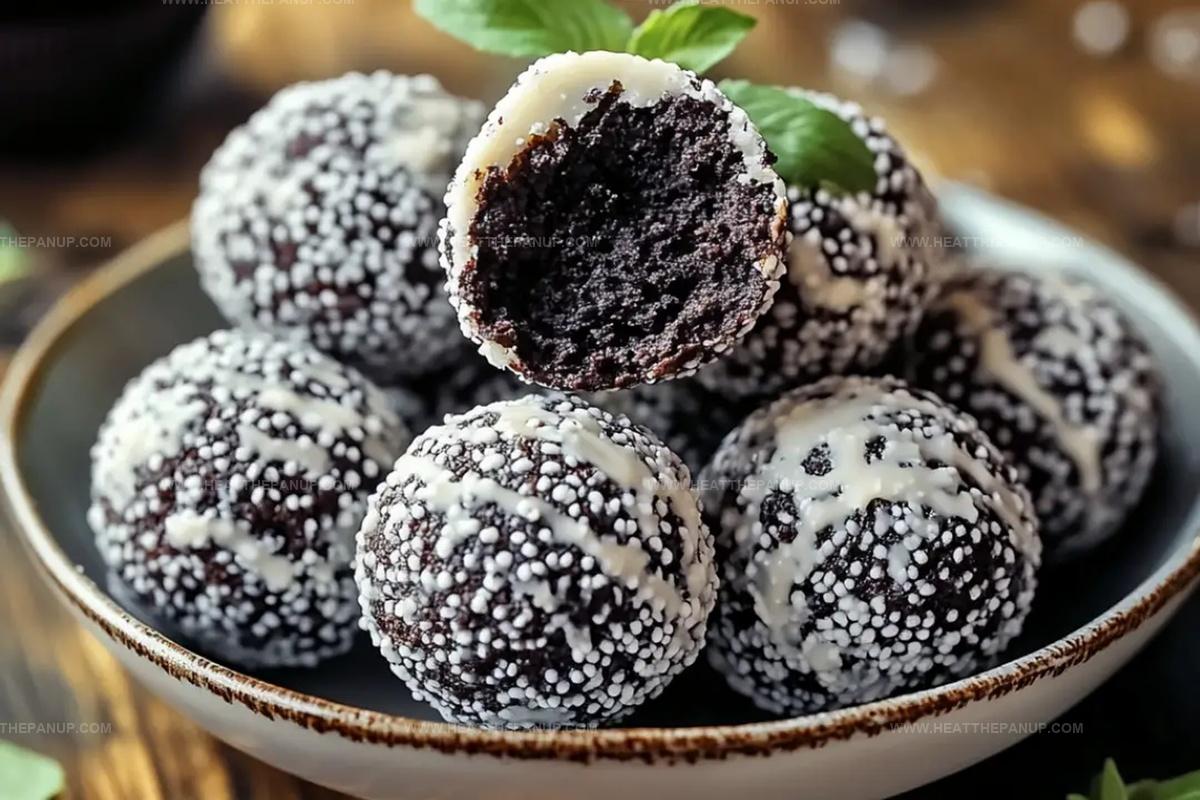
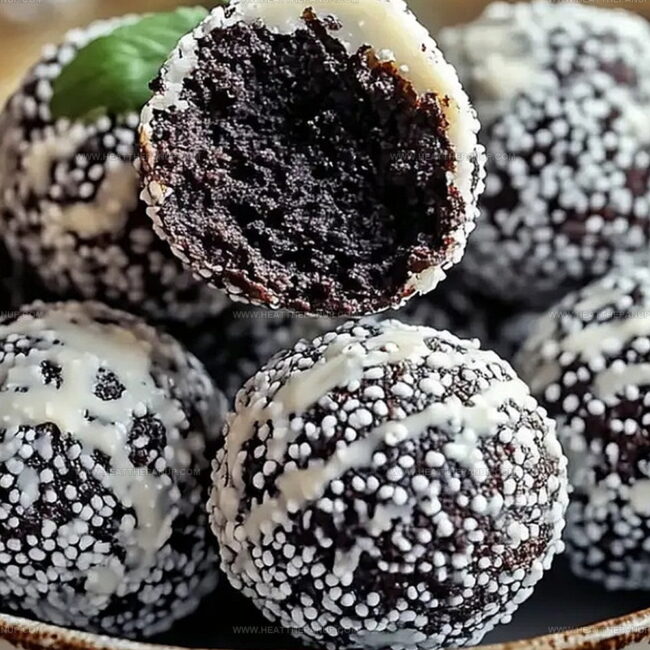
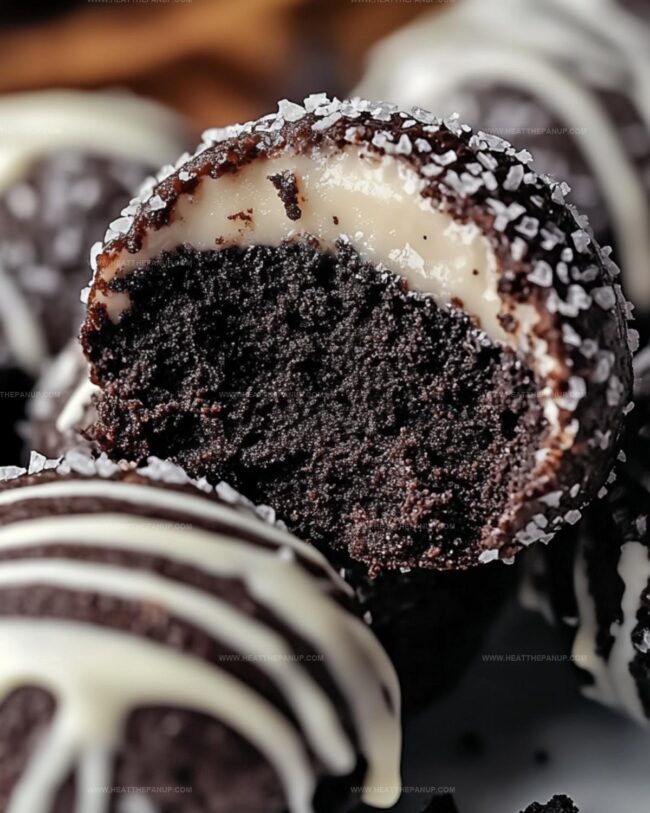
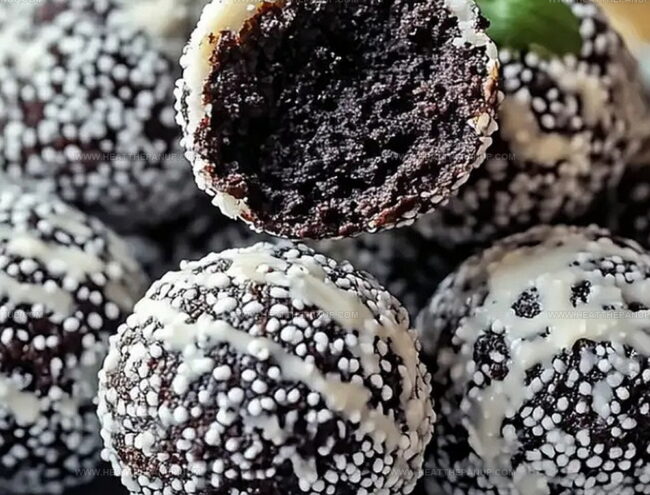
Smooth cream cheese binds crushed cookie pieces into perfect bite-sized spheres.
Rich chocolate coating adds elegance to these playful little confections.
Classic Oreo Balls Everyone Loves to Make
Ingredients Inside Oreo Balls
Base Ingredients:Coating Ingredients:Optional Decorative Ingredients:Oreo Ball Steps That Don’t Miss
Step 1: Pulverize Oreo Cookies
Use a food processor or place cookies in a sealed plastic bag.
Crush the Oreos until they transform into fine, sandy crumbs.
Break down every single cookie completely for a smooth texture.
Step 2: Blend Creamy Mixture
In a spacious mixing bowl, combine the cookie crumbs with softened cream cheese.
Stir thoroughly until the mixture becomes a uniform, rich consistency that holds together perfectly.
Step 3: Shape Delectable Spheres
Gently roll the mixture into small, bite-sized balls.
Each truffle should be roughly the size of a golf ball.
Arrange the spheres on a parchment-lined baking sheet with careful precision.
Step 4: Chill and Solidify
Transfer the cookie balls to the refrigerator.
Let them rest and firm up for approximately 30 minutes.
This cooling period helps the truffles maintain their shape during the chocolate coating process.
Step 5: Melt Chocolate Coating
Select your preferred chocolate:Melt the chocolate using a microwave or double boiler.
Stir consistently until the chocolate becomes smooth and glossy with no lumps.
Step 6: Dunk and Decorate
Remove the chilled truffles from the refrigerator.
Carefully dip each ball into the melted chocolate, allowing excess to drip off.
Optional decorative additions:Place the coated truffles back on the parchment paper.
Step 7: Final Chill and Serve
Return the chocolate-covered truffles to the refrigerator.
Allow them to set completely for 15-20 minutes.
Once the chocolate hardens, your decadent Oreo truffles are ready to devour and share!
Oreo Ball Tips for Perfect Dipping Every Time
Store Oreo Balls for Later
What to Enjoy with Oreo Balls
Oreo Balls Creative Coating Ideas
FAQs
Yes, you can experiment with flavored Oreos like mint, peanut butter, or birthday cake to create unique variations of the Oreo balls.
Make sure the Oreo balls are thoroughly chilled before dipping. Use a fork or dipping tool to carefully coat them in melted chocolate, letting excess drip off.
No, you can place the Oreos in a sealed zip-top bag and crush them with a rolling pin or the bottom of a heavy pan if you don’t have a food processor.
Absolutely! You can prepare Oreo balls up to 3 days in advance and store them in an airtight container in the refrigerator until ready to serve.
Print
Oreo Balls Recipe
- Total Time: 15 minutes
- Yield: 36 1x
Description
Creamy Oreo Balls offer a delightful no-bake dessert that blends chocolate cookie crumbs with rich cream cheese. Chocolate-dipped and sprinkled with crushed cookie bits, these irresistible treats will satisfy your sweet tooth and impress guests at any gathering.
Ingredients
Main Ingredients:
- 1 package oreo cookies (about 36 cookies)
- 8 ounces (226 grams) cream cheese, softened
Coating Ingredients:
- 1 bag chocolate chips (milk or dark)
Decorative Ingredients:
- Sprinkles (optional)
Instructions
- Transform Oreo cookies into fine, uniform crumbs using a food processor or manually crushing them within a sealed plastic bag until texture resembles coarse sand.
- Transfer the pulverized cookie fragments into a spacious mixing vessel, incorporating softened cream cheese. Thoroughly amalgamate the ingredients until achieving a consistent, homogeneous composition.
- Methodically shape the creamy mixture into compact, spherical portions approximately one inch in diameter. Arrange these nascent confections onto a parchment-lined tray, ensuring adequate spacing between each globe.
- Consign the proto-truffles to the refrigeration unit, allowing them to stabilize and solidify for roughly half an hour, enhancing structural integrity.
- Simultaneously, initiate chocolate preparation by gently liquefying chocolate chips through microwave technique or traditional double-boiler method. Continuously stir until achieving a glossy, seamless consistency.
- Extract chilled Oreo spheres and systematically immerse each one into the molten chocolate. Allow excess coating to cascade away, then carefully position each glazed morsel back onto the parchment surface. Consider adorning with complementary decorative elements like festive sprinkles prior to chocolate solidification.
- Return the embellished confections to refrigeration, permitting the chocolate coating to completely set. Once stabilized, these delectable morsels are primed for consumption and sharing.
Notes
- Crush Oreos thoroughly to ensure a smooth, consistent texture without large cookie chunks, which can make rolling and dipping challenging.
- When mixing cream cheese, ensure it’s completely softened at room temperature to blend seamlessly with cookie crumbs and prevent lumpy consistency.
- Use cold hands or slightly dampened palms when forming balls to prevent sticking and create uniform, compact shapes that hold together during chocolate coating.
- Experiment with different chocolate coatings like white chocolate, milk chocolate, or even colored candy melts for varied flavor profiles and festive appearances.
- Prep Time: 15 minutes
- Cook Time: 0 minutes
- Category: Desserts, Snacks
- Method: Chilling
- Cuisine: American
Nutrition
- Serving Size: 36
- Calories: 130
- Sugar: 10 g
- Sodium: 70 mg
- Fat: 7 g
- Saturated Fat: 4 g
- Unsaturated Fat: 3 g
- Trans Fat: 0 g
- Carbohydrates: 16 g
- Fiber: 1 g
- Protein: 1 g
- Cholesterol: 15 mg
Angelina Wiles
Content Editor & Culinary Enthusiast
Expertise
Food Writing and Editing, Vegetarian and Vegan Cuisine, Baking and Pastry Arts, Sustainable Cooking Practices
Education
Portland Community College
Certificate in Culinary Arts
Focus: Emphasis on sustainable cooking practices, vegetarian cuisine, and food writing.
Oregon Culinary Institute
Diploma in Baking and Pastry Arts
Focus: Specialized training in artisanal baking, pastry techniques, and dessert presentation.
Angelina’s love for cooking started with handwritten family recipes and weekend trips to farmers’ markets around Portland. She followed her passion with a Certificate in Culinary Arts from Portland Community College, then perfected her sweet side with a Diploma in Baking and Pastry Arts at Oregon Culinary Institute.
Angelina believes recipes should feel like a conversation, not a science project. She’s all about helping readers trust themselves in the kitchen with simple steps, fresh ideas, and easy twists on classic meals.
When she’s not editing recipes, she’s baking bread, sipping coffee, or getting inspired by the changing seasons.