
The Perfect No-Bake Peanut Butter Balls Recipe for Sweet Cravings
Crafting delightful no-bake peanut butter balls feels like unwrapping a sweet childhood memory.
Memories of kitchen adventures dance through my mind when mixing these simple ingredients.
Smooth peanut butter blends perfectly with creamy chocolate for an irresistible treat.
Quick and effortless, these no-bake delights require minimal preparation and maximum enjoyment.
Our recipe promises a delectable snack that satisfies sudden sweet cravings.
Chocolate and peanut butter create magic in just minutes, beckoning you to indulge.
Whip up these irresistible balls and watch faces light up with pure delight.
Peanut Butter Balls That Are No-Bake and Easy
No-Bake Peanut Butter Balls Ingredient Overview
Base Ingredients:Sweetening Agents:Coating Ingredients:No-Bake Peanut Butter Balls Assembly
Step 1: Blend Creamy Base
In a spacious mixing bowl, whip together peanut butter, softened butter, and vanilla extract.
Stir and fold the ingredients until they transform into a silky, uniform mixture that looks glossy and smooth.
Step 2: Fold in Sweet Powder
Sprinkle powdered sugar gradually into the creamy base.
Use your hands to knead and blend the ingredients, creating a thick dough that holds together perfectly.
The mixture should feel slightly sticky but moldable.
Step 3: Craft Delightful Spheres
Scoop small portions of the mixture and roll between your palms to create perfect round balls.
Gently place these bite-sized treats onto a parchment-lined baking sheet, ensuring they’re evenly spaced.
Step 4: Melt Chocolate Coating
Select a microwave-safe bowl and add chocolate chips.
Heat in short 20-second bursts, stirring between each interval.
Continue until the chocolate transforms into a glossy, smooth liquid with no remaining solid chunks.
Step 5: Dunk and Drizzle
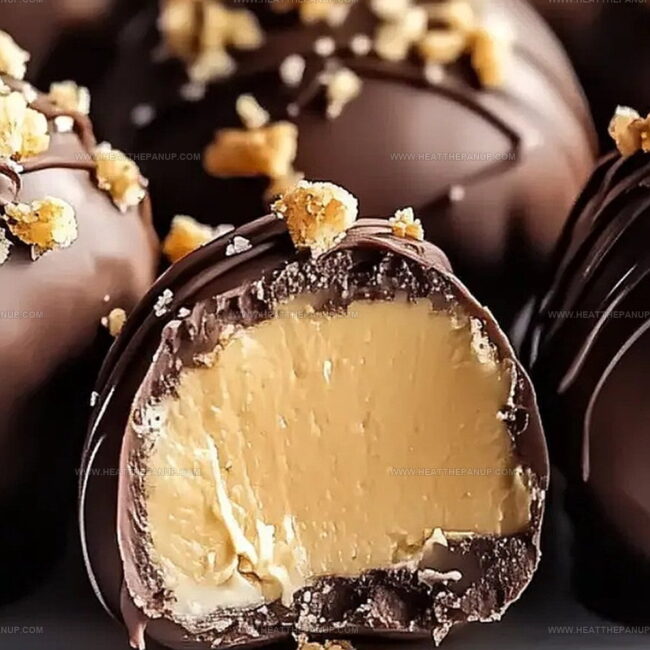
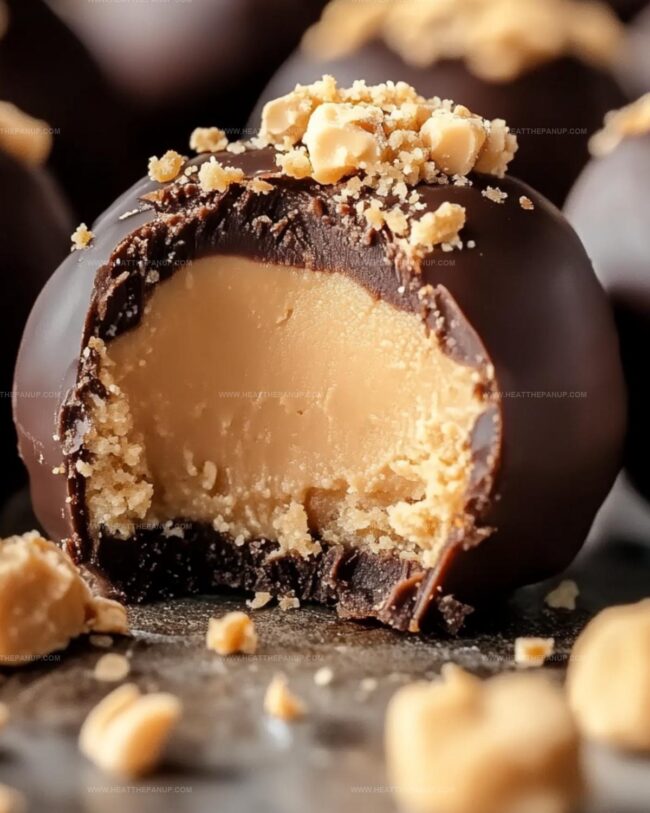
Carefully dip each peanut butter ball into the melted chocolate, using a fork to lift and allow excess chocolate to drip back into the bowl.
Ensure each ball receives a complete chocolate bath, creating a delectable exterior.
Step 6: Chill and Set
Transfer the chocolate-covered balls back to the parchment-lined sheet.
Slide the tray into the refrigerator and let them rest for 1-2 hours.
The treats will firm up, developing a satisfying snap when bitten.
No-Bake Ball Tips for Creamy Peanut Butter Treats

Store No-Bake Peanut Butter Balls
No-Bake Peanut Butter Balls Sweet Accompaniments
Peanut Butter Balls in No-Bake Forms
FAQs
While delicious, these balls are a sweet treat with sugar and chocolate. They contain protein from peanut butter but are considered an indulgence, not a health food. Enjoy in moderation.
Yes, crunchy peanut butter works perfectly. It will add extra texture to your peanut butter balls and provide a nice nutty crunch. Just ensure it’s well-mixed with other ingredients.
Add powdered sugar gradually and mix thoroughly. If the mixture remains sticky, incorporate a bit more powdered sugar until it becomes firm enough to roll into balls easily. Cold hands can also help prevent sticking.
Semi-sweet or milk chocolate chips are ideal. They melt smoothly and provide a rich coating. You can also use dark chocolate for a less sweet version or white chocolate for variety.
Print
No-Bake Peanut Butter Balls Recipe
- Total Time: 20 minutes
- Yield: 24 1x
Description
Irresistible no-bake peanut butter balls deliver a heavenly blend of creamy and crunchy textures. Chocolate-drizzled morsels promise sweet satisfaction with minimal effort, making them perfect for quick dessert cravings.
Ingredients
Main Ingredients:
- 1 1/2 cups (360 ml) creamy peanut butter
- 3 cups (360 g) powdered sugar
- 1/2 cup (113 g) unsalted butter, softened
- 2 cups (340 g) semi-sweet chocolate chips
Binding and Flavor Enhancers:
- 1 teaspoon (5 ml) vanilla extract
Optional Melting Aids:
- 2 teaspoons (10 ml) coconut oil or shortening
Instructions
- Craft a creamy foundation by whisking peanut butter, softened butter, and vanilla extract in a spacious mixing vessel until achieving a silky, uniform texture.
- Incorporate powdered sugar gradually, blending thoroughly until the mixture transforms into a dense, malleable dough that holds its shape.
- Utilize your palms to meticulously sculpt compact, uniform spheres from the peanut butter mixture, arranging them strategically on a parchment-covered tray.
- Transfer the tray to the refrigerator, allowing the delicate orbs to solidify and chill for approximately half an hour, ensuring structural integrity.
- Prepare the chocolate coating by gently melting chocolate chips with coconut oil in brief microwave intervals, stirring consistently to prevent scorching and create a glossy, smooth finish.
- Delicately immerse each peanut butter sphere into the molten chocolate, employing a fork to ensure complete coverage while permitting excess chocolate to elegantly cascade away.
- Return the chocolate-enrobed spheres to the chilled parchment surface, permitting them to set completely in the refrigerator for an additional 20-30 minutes.
- Preserve the confections in a sealed container within the refrigerator, maintaining optimal freshness for up to one week and ensuring a delectable treat is always within reach.
Notes
- Customize the sweetness by adjusting powdered sugar quantity for a less or more sugary treat.
- Ensure butter and peanut butter are at room temperature for smoother mixing and easier ball formation.
- Replace regular chocolate with dark or white chocolate for flavor variations and dietary preferences.
- Use gluten-free graham crackers or swap with almond flour to make the recipe gluten-free and accessible for different dietary needs.
- Prep Time: 20 minutes
- Cook Time: 0 minutes
- Category: Snacks, Desserts
- Method: Chilling
- Cuisine: American
Nutrition
- Serving Size: 24
- Calories: 150
- Sugar: 12 g
- Sodium: 50 mg
- Fat: 9 g
- Saturated Fat: 4 g
- Unsaturated Fat: 5 g
- Trans Fat: 0 g
- Carbohydrates: 17 g
- Fiber: 1 g
- Protein: 3 g
- Cholesterol: 5 mg
Angelina Wiles
Content Editor & Culinary Enthusiast
Expertise
Food Writing and Editing, Vegetarian and Vegan Cuisine, Baking and Pastry Arts, Sustainable Cooking Practices
Education
Portland Community College
Certificate in Culinary Arts
Focus: Emphasis on sustainable cooking practices, vegetarian cuisine, and food writing.
Oregon Culinary Institute
Diploma in Baking and Pastry Arts
Focus: Specialized training in artisanal baking, pastry techniques, and dessert presentation.
Angelina’s love for cooking started with handwritten family recipes and weekend trips to farmers’ markets around Portland. She followed her passion with a Certificate in Culinary Arts from Portland Community College, then perfected her sweet side with a Diploma in Baking and Pastry Arts at Oregon Culinary Institute.
Angelina believes recipes should feel like a conversation, not a science project. She’s all about helping readers trust themselves in the kitchen with simple steps, fresh ideas, and easy twists on classic meals.
When she’s not editing recipes, she’s baking bread, sipping coffee, or getting inspired by the changing seasons.