
Easy No-Bake Chocolate Peanut Butter Swirl Pie Recipe
Decadent no-bake chocolate peanut butter swirl pie combines rich flavors that melt together effortlessly.
Sweet chocolate weaves through creamy peanut butter layers, creating a dessert that feels like pure indulgence.
Chilled and smooth, each slice promises incredible texture without turning on your oven.
Minimal ingredients mean maximum satisfaction for anyone craving something delightfully simple.
Minimal effort guarantees maximum deliciousness in this crowd-pleasing treat.
Chocolate and peanut butter dance together in a harmonious, irresistible partnership.
You will want to savor every single bite of this dreamy, no-fuss dessert.
No-Bake Swirl Pie With Peanut Butter and Chocolate
No-Bake Chocolate Peanut Butter Swirl Pie Ingredients
Crust Base:Filling Components:Chocolate and Peanut Butter Components:No-Bake Chocolate Peanut Butter Pie Steps
Step 1: Whip Up Fluffy Cream
In a mixing bowl, whip heavy cream with powdered sugar and vanilla extract until it forms stiff, cloud-like peaks.
This magical mixture will create a dreamy, light texture for your pie.
Step 2: Create Silky Cream Cheese Base
Grab another bowl and beat cream cheese until it’s smooth and creamy.
Blend in marshmallow creme and sweetened condensed milk, stirring until the mixture becomes beautifully silky and glossy.
Step 3: Divide and Flavor
Separate the cream cheese mixture into two separate bowls.
Transform one half by stirring in cocoa powder, and the other by mixing in peanut butter.
Watch as the colors and flavors come to life.
Step 4: Fold in Whipped Cream
Gently fold half of the whipped cream into the chocolate mixture and the remaining half into the peanut butter mixture.
Be careful not to deflate the airy cream while mixing.
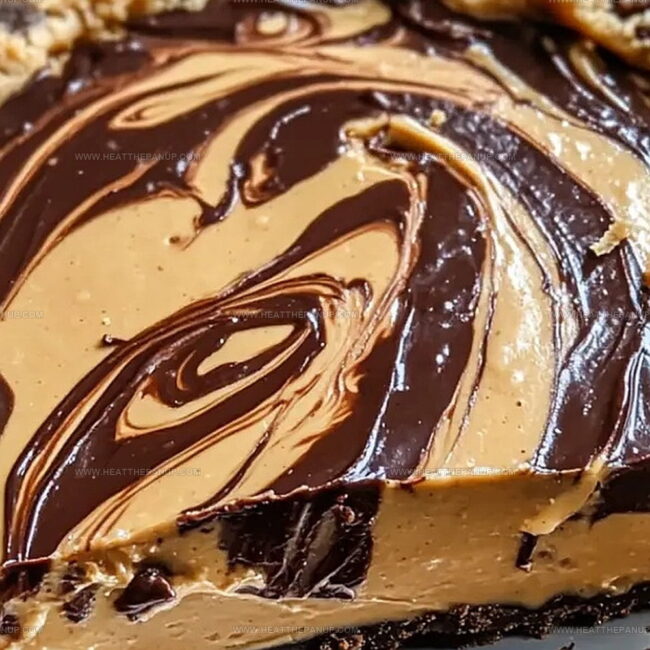
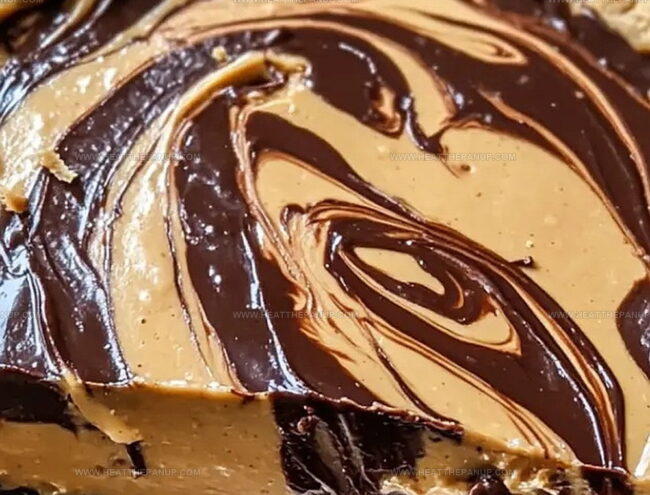
Step 5: Create Marbled Magic
In a graham cracker or chocolate cookie crust, drop alternating spoonfuls of chocolate and peanut butter mixtures.
Use a skewer or knife to swirl the colors together, creating a stunning marbled design.
Step 6: Chill and Set
Refrigerate the pie for 4 hours or until the filling is completely set and firm.
This waiting time allows the flavors to meld and the texture to become perfectly creamy.
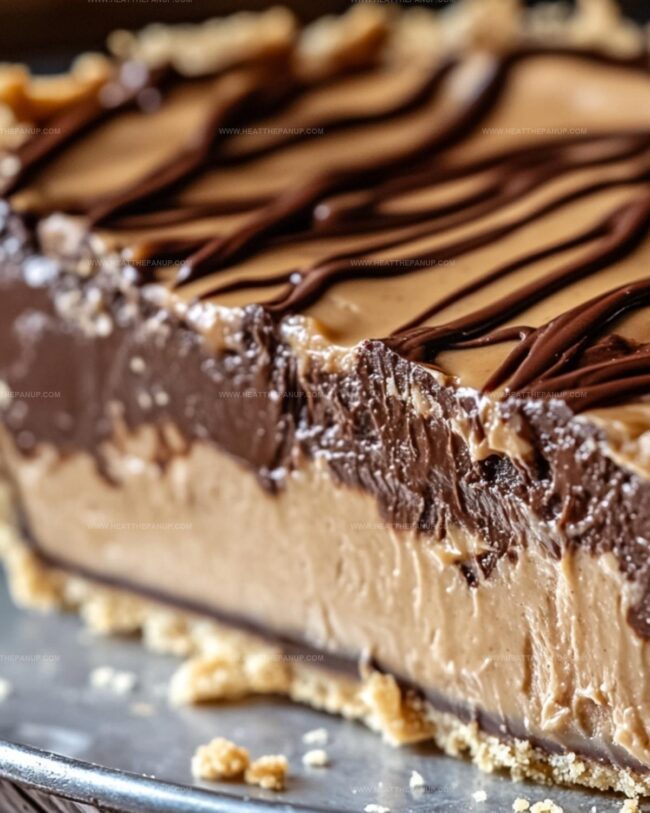
Step 7: Decorate and Serve
Before serving, drizzle melted peanut butter over the top.
Sprinkle with chopped peanuts and mini chocolate chips for an extra layer of crunch and flavor.
Slice and enjoy your decadent no-bake masterpiece!
Pie Swirl Tips for a Creamy, No-Bake Chocolate PB Finish
Use high-fat content cream cheese and real vanilla extract for richer, more robust flavor profiles.
Chill your mixing bowl and whisk beforehand to help heavy cream whip faster and reach stiffer peaks more effectively.
Work gently when creating marble design, using light zigzag motions with a skewer to blend chocolate and peanut butter mixtures without overmixing.
Keep pie refrigerated exactly 4 hours for ideal texture – not too soft, not too firm – ensuring smooth, creamy consistency when slicing.
Experiment with optional toppings like crushed graham crackers, chocolate shavings, or caramel drizzle to personalize your dessert presentation.
Chill Peanut Butter Swirl Pie
No-Bake Chocolate Peanut Butter Swirl Pie Complements
No-Bake Chocolate Swirl Pie Flavor Variants
FAQs
The key ingredients include heavy cream, cream cheese, marshmallow creme, sweetened condensed milk, cocoa powder, peanut butter, and a pre-made pie crust.
No, it’s very simple! The recipe requires no baking and involves basic mixing and folding techniques. Anyone with basic kitchen skills can easily prepare this dessert.
While the actual preparation takes about 20-30 minutes, the pie needs to chill in the refrigerator for 4 hours to set properly, so plan accordingly.
Absolutely! This pie is perfect for making in advance. You can prepare it a day before serving, and it will keep well in the refrigerator until you’re ready to enjoy it.
Print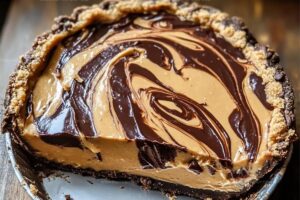
No-Bake Chocolate Peanut Butter Swirl Pie Recipe
- Total Time: 30 minutes
- Yield: 8 1x
Description
Rich and creamy no-bake chocolate peanut butter swirl pie offers a delightful dessert experience that blends indulgent flavors. Cool chocolate and smooth peanut butter create a luxurious treat you’ll savor with pure delight.
Ingredients
Base and Topping:
- 1 pre-made chocolate cookie pie crust
- Chopped peanuts (optional)
- Mini chocolate chips (optional)
Filling Ingredients:
- 8 ounces (226 grams) cream cheese, softened
- 1/2 cup (120 milliliters) smooth peanut butter
- 1/2 cup (120 milliliters) sweetened condensed milk
- 3/4 cup (180 milliliters) marshmallow creme
- 1/3 cup (40 grams) dark cocoa powder
Cream and Flavoring Ingredients:
- 1 1/2 cups (360 milliliters) cold heavy cream
- 1/2 cup (60 grams) powdered sugar
- 1 teaspoon pure vanilla extract
- 1/4 cup (60 milliliters) melted peanut butter for drizzling (optional)
Instructions
- Whip heavy cream with powdered sugar and vanilla until forming stiff, glossy peaks, then refrigerate the fluffy mixture.
- In a separate mixing vessel, cream the cream cheese until velvety and uniform in texture.
- Integrate marshmallow creme and sweetened condensed milk into the cream cheese, blending until achieving a luxurious, smooth consistency.
- Divide the creamy base into two distinct portions: infuse one section with rich cocoa powder and the other with creamy peanut butter.
- Delicately incorporate half of the previously whipped cream into the chocolate mixture, ensuring a light and airy texture.
- Repeat the folding process with the remaining whipped cream, gently blending it into the peanut butter mixture.
- Transfer the prepared pie crust to a workspace and artfully deposit alternating spoonfuls of chocolate and peanut butter mixtures.
- Using a slender skewer, create elegant swirling patterns, transforming the surface into a mesmerizing marbled landscape.
- Carefully place the pie in the refrigerator, allowing it to set and solidify for approximately 4 hours.
- Before serving, embellish the chilled pie with a delicate drizzle of melted peanut butter, then garnish with chopped peanuts and miniature chocolate chips.
Notes
- Choose a high-quality graham cracker crust for maximum flavor and crunch, ensuring a solid base for your no-bake pie.
- Ensure cream cheese is at room temperature to prevent lumps and create a smooth, silky texture when mixing.
- Chill all utensils and mixing bowls beforehand to help whipped cream maintain its structure and create a lighter, fluffier pie.
- For a gluten-free version, swap the graham cracker crust with a nut-based crust made from ground almonds or pecans.
- Prep Time: 30 minutes
- Cook Time: 0 minutes
- Category: Desserts
- Method: Chilling
- Cuisine: American
Nutrition
- Serving Size: 8
- Calories: 350
- Sugar: 24 g
- Sodium: 200 mg
- Fat: 25 g
- Saturated Fat: 12 g
- Unsaturated Fat: 13 g
- Trans Fat: 0 g
- Carbohydrates: 32 g
- Fiber: 1 g
- Protein: 5 g
- Cholesterol: 30 mg
Angelina Wiles
Content Editor & Culinary Enthusiast
Expertise
Food Writing and Editing, Vegetarian and Vegan Cuisine, Baking and Pastry Arts, Sustainable Cooking Practices
Education
Portland Community College
Certificate in Culinary Arts
Focus: Emphasis on sustainable cooking practices, vegetarian cuisine, and food writing.
Oregon Culinary Institute
Diploma in Baking and Pastry Arts
Focus: Specialized training in artisanal baking, pastry techniques, and dessert presentation.
Angelina’s love for cooking started with handwritten family recipes and weekend trips to farmers’ markets around Portland. She followed her passion with a Certificate in Culinary Arts from Portland Community College, then perfected her sweet side with a Diploma in Baking and Pastry Arts at Oregon Culinary Institute.
Angelina believes recipes should feel like a conversation, not a science project. She’s all about helping readers trust themselves in the kitchen with simple steps, fresh ideas, and easy twists on classic meals.
When she’s not editing recipes, she’s baking bread, sipping coffee, or getting inspired by the changing seasons.