The Ultimate No-Bake Banana Split Cake Recipe for Sweet Lovers
Craving a delightful no-bake banana split cake that combines creamy textures with nostalgic flavors?
Sweet layers of comfort await you in this dreamy dessert.
Childhood memories dance across each delectable slice.
Cool and refreshing ingredients merge into a stunning no-fuss treat.
Summer afternoons become magical with this simple yet impressive confection.
Minimal effort yields maximum satisfaction for anyone seeking a crowd-pleasing dessert.
One bite promises pure indulgence that’ll have everyone asking for seconds.
Why No-Bake Banana Split Cake Is a Treat
Ingredients You’ll Need for Banana Split Cake
Crust Ingredients:Cream Cheese Layer:Fruit and Topping Ingredients:Easy Steps to Make No-Bake Banana Split Cake
Step 1: Create the Crunchy Crust
In a medium bowl, mix graham cracker crumbs with melted butter until the mixture looks like wet sand.
Press this mixture firmly into the bottom of a 9×13-inch pan, creating an even base that will support all the delicious layers to come.
Step 2: Whip Up the Creamy Filling
Grab another bowl and beat softened cream cheese with granulated sugar until the mixture becomes silky smooth and free of lumps.
Gently fold in whipped topping, creating a light and fluffy cream cheese layer that will melt in your mouth.
Step 3: Layer the Fruity Goodness
Spread the cream cheese mixture evenly over the graham cracker crust.
Next, arrange sliced bananas in a beautiful layer, covering the entire cream cheese surface.
Drain crushed pineapple and sprinkle it over the bananas, adding a tropical twist to the dessert.
Step 4: Top with Dreamy Clouds
Cover the fruit layer with the remaining whipped topping, creating a soft, cloud-like blanket that hints at the deliciousness underneath.
Generously spoon cherry pie filling over the top, making sure it’s distributed evenly.
Step 5: Add the Final Flourishes
Sprinkle chopped nuts across the dessert for a delightful crunch.
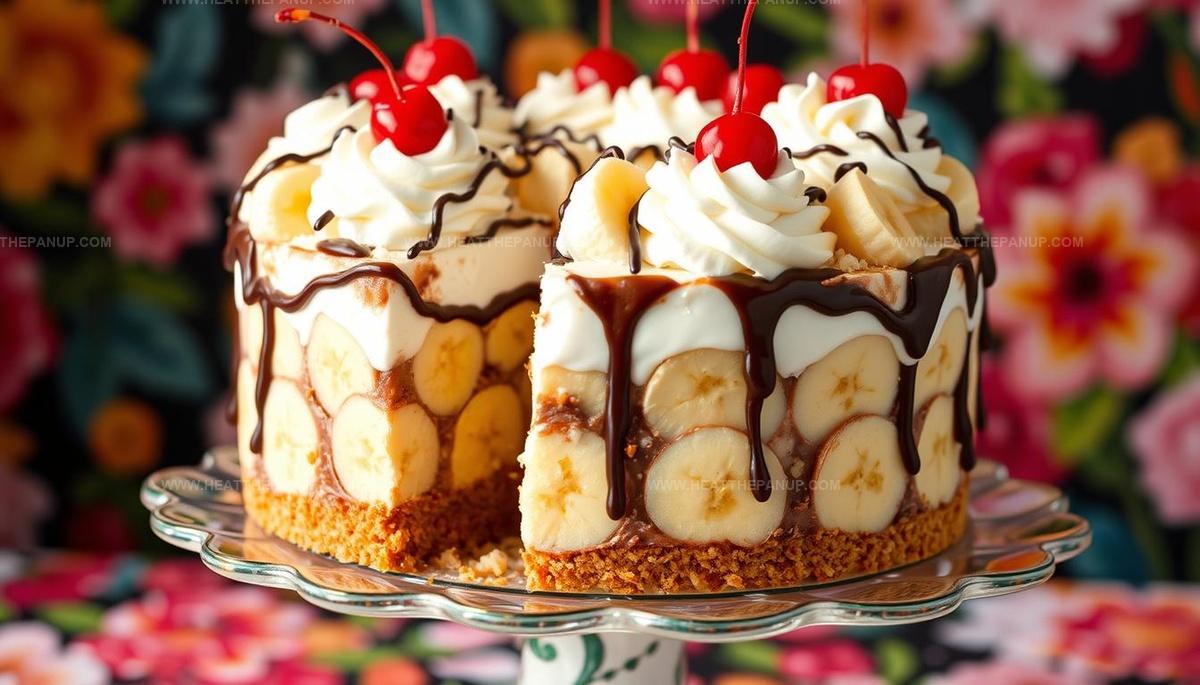
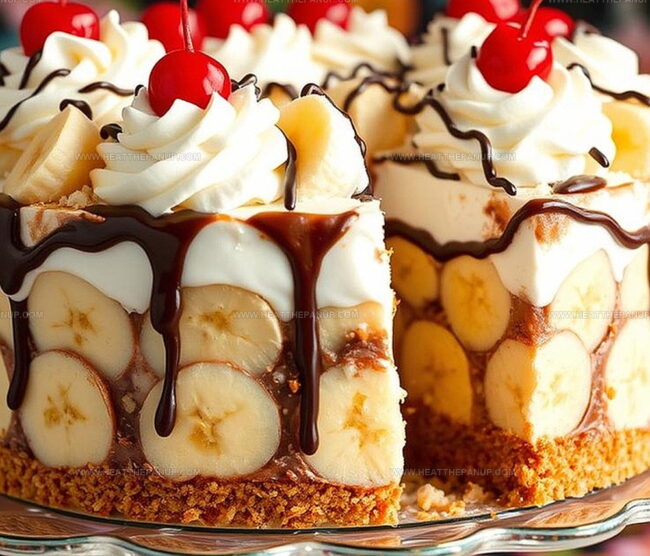
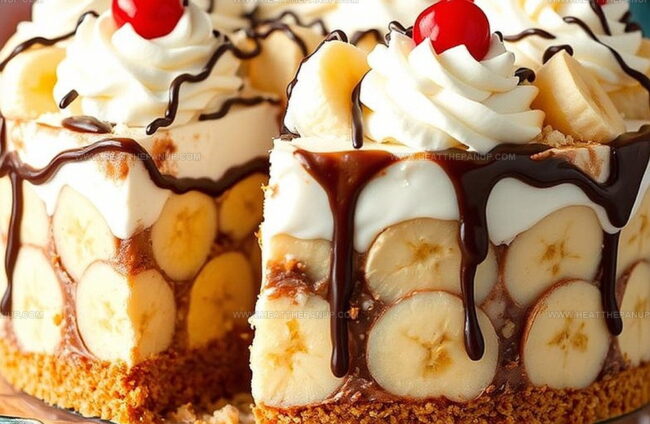
Drizzle chocolate syrup in a zigzag pattern, creating an artistic design.
Dot the top with bright maraschino cherries for a classic banana split look.
Step 6: Chill and Enjoy
Cover the pan with plastic wrap and refrigerate for at least 4 hours, or ideally overnight.
This resting time allows all the flavors to mingle and the layers to set perfectly.
When ready, slice into squares and serve chilled for a refreshing, crowd-pleasing dessert.
Smart Tips for Assembling Banana Split Cake
How to Store Banana Split Cake Without a Mess
Serving Suggestions for Banana Split Cake
Recipe Variations for Banana Split Cake
FAQs
The key ingredients like graham cracker crust, cream cheese, bananas, pineapple, whipped topping, chocolate syrup, and maraschino cherries capture the traditional banana split taste while transforming it into an easy no-bake cake format.
Yes, this dessert is perfect for preparing in advance. You can make it the night before an event, and it actually tastes better after chilling for 4-8 hours, allowing all the flavors to meld together and the layers to set properly.
You can swap graham cracker crumbs with crushed vanilla wafers, use Greek yogurt instead of cream cheese, and replace whipped topping with homemade whipped cream. Just ensure the consistency remains similar for best results.
Use a sharp knife dipped in hot water and wiped clean between each cut to get clean, neat slices. Serve the cake chilled directly from the refrigerator for the best texture and flavor.
Print
No-Bake Banana Split Cake Recipe
- Total Time: 30 minutes
- Yield: 12 1x
Description
Creamy layers of no-bake banana split cake bring summer memories flooding back with classic dessert charm. Cool banana, pineapple, and chocolate harmonize perfectly, inviting you to savor each delightful spoonful without turning on the oven.
Ingredients
Main Ingredients:
- 4–5 bananas, sliced
- 2 cups graham cracker crumbs
- 8 ounces (226 grams) cream cheese, softened
- 4 cups whipped topping (Cool Whip), divided
Sweeteners and Sugars:
- 1/2 cup granulated sugar
- 1 (20 ounces/567 grams) can crushed pineapple, drained
- 1 (21 ounces/595 grams) can cherry pie filling
Toppings and Extras:
- 1/2 cup unsalted butter, melted
- 1/2 cup chopped walnuts or pecans
- Chocolate syrup for drizzling
- Maraschino cherries for garnish
Instructions
- Construct a uniform base by thoroughly blending graham cracker crumbs with melted butter, then firmly press the mixture into the bottom of a 9×13-inch pan, creating a solid foundation for the dessert.
- Whip cream cheese and granulated sugar together until achieving a silky, homogeneous texture that is completely free of lumps.
- Gently incorporate 2 cups of whipped topping into the cream cheese mixture, maintaining a light and airy consistency.
- Carefully distribute the cream cheese blend across the graham cracker crust, ensuring an even and smooth layer.
- Strategically arrange sliced bananas in a uniform pattern directly over the cream cheese layer, covering the entire surface.
- Drain crushed pineapple thoroughly, then delicately spread the fruit across the banana layer to add a tropical dimension.
- Apply the remaining whipped topping as a luxurious blanket, completely covering the pineapple layer.
- Cascade cherry pie filling over the whipped topping, creating an elegant and vibrant top layer with consistent coverage.
- Enhance the dessert’s visual appeal and flavor profile by sprinkling chopped nuts across the surface for added texture and crunch.
- Artfully drizzle chocolate syrup in a decorative pattern, transforming the dessert into a stunning culinary creation.
- Garnish with maraschino cherries for a classic, playful finish.
- Refrigerate the dessert for a minimum of 4 hours, preferably overnight, allowing the layers to harmonize and set completely.
- When ready to serve, slice into neat portions and enjoy chilled for optimal taste and presentation.
Notes
- Chill the cream cheese beforehand to ensure a smoother, lump-free mixture when beating with sugar.
- Use room temperature ingredients for easier mixing and a more consistent texture throughout the dessert.
- Drain the crushed pineapple thoroughly to prevent excess liquid from making the cake soggy.
- For a gluten-free version, swap graham cracker crumbs with gluten-free cookie crumbs or ground nuts.
- Create a lighter version by using low-fat cream cheese and reduced-sugar whipped topping.
- Prevent browning of bananas by tossing sliced bananas in a bit of lemon juice before layering.
- Customize the dessert by using different nut varieties or adding chocolate chips for extra crunch.
- Prep Time: 30 minutes
- Cook Time: 0 minutes
- Category: Desserts, Snacks
- Method: None
- Cuisine: American
Nutrition
- Serving Size: 12
- Calories: 320
- Sugar: 16 g
- Sodium: 250 mg
- Fat: 18 g
- Saturated Fat: 9 g
- Unsaturated Fat: 7 g
- Trans Fat: 0 g
- Carbohydrates: 37 g
- Fiber: 1 g
- Protein: 3 g
- Cholesterol: 30 mg
Angelina Wiles
Content Editor & Culinary Enthusiast
Expertise
Food Writing and Editing, Vegetarian and Vegan Cuisine, Baking and Pastry Arts, Sustainable Cooking Practices
Education
Portland Community College
Certificate in Culinary Arts
Focus: Emphasis on sustainable cooking practices, vegetarian cuisine, and food writing.
Oregon Culinary Institute
Diploma in Baking and Pastry Arts
Focus: Specialized training in artisanal baking, pastry techniques, and dessert presentation.
Angelina’s love for cooking started with handwritten family recipes and weekend trips to farmers’ markets around Portland. She followed her passion with a Certificate in Culinary Arts from Portland Community College, then perfected her sweet side with a Diploma in Baking and Pastry Arts at Oregon Culinary Institute.
Angelina believes recipes should feel like a conversation, not a science project. She’s all about helping readers trust themselves in the kitchen with simple steps, fresh ideas, and easy twists on classic meals.
When she’s not editing recipes, she’s baking bread, sipping coffee, or getting inspired by the changing seasons.