
Dreamy Mint Brownie Cheesecake Cups Recipe For Sweet Moments
Creamy cheesecake meets decadent mint brownie cups in a dessert that defies ordinary expectations.
Chocolate lovers will swoon over this unexpected combination of rich flavors.
Every bite promises a cool, refreshing twist on classic brownies.
Bold swirls of mint complement the deep cocoa base, creating a sophisticated treat.
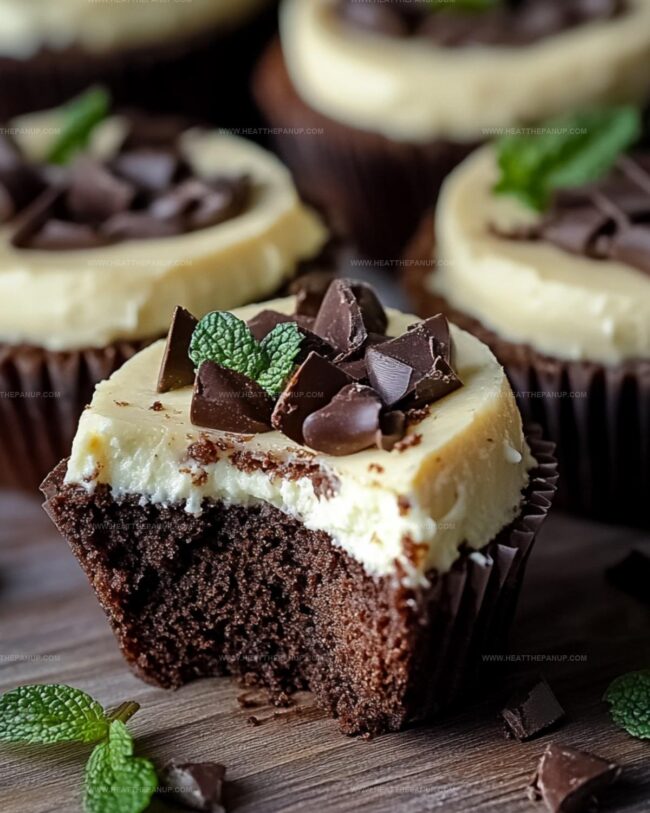
Sweet layers meld together in a delightful dance of textures and tastes.
Chocolate chips scattered throughout add delightful crunch and extra indulgence.
We promise this recipe will become your new favorite party showstopper.
Prepare to impress everyone with these irresistible mini desserts that bring serious wow factor.
Mint Brownie Cheesecake Cups That Are Cool, Fudgy, and Fresh
Quick Kitchen Victory: Effortlessly create delightful mini desserts that wow everyone with minimal preparation time.
Crowd-Pleasing Charm: Combine two beloved treats – brownies and cheesecake – into bite-sized portions perfect for parties, gatherings, or personal indulgence.
Customizable Creativity: Easily adapt the recipe by adjusting mint intensity, adding food coloring, or experimenting with different chocolate drizzle techniques to match your taste preferences.
Stress-Free Baking: Requires basic baking skills, uses pre-made brownie mix, and provides simple step-by-step instructions that guarantee success for both novice and experienced bakers.
Mint Brownie Cheesecake Cups: Ingredient Breakdown
Base Ingredients:Cheesecake Filling Ingredients:Topping and Garnish Ingredients:Assembling Mint Brownie Cheesecake Cups
Step 1: Prepare Brownie Base
Warm up your oven to 350°F.
Grab a muffin tin and lightly coat with cooking spray or line with paper liners.
Mix the brownie batter following the package guidance.
Carefully spoon the rich chocolatey mixture into each cup, filling them about one-third of the way.
Step 2: Whip Cheesecake Filling
In a mixing bowl, cream together:Blend until silky smooth.
Want a pop of color?
Add a few drops of green food coloring to create a playful mint appearance.
Step 3: Create Layered Masterpiece
Gently dollop a tablespoon of cheesecake mixture atop each brownie base.
Use a toothpick to swirl the layers together or leave them distinctly separated for a beautiful visual contrast.
Step 4: Bake to Perfection
Slide the muffin tin into the oven.
Bake for 18-22 minutes until edges look set and centers have a slight wobble.
Once done, let them rest in the pan for 10 minutes, then transfer to a cooling rack.
Step 5: Decorate with Flair
Melt chocolate chips in short microwave bursts, stirring between each interval.
Drizzle melted chocolate over each cooled cup.
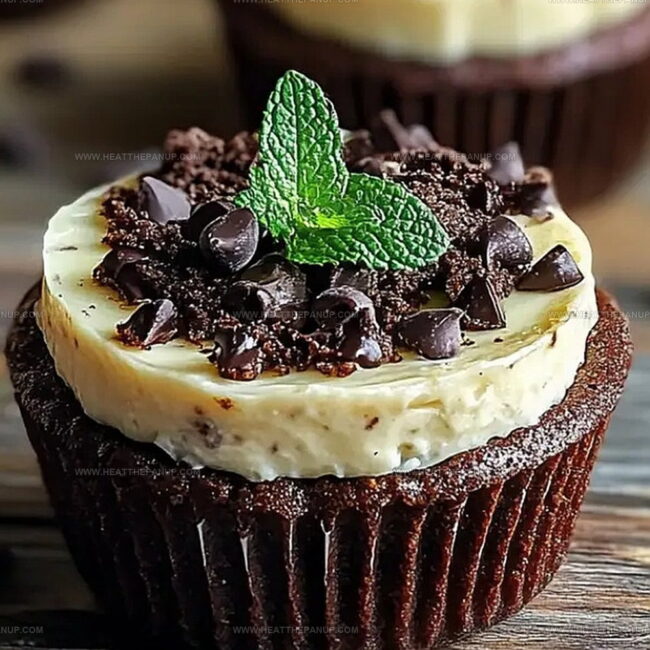
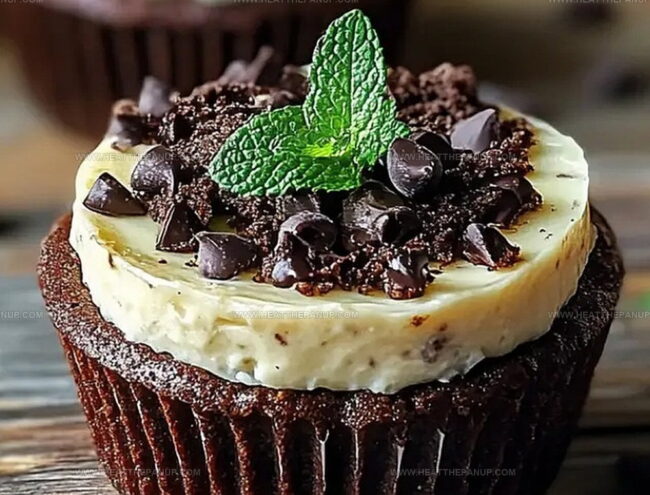
Sprinkle crushed peppermint candies or Andes mints on top for an extra flavor punch.
Step 6: Chill and Serve
Refrigerate the cups for at least an hour to let flavors mingle and texture settle.
Pull out when ready to indulge and enjoy these decadent treats!
Tips for Rich Mint Brownie Cheesecake Cup Perfection
Store & Reheat Mint Brownie Cheesecake Cups
Mint Brownie Cheesecake Cups Pairings
Perfect Pairings for Mint Brownie Cheesecake Cups:Mint Cheesecake Cups with Brownie Layers
FAQs
Yes, you can substitute boxed mix with a homemade brownie recipe. Just ensure the batter consistency is similar and you use about 2 tablespoons per muffin cup.
Avoid overmixing the cheesecake batter and don’t overbake. Remove from the oven when centers are slightly jiggly. Letting them cool gradually helps prevent cracking.
Peppermint extract adds the signature mint flavor. If you don’t have it, you can skip it, but the mint profile will be less pronounced. Alternatively, use mint chocolate chips as a substitute.
Absolutely! These mint brownie cheesecake cups can be prepared 2-3 days in advance. Store them in an airtight container in the refrigerator and add chocolate drizzle just before serving for the best presentation.
Print
Mint Brownie Cheesecake Cups Recipe
- Total Time: 40 minutes
- Yield: 12 1x
Description
Luscious mint brownie cheesecake cups blend rich chocolate and creamy cheesecake in a delightful single-serving dessert. Chocolate lovers will savor each cool, indulgent bite of this elegant treat perfect for special occasions.
Ingredients
Mint Brownie Cheesecake Cups
Base:
- 1 box fudge brownie mix (for 8-inch square pan size), prepared as directed
Filling:
- 1 package (8 ounces / 226 grams) cream cheese, softened
- 1/4 cup granulated sugar
- 1 large egg, room temperature
- 1 teaspoon vanilla extract
- 1/2 teaspoon peppermint extract
- Green food coloring (optional)
Topping and Garnish:
- 1/2 cup semi-sweet or white chocolate chips, melted (for drizzle)
- Crushed peppermint candies or Andes mints (optional, for garnish)
Instructions
- Craft the foundation by mixing brownie batter according to package guidelines, ensuring a smooth and consistent texture.
- Generously distribute the brownie mixture into a prepared muffin tin, filling each cavity approximately one-third full to create an even base.
- Whip cream cheese and sugar in a mixing vessel until achieving a silky, lump-free consistency that promises a velvety finish.
- Incorporate vanilla extract, peppermint extract, and egg into the cream cheese mixture, blending thoroughly to create a harmonious cheesecake filling.
- Introduce a hint of festive green by adding food coloring, creating a vibrant mint-inspired visual appeal.
- Carefully layer the cheesecake mixture atop the brownie foundation, using a gentle swirling motion with a toothpick to create an artistic marbled effect.
- Position the muffin tin in a preheated oven at 350°F, allowing the delicate cups to bake for 18-22 minutes until edges firm up and centers maintain a subtle wobble.
- Allow the freshly baked cups to rest in the pan for ten minutes, then transition to a cooling rack to reach room temperature.
- Transform chocolate chips into a luxurious drizzle by melting them in short microwave intervals, stirring between each session to ensure smooth consistency.
- Embellish the cooled cups with a delicate chocolate cascade, optionally garnishing with crushed peppermint candies or Andes mints for an extra layer of decadence.
- Refrigerate the prepared treats for a minimum of one hour, enabling flavors to harmonize and the cheesecake to set completely.
- Serve chilled, presenting a divine fusion of rich brownie and creamy mint cheesecake.
Notes
- Adjust brownie batter thickness by adding a tablespoon of flour if the mix seems too runny, ensuring a perfect base texture.
- Ensure cream cheese is at room temperature to prevent lumps and create a smooth, silky cheesecake filling.
- Use gel food coloring for a more vibrant mint green color without altering the batter’s consistency.
- For a gluten-free version, swap regular brownie mix with a gluten-free alternative and check all ingredients for gluten-free certification.
- Prep Time: 20 minutes
- Cook Time: 20 minutes
- Category: Desserts
- Method: Baking
- Cuisine: American
Nutrition
- Serving Size: 12
- Calories: 250
- Sugar: 18 g
- Sodium: 210 mg
- Fat: 10 g
- Saturated Fat: 5 g
- Unsaturated Fat: 4 g
- Trans Fat: 0 g
- Carbohydrates: 35 g
- Fiber: 1 g
- Protein: 3 g
- Cholesterol: 40 mg
Angelina Wiles
Content Editor & Culinary Enthusiast
Expertise
Food Writing and Editing, Vegetarian and Vegan Cuisine, Baking and Pastry Arts, Sustainable Cooking Practices
Education
Portland Community College
Certificate in Culinary Arts
Focus: Emphasis on sustainable cooking practices, vegetarian cuisine, and food writing.
Oregon Culinary Institute
Diploma in Baking and Pastry Arts
Focus: Specialized training in artisanal baking, pastry techniques, and dessert presentation.
Angelina’s love for cooking started with handwritten family recipes and weekend trips to farmers’ markets around Portland. She followed her passion with a Certificate in Culinary Arts from Portland Community College, then perfected her sweet side with a Diploma in Baking and Pastry Arts at Oregon Culinary Institute.
Angelina believes recipes should feel like a conversation, not a science project. She’s all about helping readers trust themselves in the kitchen with simple steps, fresh ideas, and easy twists on classic meals.
When she’s not editing recipes, she’s baking bread, sipping coffee, or getting inspired by the changing seasons.