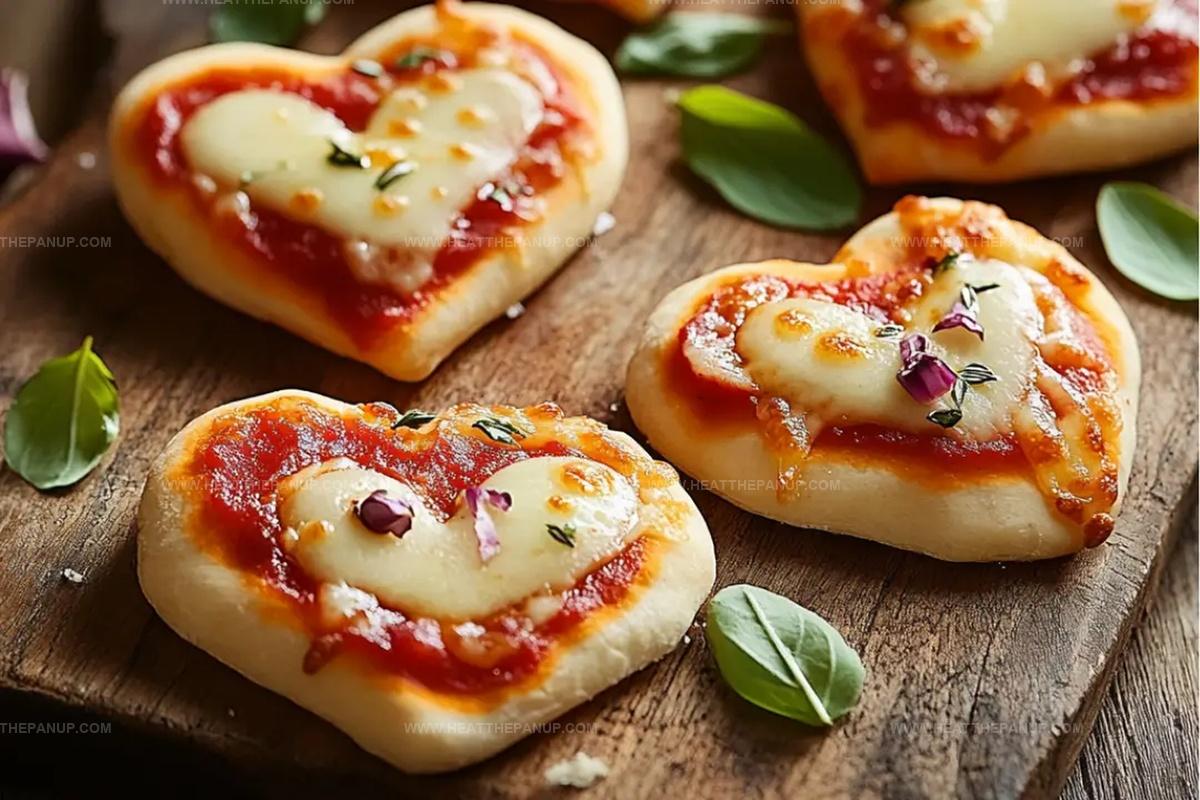
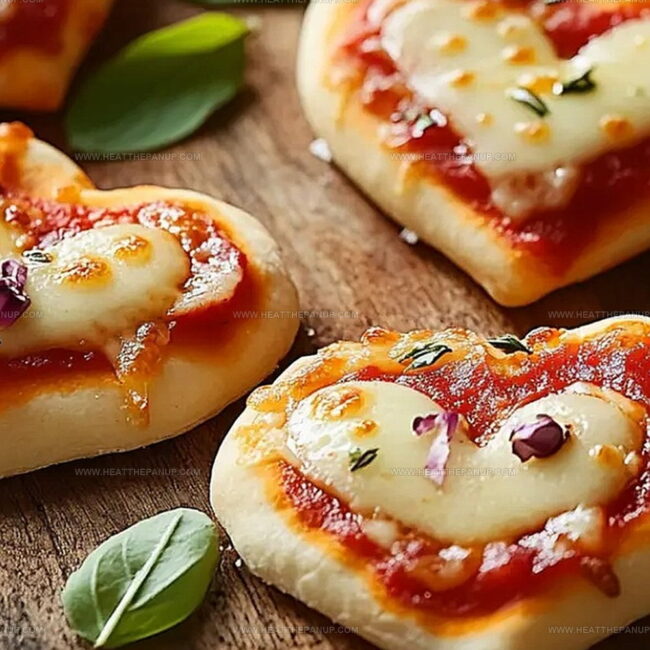
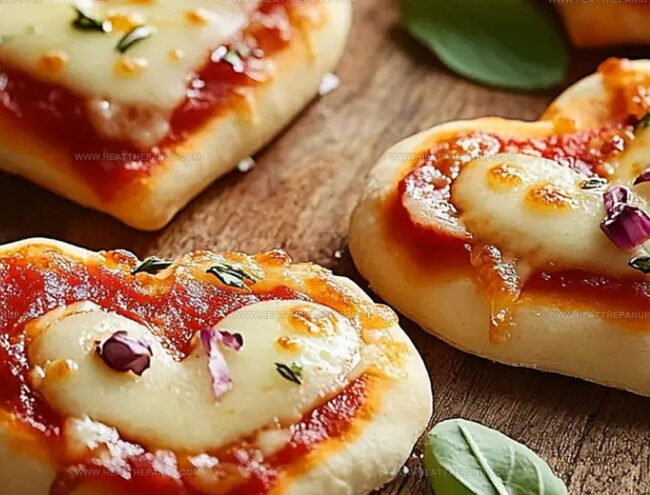
Adorable Mini Heart-Shaped Pizzas Recipe: Love Bites for Everyone
Crafting mini heart-shaped pizzas brings a playful twist to your usual dinner routine.
Culinary creativity knows no bounds when you start shaping dough with love.
Small pizzas packed with personality capture everyone’s attention at the table.
Romantic meal prep becomes delightfully simple with these adorable bite-sized treats.
Homemade pizza transforms into a charming expression of affection and fun.
Customizable toppings mean each heart can reflect personal taste and style.
Surprise your loved ones with these delectable little masterpieces that promise to spark joy and delicious conversations.
Mini Heart Pizzas That Make Dinner Fun
Ingredients for Mini Heart-Shaped Pizzas
Pizza Dough Base:Pizza Topping Elements:Finishing and Garnish:Mini Heart Pizza Assembly and Baking Directions

Step 1: Awaken the Yeast
Grab a small bowl and combine warm water, sugar, and active dry yeast.
Watch the mixture transform and become frothy over 5-10 minutes, signaling the yeast is ready to work its magic.
Step 2: Create Dough Foundation
In a large mixing bowl, blend:Create a little hollow in the center, then pour in the bubbly yeast mixture and olive oil.
Start mixing until everything comes together smoothly.
Step 3: Massage the Dough
Transfer the dough onto a lightly floured surface.
Knead with your hands, pushing and folding for about 5 minutes until the texture becomes silky and stretchy.
Step 4: Allow Dough to Rise
Place the dough in a lightly oiled bowl.
Cover with a clean kitchen towel and let it rest in a warm spot for 1 hour.
The dough will double in size, becoming puffy and light.
Step 5: Prepare Oven
Crank up your oven to 475°F.
Line a baking sheet with parchment paper.
Step 6: Shape Adorable Pizzas
Punch down the risen dough and divide into 4 equal pieces.
Roll each portion into heart or oval shapes about 6 inches wide.
Gently transfer these onto the prepared baking sheet.
Step 7: Dress the Pizzas
Spread a thin layer of pizza sauce over each base.
Sprinkle generously with:Brush the edges with olive oil for a beautiful golden finish.
Step 8: Bake to Perfection
Slide the baking sheet into the hot oven.
Bake for 10-12 minutes until the crust turns golden and cheese becomes wonderfully bubbly.
Step 9: Final Touches
Remove pizzas from the oven and let them rest for a minute.
Optionally, garnish with fresh basil leaves for an extra flavor punch.
Serve and enjoy your adorable mini pizzas!
Pizza Tips for Cute, Cheesy Valentine Hearts
Keep Mini Heart-Shaped Pizzas Fresh
Heart-Shaped Pizzas Sides
Calzone Hearts with Valentine Filling Combos
FAQs
Look for frothy bubbles on the surface of the water mixture after 5-10 minutes. If the yeast doesn’t foam, it might be expired or the water was too hot or cold, which can kill the yeast.
Yes, you can prepare the dough up to 24 hours in advance. After kneading, cover and refrigerate. Let it come to room temperature and rise before shaping the pizzas.
Use a knife to carefully cut heart shapes by hand. Alternatively, roll the dough into an oval and pinch the top to create a heart shape.
Bread flour works best for pizza dough as it has higher protein content, creating a chewier crust. All-purpose flour is a good substitute if bread flour isn’t available.
Print
Mini Heart-Shaped Pizzas Recipe
- Total Time: 27 minutes
- Yield: 4 1x
Description
Mini heart-shaped pizzas capture romance on a plate, blending Italian culinary charm with playful Valentine’s Day spirit. Crisp homemade dough, rich marinara, and melted cheese create an irresistible treat you’ll adore sharing with someone special.
Ingredients
Main Ingredients:
- 1.5 cups all-purpose flour
- 0.5 cup warm water
- 1.5 cups shredded mozzarella cheese
- 0.5 cup pizza sauce
- 0.5 cup sliced pepperoni
Dough Ingredients:
- 1 teaspoon active dry yeast
- 1 teaspoon sugar
- 1 tablespoon olive oil
- 0.5 teaspoon salt
Additional/Optional Ingredients:
- Fresh basil leaves
- Olive oil (for brushing)
Instructions
- Activate the yeast by whisking warm water, sugar, and active dry yeast in a small vessel. Allow the mixture to bloom and become foamy, indicating the yeast’s activation.
- Create a flour foundation by combining flour and salt in a spacious mixing bowl. Form a central cavity and introduce the frothy yeast mixture along with olive oil.
- Transform the ingredients into a cohesive dough by stirring and then transferring to a floured surface. Knead the mixture thoroughly, developing a smooth and elastic texture through consistent manipulation.
- Nurture dough development by placing the kneaded mixture into a lightly oiled bowl. Drape a clean cloth over the container and permit the dough to rise, doubling in volume within approximately one hour.
- Prepare the baking environment by heating the oven to a high temperature of 475°F, ensuring a crisp pizza foundation.
- Deflate the risen dough and segment it into four equal portions. Skillfully roll each section into delicate heart-shaped configurations, maintaining a consistent six-inch width.
- Position the heart-shaped dough onto a parchment-lined baking sheet, preparing for topping and baking.
- Embellish each pizza base with a thin layer of pizza sauce, distributing shredded mozzarella cheese evenly. Add preferred toppings like pepperoni slices for additional flavor complexity.
- Enhance the crust’s appearance by delicately brushing olive oil along the dough’s perimeter, promising a golden and crispy exterior.
- Bake the adorned pizzas for 10-12 minutes, monitoring until the crust achieves a beautiful golden hue and the cheese melts into a bubbling, slightly browned landscape.
- Extract the pizzas from the oven and allow a brief cooling moment. Optionally, garnish with fresh basil leaves to introduce a vibrant aromatic finish.
Notes
- Ensure water temperature is lukewarm (around 110°F) to activate yeast correctly without killing it.
- Let yeast mixture sit until it becomes frothy and bubbly, indicating active fermentation for better dough rise.
- Knead dough thoroughly to develop gluten, creating a stretchy and soft pizza base with perfect texture.
- Use parchment paper for easy transfer and cleanup, preventing stuck pizza bases.
- Experiment with heart shape by using a template or cutting free-hand for personalized pizzas.
- Control cheese melting by using shredded mozzarella and avoiding overloading toppings.
- Rotate baking sheet halfway through cooking for even browning and consistent crispiness.
- vegetarian options, gluten-free flour, dairy-free cheese alternatives.
- Prep Time: 15 minutes
- Cook Time: 12 minutes
- Category: Lunch, Dinner, Appetizer, Snacks
- Method: Baking
- Cuisine: Italian
Nutrition
- Serving Size: 4
- Calories: 310
- Sugar: 2 g
- Sodium: 500 mg
- Fat: 12 g
- Saturated Fat: 5 g
- Unsaturated Fat: 7 g
- Trans Fat: 0 g
- Carbohydrates: 38 g
- Fiber: 2 g
- Protein: 12 g
- Cholesterol: 25 mg
Angelina Wiles
Content Editor & Culinary Enthusiast
Expertise
Food Writing and Editing, Vegetarian and Vegan Cuisine, Baking and Pastry Arts, Sustainable Cooking Practices
Education
Portland Community College
Certificate in Culinary Arts
Focus: Emphasis on sustainable cooking practices, vegetarian cuisine, and food writing.
Oregon Culinary Institute
Diploma in Baking and Pastry Arts
Focus: Specialized training in artisanal baking, pastry techniques, and dessert presentation.
Angelina’s love for cooking started with handwritten family recipes and weekend trips to farmers’ markets around Portland. She followed her passion with a Certificate in Culinary Arts from Portland Community College, then perfected her sweet side with a Diploma in Baking and Pastry Arts at Oregon Culinary Institute.
Angelina believes recipes should feel like a conversation, not a science project. She’s all about helping readers trust themselves in the kitchen with simple steps, fresh ideas, and easy twists on classic meals.
When she’s not editing recipes, she’s baking bread, sipping coffee, or getting inspired by the changing seasons.