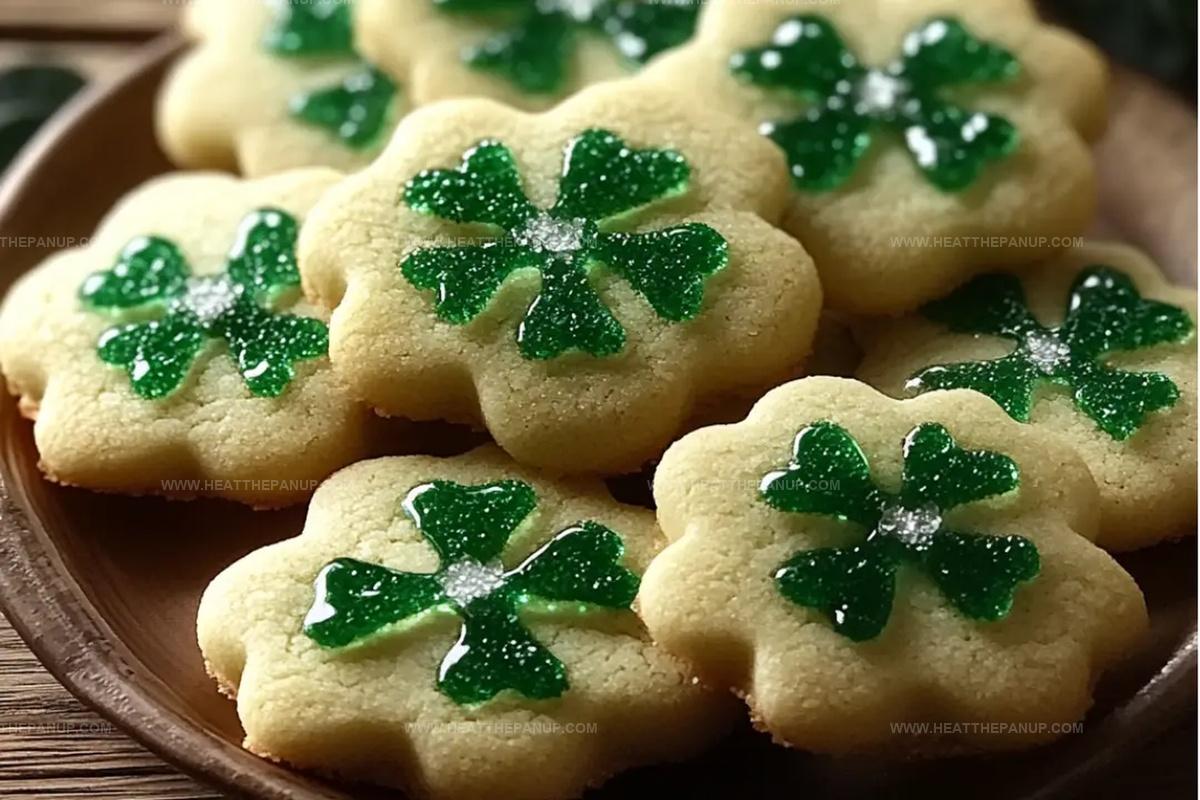
The Best Irish Shamrock Cookies Recipe for St. Patrick’s Day Fun
Baking delightful irish shamrock cookies brings a burst of festive cheer to any kitchen gathering.
Sweet memories dance through my mind when mixing these emerald-hued treats.
Buttery dough transforms into playful three-leaf shapes that capture Ireland’s cultural spirit.
Crisp edges and soft centers create a perfect balance of textures.
Friendly hints of vanilla and subtle green sprinkles make these cookies irresistibly charming.
Each cookie tells a story of tradition and playful baking magic.
You’ll find yourself smiling while crafting these delectable little treasures that everyone will adore.
Shamrock Cookies That Are Festive, Fun, and Lightly Minty
Spicy Honey Ginger Chicken Bowls Ingredient Breakdown
Butter and Sugar Base:Binding Ingredients:Dry Ingredients:Decorative Coating:Irish Shamrock Cookie Instructions for Festive Baking
Step 1: Whip Up the Magical Dough
In a spacious mixing bowl, transform butter and sugar into a cloud-like, fluffy mixture.
Add the egg and vanilla, blending until smooth and harmonious.
In a separate bowl, combine the dry ingredients:Gradually merge the dry mixture into the wet ingredients, creating a soft, pillowy dough.
Wrap the dough in plastic and let it rest in the refrigerator, allowing flavors to mingle and texture to firm up for 30 minutes to an hour.
Step 2: Shape Emerald Green Cookies
Fire up the oven to 350°F.
Line baking sheets with parchment paper.
Roll out the chilled dough on a lightly floured surface, aiming for a delicate 1/4-inch thickness.
Grab your shamrock cookie cutter and create charming little green-inspired shapes.
Step 3: Sprinkle with Festive Sparkle
Spread green sanding sugar on a plate.
Gently press the top of each shamrock cookie into the sugary crystals, ensuring a complete, glittering coating.
Step 4: Bake to Golden Perfection
Arrange the cookies on prepared baking sheets, leaving a small gap between each.
Slide into the oven and bake for 8-10 minutes until the edges turn a delicate golden hue.
Let the cookies rest on the baking sheet for 5 minutes, then transfer to a wire rack to cool completely.
Shamrock Cookie Tricks for a Lucky Batch
Store Irish Shamrock Cookies
Irish Shamrock Cookies Matches
Shamrock Cookies with Irish Theme Variants
FAQs
Chilling helps prevent the dough from spreading during baking, ensures cleaner cookie shapes, and makes the dough easier to handle. Cold dough maintains its shape better and creates a more professional-looking cookie.
Regular granulated sugar won’t provide the same sparkly, decorative effect as sanding sugar. Sanding sugar has larger crystals that create a glittery texture and add a decorative shine to the shamrock cookies.
Roll the dough to about 1/4-inch thickness. This ensures the cookies are thin enough to be crisp but thick enough to hold their shamrock shape without breaking easily.
You can use a small knife to hand-cut shamrock shapes or use a different festive cookie cutter like a heart or star. The key is to create a fun, St. Patrick’s Day-themed cookie.
Print
Irish Shamrock Cookies Recipe
- Total Time: 25 minutes
- Yield: 24 1x
Description
Delightful Irish Shamrock Cookies bring festive cheer straight from Ireland’s emerald landscapes. Sweet butter-rich shortbread shaped like charming green clovers will enchant holiday gatherings with traditional Celtic charm.
Ingredients
Main Ingredients:
- 2 1/2 cups all-purpose flour
- 1 cup unsalted butter, softened
- 1 cup sugar
Binding and Flavoring Ingredients:
- 1 large egg
- 1 teaspoon vanilla extract
Seasoning and Leavening Ingredients:
- 1/2 teaspoon baking powder
- 1/4 teaspoon salt
Decoration:
- Green sanding sugar (for rolling)
Instructions
- Craft a velvety dough by whipping softened butter and sugar until airy and pale, then incorporate egg and vanilla extract, ensuring a smooth, homogeneous mixture.
- Sift flour, baking powder, and salt into a separate vessel, then gradually fold dry ingredients into the creamy base, gently kneading until a supple dough emerges.
- Encase the dough in plastic wrap and refrigerate for 30-60 minutes, allowing it to firm and develop robust flavor.
- Heat the oven to 350°F and line baking sheets with parchment paper.
- Dust a clean surface with flour and roll the chilled dough to a uniform 1/4-inch thickness, creating an even canvas for cutting.
- Utilize a shamrock-shaped cookie cutter to delicately stamp out festive shapes from the rolled dough.
- Spread verdant sanding sugar on a flat plate, then tenderly press each shamrock’s surface into the sparkling crystals, ensuring complete coverage.
- Arrange the sugar-coated cookies on prepared baking sheets, maintaining space between each delicate morsel.
- Bake for 8-10 minutes, watching for subtle golden edges that signal perfect doneness.
- Let cookies rest on the baking sheet for 5 minutes to stabilize, then transfer to a wire rack for complete cooling, preserving their crisp texture.
Notes
- Chill dough thoroughly to prevent spreading and maintain crisp shamrock shapes during baking.
- Use gel food coloring for vibrant green sugar if traditional sanding sugar isn’t available, ensuring even color coverage.
- Swap butter with plant-based alternative for vegan version, maintaining same creaming technique for soft texture.
- Handle delicate cookie shapes gently when transferring to prevent breaking, using thin offset spatula for precise movement.
- Prep Time: 15 minutes
- Cook Time: 10 minutes
- Category: Desserts, Snacks
- Method: Baking
- Cuisine: Irish
Nutrition
- Serving Size: 24
- Calories: 130
- Sugar: 6 g
- Sodium: 50 mg
- Fat: 7 g
- Saturated Fat: 4 g
- Unsaturated Fat: 2 g
- Trans Fat: 0 g
- Carbohydrates: 16 g
- Fiber: 0 g
- Protein: 1 g
- Cholesterol: 20 mg
Angelina Wiles
Content Editor & Culinary Enthusiast
Expertise
Food Writing and Editing, Vegetarian and Vegan Cuisine, Baking and Pastry Arts, Sustainable Cooking Practices
Education
Portland Community College
Certificate in Culinary Arts
Focus: Emphasis on sustainable cooking practices, vegetarian cuisine, and food writing.
Oregon Culinary Institute
Diploma in Baking and Pastry Arts
Focus: Specialized training in artisanal baking, pastry techniques, and dessert presentation.
Angelina’s love for cooking started with handwritten family recipes and weekend trips to farmers’ markets around Portland. She followed her passion with a Certificate in Culinary Arts from Portland Community College, then perfected her sweet side with a Diploma in Baking and Pastry Arts at Oregon Culinary Institute.
Angelina believes recipes should feel like a conversation, not a science project. She’s all about helping readers trust themselves in the kitchen with simple steps, fresh ideas, and easy twists on classic meals.
When she’s not editing recipes, she’s baking bread, sipping coffee, or getting inspired by the changing seasons.