The Spookiest Halloween Icebox Cake Recipe for Sweet Frights
Creamy layers of decadent halloween icebox cake bring nostalgic autumn memories flooding back with each delightful bite.
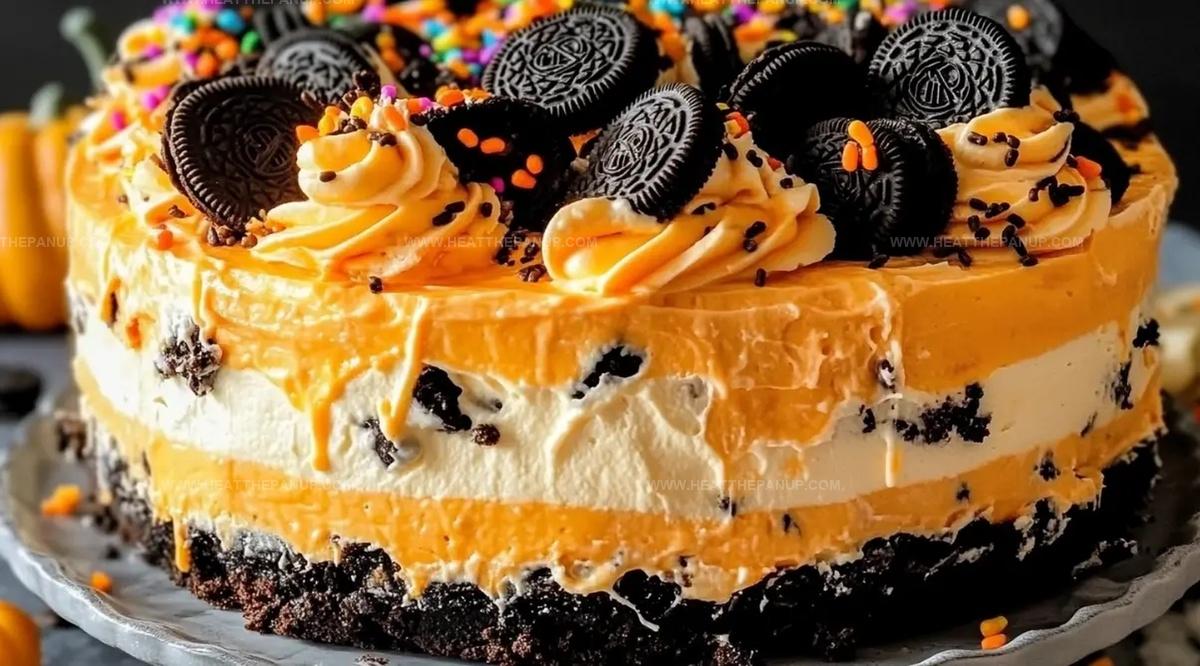
Chocolate wafers and silky whipped cream create a dreamy dessert that looks as spectacular as it tastes.
Dark and light contrasts make this simple no-bake treat a showstopper at any seasonal gathering.
Rich chocolate notes intermingle with smooth cream, promising a delectable experience for every sweet tooth.
Minimal ingredients and zero baking mean you can whip this dessert up in minutes.
Chilled and set overnight, this cake transforms into a hauntingly delicious centerpiece that will have everyone asking for seconds.
Prepare to indulge in a dessert that captures the magical essence of Halloween.
Why Halloween Icebox Cake Is a Spooky Delight
Ingredients for a Halloween-Themed Icebox Cake
Base Ingredients:Coloring and Decorative Ingredients:Binding and Preparation Ingredients:How to Build This Chilled Halloween Dessert
Step 1: Prepare Pan and Whipped Cream Base
Line a 9-inch springform pan with plastic wrap, allowing extra material to hang over the edges.
In a large mixing bowl, whip heavy cream, vanilla extract, and powdered sugar until stiff, fluffy peaks form using an electric mixer.
Step 2: Create Orange Color Variations
Divide the whipped cream into three separate bowls.
Add different intensities of orange food coloring to each bowl, gently folding until colors blend smoothly without deflating the cream.
Step 3: Layer First Cookie Base
Arrange Oreo cookies across the bottom of the pan, using broken cookie pieces to fill any empty spaces and create a solid foundation.
Step 4: Add First Cream Layer
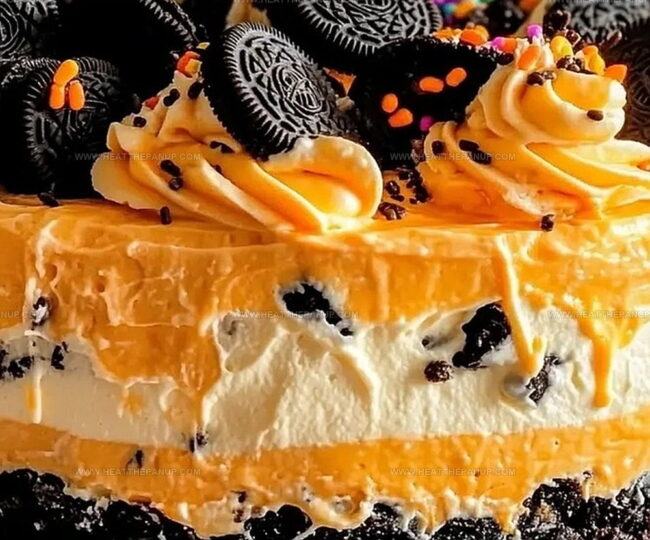
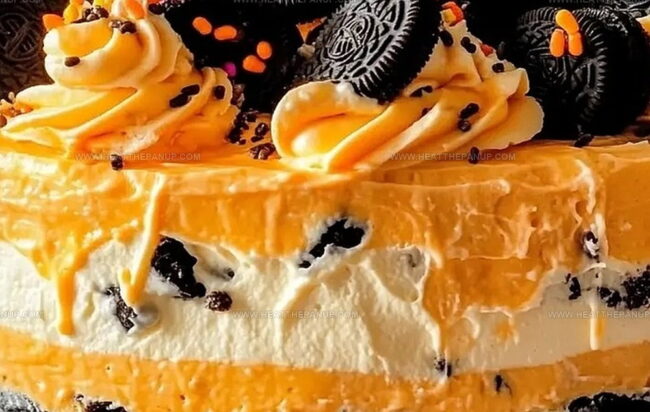
Spread the darkest orange whipped cream evenly over the cookie layer using a spatula, ensuring complete coverage.
Step 5: Create Second Cookie Layer
Place another row of Oreo cookies directly on top of the first cream layer, maintaining a consistent pattern.
Step 6: Apply Second Cream Layer
Cover the cookie layer with the medium-toned orange whipped cream, spreading gently and evenly.
Step 7: Complete Final Layers
Repeat the cookie and cream layering process one more time, using the lightest orange cream on top.
Step 8: Chill and Set
Cover the cake with plastic wrap and refrigerate for minimum 6 hours or ideally overnight to allow flavors and structure to develop.
Step 9: Decorate and Serve
Remove cake from refrigerator.
Embellish with orange icing and festive Halloween sprinkles.
Slice and enjoy the spooky treat!
Tips to Make a Stunning Holiday Icebox Cake
Keeping Your Halloween Cake Fresh and Chilled
Festive Pairings for Icebox Cake Fun
Creepy-Cute Ideas for Icebox Cake Variations
FAQs
You’ll need heavy cream, vanilla extract, powdered sugar, Oreo cookies, orange food coloring, orange icing, and Halloween sprinkles.
Yes, you can substitute Graham crackers or chocolate wafer cookies, but Oreos work best for the Halloween theme and texture.
When you lift the whisk and the cream forms stiff, pointed peaks that hold their shape without falling over, it’s perfectly whipped.
Absolutely! Kids can help with adding food coloring, layering cookies, and decorating with sprinkles, making it a fun Halloween baking activity.
Print
Halloween Icebox Cake Recipe
- Total Time: 30 minutes
- Yield: 12 1x
Description
Spooky Halloween icebox cake brings ghoulish delight to dessert tables, blending creamy layers with haunting chocolate cookies. Chilling overnight creates a spine-tingling treat you’ll crave long after the witching hour passes.
Ingredients
Main Ingredients:
- 2 14.5-ounce packages Oreo cookies (approximately 42 cookies)
- 4 cups heavy whipping cream
Sweeteners and Flavor Enhancers:
- 1 cup powdered sugar
- 1 teaspoon vanilla extract
Decorative Ingredients:
- Orange food coloring (gel recommended)
- Orange icing
- Halloween sprinkles
Instructions
- Prepare a 9-inch springform pan by lining it with plastic wrap or parchment paper, ensuring the edges extend slightly above the pan’s rim.
- Whip heavy cream, vanilla extract, and powdered sugar until stiff, voluminous peaks form using an electric mixer.
- Separate the whipped cream into three equal portions, gradually incorporating orange food coloring to create a gradient of orange hues.
- Arrange a complete layer of Oreo cookies across the pan’s bottom, using crumbled cookies to fill any empty spaces.
- Apply the darkest orange-tinted whipped cream evenly over the first cookie layer, ensuring complete coverage.
- Create a second cookie layer directly atop the initial cream layer.
- Spread the medium-toned orange whipped cream across the second cookie layer with smooth, consistent strokes.
- Position the final cookie layer over the previous cream layer.
- Top with the lightest orange-tinted whipped cream, distributing it uniformly to create a smooth surface.
- Securely cover the cake with plastic wrap and refrigerate for a minimum of 6 hours, preferably overnight.
- Before serving, remove from refrigerator and embellish with orange icing and festive Halloween sprinkles.
- Carefully release from springform pan and slice to reveal the vibrant orange-layered dessert.
Notes
- Prevent Soggy Base by ensuring cookies are fully covered with whipped cream, creating a barrier that stops them from becoming soft too quickly.
- Customize Color Intensity by gradually adding food coloring, allowing precise control over the orange gradient from light to dark for a stunning visual effect.
- Make Gluten-Free by substituting Oreo cookies with gluten-free chocolate sandwich cookies, keeping the dessert accessible for those with dietary restrictions.
- Enhance Flavor Complexity by adding a pinch of cinnamon or ginger to the whipped cream, introducing warm autumnal notes that complement the Halloween theme.
- Prep Time: 30 minutes
- Cook Time: 0 minutes
- Category: Desserts
- Method: None
- Cuisine: American
Nutrition
- Serving Size: 12
- Calories: 370
- Sugar: 19g
- Sodium: 200mg
- Fat: 27g
- Saturated Fat: 16g
- Unsaturated Fat: 8g
- Trans Fat: 0g
- Carbohydrates: 32g
- Fiber: 1g
- Protein: 3g
- Cholesterol: 90mg
James Hambly
Founder & Recipe Creator
Expertise
Recipe Development, Culinary Education, Farm-to-Table Cooking, Southern Cuisine
Education
Asheville-Buncombe Technical Community College
Certificate in Culinary Arts
Focus: Hands-on training in professional cooking techniques, emphasizing farm-to-table practices and Southern cuisine.
The Chef’s Academy
Associate Degree in Culinary Arts
Focus: Comprehensive culinary education covering global cuisines, kitchen management, and food safety.
James grew up surrounded by the smells of cast-iron skillets and slow-cooked Southern meals in Asheville, North Carolina.
He sharpened his skills with a Certificate in Culinary Arts from Asheville-Buncombe Technical Community College, and later leveled up with an Associate Degree from The Chef’s Academy.
James’s philosophy is simple: the best meals don’t need fancy tricks, just fresh ingredients, a hot pan, and a little bit of heart. His favorite days are spent testing one-pan wonders, chasing bold flavors, and creating recipes that feel easy, even on a busy night.