
Fluffy Little Deviled Egg Chicks Recipe: Spring’s Cutest Treat
Deviled egg chicks will make everyone smile at your next gathering.
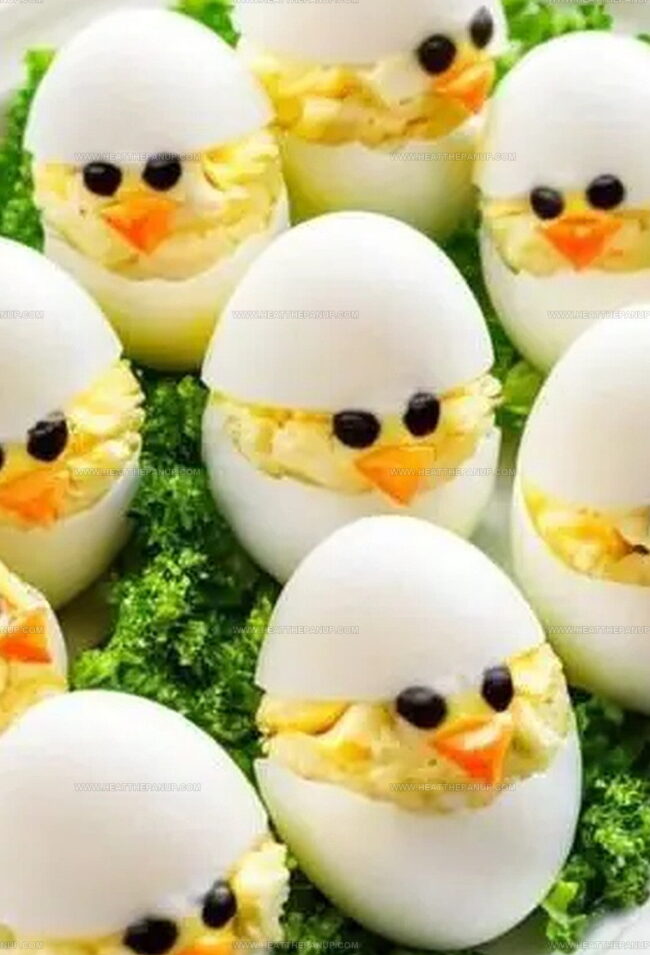
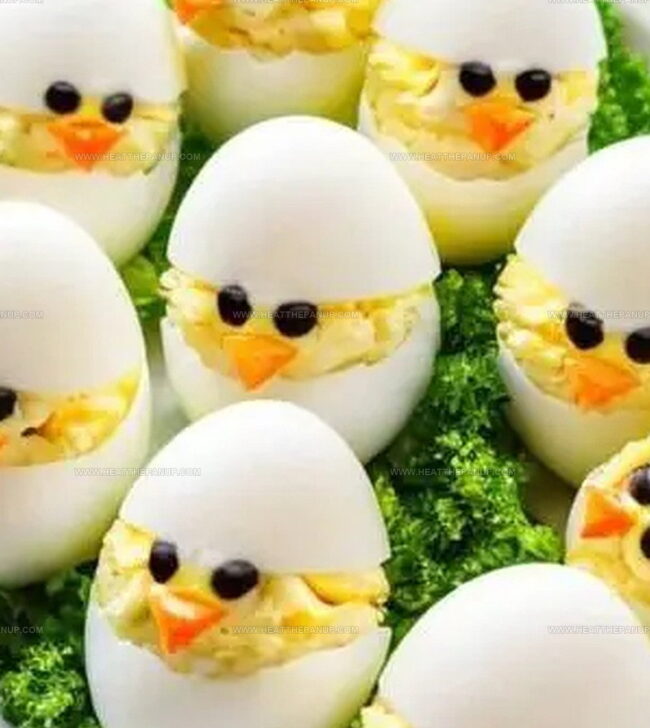
Cute little egg characters peek out with tiny beaks and charming faces.
Guests always marvel at how simple ingredients can create such whimsical party treats.
Kids absolutely love these playful appetizers that look like baby chickens.
Crafting these delightful bites requires minimal kitchen skills and basic pantry staples.
Pastel plates and spring celebrations become instantly more cheerful with these charming edible creatures.
She promises you’ll become the star of any potluck with these delightful deviled egg chicks.
Why Deviled Egg Chicks Are Crowd Pleasers
Deviled Egg Chicks Ingredient List
Eggs:Egg Filling:Decorative Ingredients:Make Deviled Egg Chicks At Home
Step 1: Prepare Egg Bases
Remove shells from hard-boiled eggs carefully.
Use a sharp knife to slice a tiny layer from the bottom of each egg, creating a stable base for standing.
Slice off the top third of each egg, keeping the lids matched with their original bases.
Step 2: Extract Egg Yolks
Gently squeeze the egg base to release the yolk.
The yolk should pop out smoothly into a mixing bowl.
Use a fork to mash the yolks completely.
Step 3: Create Creamy Filling
Add the following ingredients to the mashed yolks:Blend everything together until the mixture becomes smooth and creamy.
Mix thoroughly to ensure no lumps remain.
Step 4: Fill Egg Whites
Transfer the yolk mixture into a piping bag or ziplock bag with a corner snipped off.
Pipe the filling generously into the egg white bases, creating a plump mound.
Step 5: Assemble Chick Bodies
Carefully place the top egg lid back onto each filled base.
Press gently to secure the two pieces together.
Step 6: Create Chick Features
Prepare olive eyes and carrot beaks:Insert two olive spots as eyes and two carrot wedges as beaks on each egg chick.
Step 7: Final Presentation
Arrange the chicks on a serving platter.
Garnish with fresh herbs like parsley or dill to create a whimsical, free-range inspired display.
Serve immediately and watch guests delight in these cute edible chicks.
Pro Tips For Deviled Egg Chicks
Save Deviled Egg Chicks The Right Way
What To Serve With Deviled Egg Chicks
Deviled Egg Chicks Creative Variants
FAQs
Gently squeeze around the egg base to loosen the yolk, which helps it pop out smoothly without breaking.
Yes, you can prepare the filling up to a day in advance and store it in an airtight container in the refrigerator until you’re ready to assemble the chicks.
Use a ziplock bag by cutting a small corner off to pipe the yolk mixture into the egg bases, which works just as well as a pastry bag.
Use a plastic straw to punch through the olive and gently squeeze to release perfect small olive circles for the chick’s eyes.
Print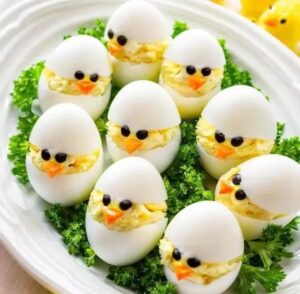
Deviled Egg Chicks Recipe
- Total Time: 40 minutes
- Yield: 12 1x
Description
Adorable deviled egg chicks peek out from easter platters, bringing whimsy to classic appetizers. Creamy filling nestled within egg white bodies creates playful spring party treats you’ll want to gobble up instantly.
Ingredients
Main Ingredients:
- 12 large eggs, hard boiled and peeled
- 1/3 cup (79 milliliters) mayonnaise
- 1 1/2 teaspoons dijon mustard
Seasoning:
- 1/4 teaspoon garlic powder
- 1/8 teaspoon salt
Garnish:
- 1 small carrot, peeled and sliced into rings
- 6 black olives
Instructions
- Meticulously prepare hard-boiled eggs, ensuring uniform cooking and smooth surfaces for creating adorable egg chicks.
- Carefully trim a slim base layer from each egg to create a stable standing platform on the serving platter.
- Delicately slice off approximately one-third of the egg’s top portion, maintaining precise alignment with the base.
- Gently manipulate the egg’s foundation to extract the cooked yolk smoothly, ensuring minimal disruption to the egg white structure.
- Pair each egg base with its corresponding top section for precise reconstruction later.
- Transfer extracted yolks into a clean mixing bowl, using a fork to pulverize them into a fine, consistent texture.
- Incorporate mayonnaise, dijon mustard, garlic powder, and salt into the mashed yolks, blending thoroughly until achieving a creamy, uniform consistency.
- Utilize a piping bag or sealed plastic bag with a corner snipped to elegantly fill egg whites with the seasoned yolk mixture.
- Carefully reposition the egg tops, pressing gently to secure them in place and create the chick’s silhouette.
- Transform black olives into delicate eyes by piercing them with a plastic straw, allowing small circular pieces to be extracted with minimal effort.
- Slice carrots into thin rings, then subdivide them into tiny triangular segments to craft precise beaks for each egg chick.
- Strategically place olive eye spots and carrot beak wedges onto each egg, creating charming facial features.
- Arrange the completed egg chicks on a decorative platter, garnishing with fresh herbs like parsley or dill to enhance visual appeal and suggest a whimsical, pastoral setting.
Notes
- Egg Selection Matters: Choose fresh, room-temperature eggs for easier peeling and smoother texture.
- Precise Cutting Technique: Use a sharp, clean knife and wipe between cuts to create smooth, even egg chick shapes.
- Yolk Mixing Magic: Mash yolks thoroughly to eliminate lumps and create a creamy, silky filling that pipes beautifully.
- Flavor Flexibility: Experiment with spices like paprika, dill, or chives to customize the deviled egg chicks’ taste profile.
- Prep Time: 25 minutes
- Cook Time: 15 minutes
- Category: Appetizer, Snacks
- Method: Boiling
- Cuisine: American
Nutrition
- Serving Size: 12
- Calories: 98
- Sugar: 0.5 g
- Sodium: 108 mg
- Fat: 8 g
- Saturated Fat: 1.5 g
- Unsaturated Fat: 6 g
- Trans Fat: 0 g
- Carbohydrates: 1 g
- Fiber: 0.2 g
- Protein: 6 g
- Cholesterol: 186 mg
Angelina Wiles
Content Editor & Culinary Enthusiast
Expertise
Food Writing and Editing, Vegetarian and Vegan Cuisine, Baking and Pastry Arts, Sustainable Cooking Practices
Education
Portland Community College
Certificate in Culinary Arts
Focus: Emphasis on sustainable cooking practices, vegetarian cuisine, and food writing.
Oregon Culinary Institute
Diploma in Baking and Pastry Arts
Focus: Specialized training in artisanal baking, pastry techniques, and dessert presentation.
Angelina’s love for cooking started with handwritten family recipes and weekend trips to farmers’ markets around Portland. She followed her passion with a Certificate in Culinary Arts from Portland Community College, then perfected her sweet side with a Diploma in Baking and Pastry Arts at Oregon Culinary Institute.
Angelina believes recipes should feel like a conversation, not a science project. She’s all about helping readers trust themselves in the kitchen with simple steps, fresh ideas, and easy twists on classic meals.
When she’s not editing recipes, she’s baking bread, sipping coffee, or getting inspired by the changing seasons.