
The Jolly Christmas Fudge Recipe Everyone Adores
Sweet memories of holiday gatherings often spark my passion for creamy christmas fudge recipe that melts hearts.
Childhood winters bring back comforting chocolate moments shared around warm kitchens.
Grandmothers and mothers crafted these delectable treats with love and precision.
Rich, velvety textures promise indulgence in every single bite.
Simple ingredients combine to create magic that connects generations.
Smooth chocolate swirls whisper nostalgic tales of celebration and joy.
You’ll find this recipe transforms ordinary ingredients into extraordinary festive delight.
Let’s unwrap this delicious tradition together and make something spectacular!
Why Christmas Fudge Feels Extra Festive
What You’ll Need for Holiday Fudge
Main Ingredients:
White Chocolate: Rich, creamy chocolate perfect for creating smooth fudge texture.
Sweetened Condensed Milk: Sweet, thick milk that helps bind the fudge together.
Vanilla Extract: Classic flavor enhancer for desserts.
Coloring Ingredients:Preparation Ingredients:How to Make Christmas Fudge at Home
Step 1: Prep Baking Vessel
Line an 8×8-inch baking dish with parchment paper, ensuring extra paper hangs over sides for effortless removal later.
Step 2: Craft Chocolate Base
In a medium saucepan, combine:Gently heat and stir over low temperature until chocolate melts completely, creating a silky smooth mixture.
Remove from heat and blend in vanilla extract.
Step 3: Create Festive Colors
Separate melted chocolate mixture into three equal bowls.
Add red food coloring to one bowl and green food coloring to another, leaving the third bowl in its original white state.
Step 4: Build Colorful Layers
Pour red fudge mixture into prepared pan, spreading evenly across bottom.
Carefully add plain white fudge layer on top of red, then crown with green fudge layer.
Step 5: Design Swirled Pattern
Using a knife, gently swirl layers together, creating a beautiful marbled design with festive Christmas colors.
Step 6: Add Holiday Sparkle
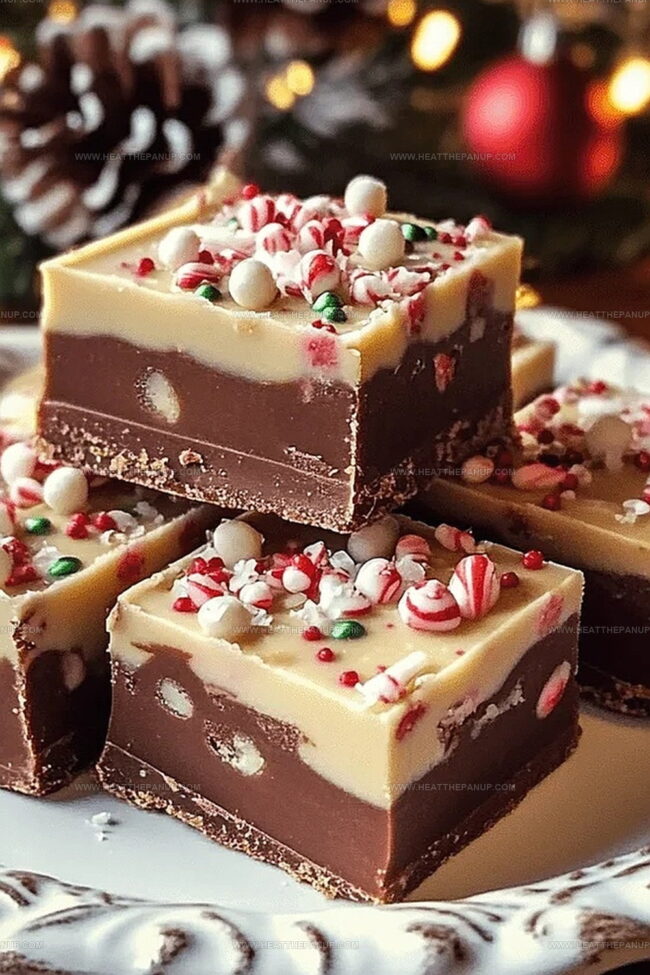
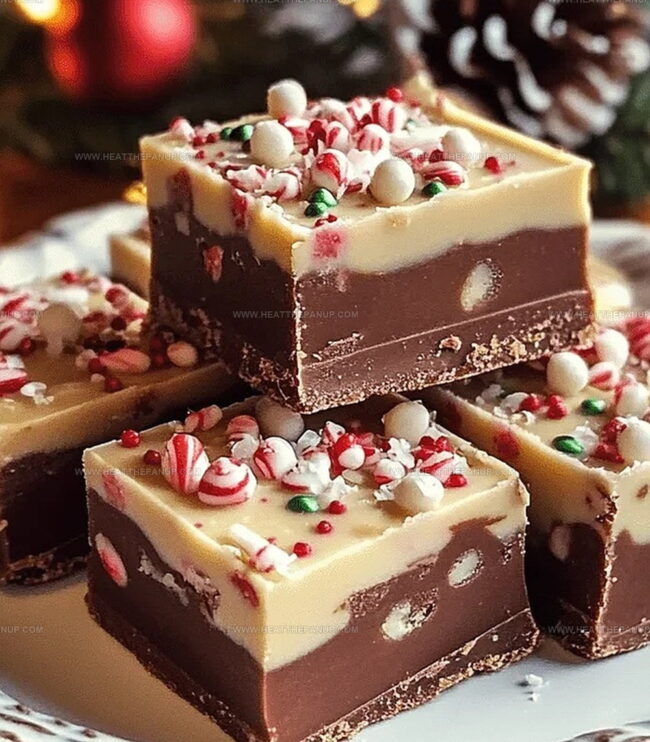
While fudge remains warm, sprinkle holiday-themed decorative toppings across surface.
Step 7: Chill and Set
Refrigerate fudge for minimum two hours until completely firm and solid.
Step 8: Slice and Serve
Remove fudge from pan using parchment paper edges.
Cut into small, bite-sized square pieces ready for enjoying.
Tips for Smooth, Creamy Holiday Fudge
Best Way to Store and Serve Fudge
Fudge Pairings That Hit the Sweet Spot
Variants for Christmas Fudge Fans
FAQs
Use a knife to gently swirl the red, white, and green layers together. Don’t overmix, or the colors will blend completely. Make light, random swirling motions to create a beautiful marble pattern.
Absolutely! You can choose festive colors like blue and silver for a winter theme, or stick to traditional Christmas red and green. Just ensure the food coloring is gel-based for vibrant, true colors.
Use high-quality white chocolate chips or melting wafers. Avoid white chocolate bars, as they might not melt as smoothly. Brands like Ghirardelli or Wilton work great for creamy, smooth fudge.
Always melt chocolate over low heat and stir constantly. Use sweetened condensed milk to help create a smooth, creamy texture. Avoid overheating, which can cause sugar crystallization and a grainy result.
Print
Christmas Fudge Recipe
- Total Time: 2 hours 25 minutes
- Yield: 12 1x
Description
Sweet holiday magic comes alive in this Christmas Fudge, blending rich chocolate with festive cheer. Creamy layers melt instantly, creating irresistible seasonal joy you’ll savor with pure delight.
Ingredients
Main Ingredients:
- 3 cups white chocolate chips
- 1 (14-ounce) can sweetened condensed milk
Flavoring:
- 1/2 teaspoon vanilla extract
Decorative Elements:
- Red food coloring
- Green food coloring
- 1/4 cup holiday sprinkles (optional)
Instructions
- Prepare a festive workspace by lining an 8×8-inch baking dish with parchment paper, ensuring extended edges for effortless removal.
- Create a smooth chocolate base by gently melting white chocolate chips with sweetened condensed milk in a medium saucepan over low heat, stirring continuously until fully integrated.
- Remove the chocolate mixture from heat and incorporate vanilla extract, blending thoroughly.
- Divide the melted chocolate mixture equally into three separate bowls, reserving one for each color – red, green, and the original white.
- Add red food coloring to one bowl and green food coloring to another, stirring until the hues are vibrant and consistent.
- Carefully pour the red fudge mixture into the prepared pan, spreading evenly across the bottom.
- Gently layer the white fudge over the red layer, ensuring a smooth transition.
- Follow by spreading the green fudge as the final layer, creating a festive color gradient.
- Use a knife to create delicate swirls, merging the layers into an artistic marbled pattern.
- While the fudge remains warm, sprinkle holiday-themed decorative elements across the surface for added visual appeal.
- Transfer the pan to the refrigerator and chill for a minimum of 2 hours, allowing the fudge to set completely.
- Once firm, lift the fudge from the pan using the parchment paper overhang and slice into bite-sized squares ready for serving.
Notes
- Adjust the food coloring intensity by adding drops gradually to achieve your desired holiday color vibrancy.
- Swap white chocolate with dairy-free alternatives like coconut milk-based chips for vegan-friendly Christmas fudge.
- Use a metal offset spatula for ultra-smooth layer spreading and precise marbling techniques.
- Ensure low, gentle heat when melting chocolate to prevent scorching and maintain silky texture.
- Prep Time: 25 minutes
- Cook Time: 2 hours
- Category: Desserts, Snacks
- Method: Baking
- Cuisine: American
Nutrition
- Serving Size: 12
- Calories: 170
- Sugar: 20g
- Sodium: 50mg
- Fat: 7g
- Saturated Fat: 4g
- Unsaturated Fat: 2g
- Trans Fat: 0g
- Carbohydrates: 26g
- Fiber: 0g
- Protein: 1g
- Cholesterol: 5mg
Angelina Wiles
Content Editor & Culinary Enthusiast
Expertise
Food Writing and Editing, Vegetarian and Vegan Cuisine, Baking and Pastry Arts, Sustainable Cooking Practices
Education
Portland Community College
Certificate in Culinary Arts
Focus: Emphasis on sustainable cooking practices, vegetarian cuisine, and food writing.
Oregon Culinary Institute
Diploma in Baking and Pastry Arts
Focus: Specialized training in artisanal baking, pastry techniques, and dessert presentation.
Angelina’s love for cooking started with handwritten family recipes and weekend trips to farmers’ markets around Portland. She followed her passion with a Certificate in Culinary Arts from Portland Community College, then perfected her sweet side with a Diploma in Baking and Pastry Arts at Oregon Culinary Institute.
Angelina believes recipes should feel like a conversation, not a science project. She’s all about helping readers trust themselves in the kitchen with simple steps, fresh ideas, and easy twists on classic meals.
When she’s not editing recipes, she’s baking bread, sipping coffee, or getting inspired by the changing seasons.