Fluffy Chocolate Snowball Cookies Recipe That Melts Hearts
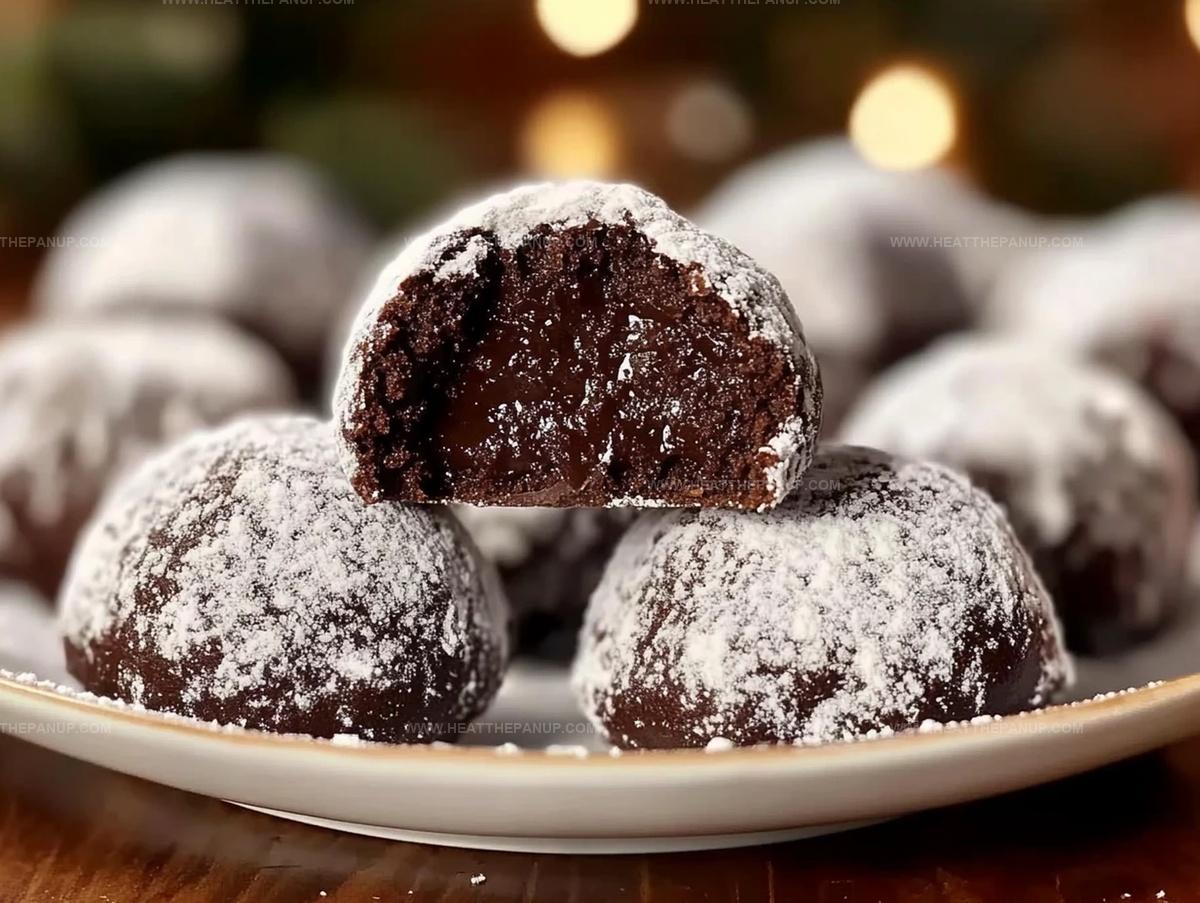
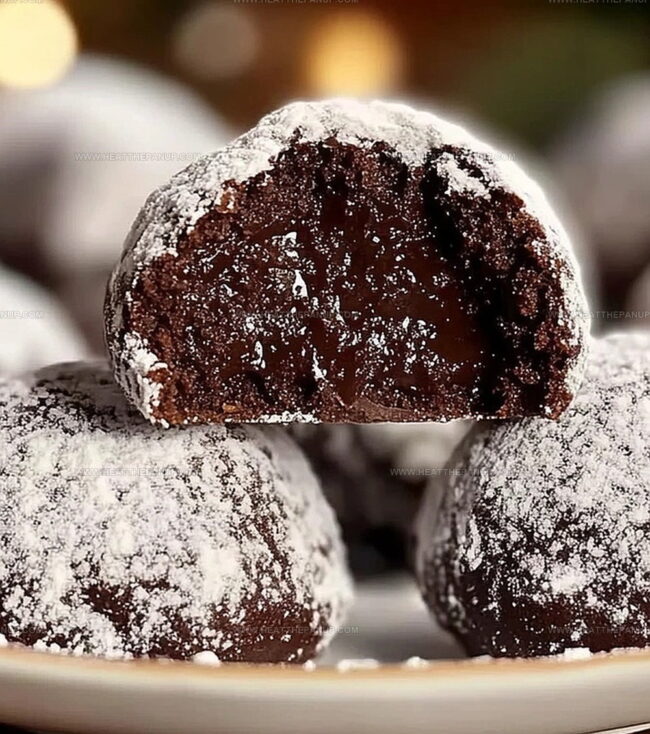
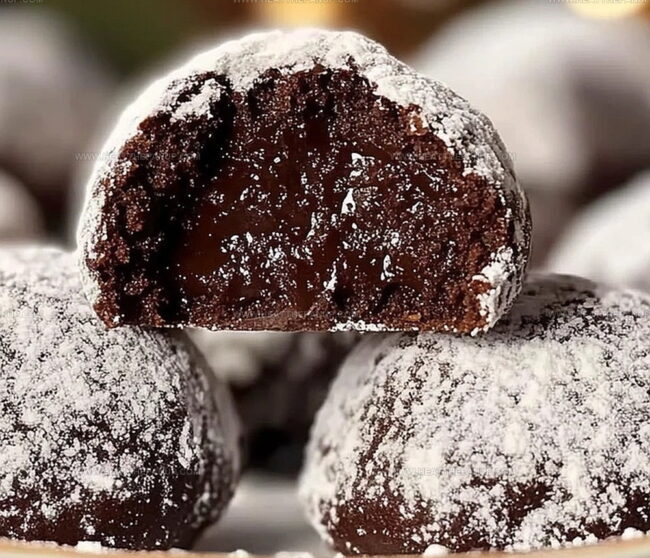
Sweet moments of joy burst forth with these delightful chocolate snowball cookies that melt in your mouth.
Winter gatherings sparkle with these delectable treats nestled on festive plates.
Powdered sugar coats each soft, crumbly cookie like a gentle snowfall.
Chocolate lovers relish the rich, nutty flavor packed into every bite.
The recipe brings warmth and comfort to chilly afternoons.
Sharing these cookies creates memories that linger long after the last crumb disappears.
These irresistible morsels will become your new favorite holiday tradition.
Why Snowball Cookies Are a Holiday Staple
What You Need for Chocolate Snowball Cookies
Chocolate Base Ingredients:Dry Ingredients:Optional Add-Ins:Coating:How to Bake Rich Chocolate Snowballs
Step 1: Warm Up the Oven
Get your oven ready by heating it to 350°F.
Line a baking sheet with parchment paper to prevent sticking and make cleanup a breeze.
Step 2: Whip Up the Base
Grab a large mixing bowl and cream together softened butter and powdered sugar until the mixture becomes light and fluffy.
Splash in vanilla extract for an extra burst of flavor.
Step 3: Blend Dry Ingredients
Carefully sift flour, cocoa powder, and salt into the buttery mixture.
Stir gently until the dough becomes smooth and completely combined.
The rich chocolate color will start to emerge.
Step 4: Optional Nutty Twist
If you’re feeling adventurous, fold in chopped nuts to add a delightful crunch:Mix the nuts evenly throughout the dough.
Step 5: Shape the Delights
Roll the dough into perfect bite-sized balls, each about 1 inch in diameter.
Arrange them on the prepared baking sheet, leaving a small space between each cookie.
Step 6: Bake to Perfection
Slide the baking sheet into the preheated oven.
Bake for 12-15 minutes until the edges look set and slightly firm.
Let the cookies rest on the baking sheet for 5 minutes after removing from the oven.
Step 7: Create the Snowy Coating
While the cookies are still warm, gently roll them in powdered sugar for the first layer of “snow”.
Once completely cooled, give them a second roll in powdered sugar to create that magical, frost-covered look.
Tips for Buttery, Powdery Cookie Bites
How to Keep Snowball Cookies Fresh
Sweet Pairings for Chocolate Snowballs
Creative Cookie Variations to Try
FAQs
No, they’re super easy! Even beginner bakers can master this recipe with simple ingredients and basic mixing techniques.
Absolutely! The recipe works perfectly fine without nuts. Just skip the nut-folding step, and your cookies will still be delicious.
Keep your butter at room temperature and mix the dough gently. Avoid overmixing, which can make the cookies dry and prone to cracking.
The first coating happens while the cookies are warm, which helps the sugar stick better. The second coating when they’re cool creates that classic snowy, powdery look and adds extra sweetness.
Print
Chocolate Snowball Cookies Recipe
- Total Time: 40 minutes
- Yield: 24 1x
Description
Delightful Mexican wedding cookies bring holiday magic through rich chocolate snowball cookies dusted with powdered sugar. Crisp pecans and buttery texture create an irresistible winter treat you’ll savor with each delicate, melt-in-your-mouth bite.
Ingredients
Main Ingredients:
- 2 cups all-purpose flour
- 1 cup unsalted butter, softened
- 1/4 cup cocoa powder
Binding and Flavor Ingredients:
- 1/2 cup powdered sugar (plus extra for rolling)
- 1 teaspoon vanilla extract
- 1/2 teaspoon salt
Optional Ingredient:
- 1 cup finely chopped nuts (such as pecans or walnuts)
Instructions
- Prepare a pristine workspace and gather all necessary ingredients for these decadent chocolate confections.
- Utilize an electric mixer to thoroughly blend softened butter with powdered sugar until the mixture achieves a velvety, cloud-like consistency.
- Incorporate vanilla extract, ensuring it’s evenly distributed throughout the creamy base.
- Carefully sift cocoa powder, flour, and salt directly into the butter mixture, gently folding until a uniform chocolate dough emerges.
- If desired, delicately introduce chopped nuts, distributing them with a light touch to maintain the dough’s delicate texture.
- Craft uniform spheres approximately one inch in diameter, placing them methodically on a parchment-lined baking sheet with gentle spacing.
- Position the cookie sheet in a preheated oven, allowing the delicate morsels to transform for 12-15 minutes until subtle edges become firm.
- Remove from oven and permit cookies to rest momentarily, cooling slightly but remaining warm to the touch.
- While still gently heated, gracefully enrobe each cookie in a cloud of powdered sugar, creating an initial snowy layer.
- After complete cooling, perform a second delicate dusting of powdered sugar, ensuring a luxurious, frost-like finish that mimics fresh winter snowfall.
Notes
- Swap butter with plant-based alternatives for a vegan version of these delightful cookies, ensuring everyone can enjoy the sweet treat.
- Experiment with different nut varieties like almonds or pecans to add unique texture and flavor dimensions to the classic recipe.
- Control cookie size by using a small cookie scoop for consistent, perfectly round snowball cookies that bake evenly.
- Store cookies in an airtight container with parchment paper between layers to maintain their delicate powdered sugar coating and prevent sticking.
- Prep Time: 25 minutes
- Cook Time: 15 minutes
- Category: Desserts, Snacks
- Method: Baking
- Cuisine: American
Nutrition
- Serving Size: 24
- Calories: 160
- Sugar: 2 g
- Sodium: 50 mg
- Fat: 10 g
- Saturated Fat: 4 g
- Unsaturated Fat: 6 g
- Trans Fat: 0 g
- Carbohydrates: 18 g
- Fiber: 1 g
- Protein: 2 g
- Cholesterol: 30 mg
James Hambly
Founder & Recipe Creator
Expertise
Recipe Development, Culinary Education, Farm-to-Table Cooking, Southern Cuisine
Education
Asheville-Buncombe Technical Community College
Certificate in Culinary Arts
Focus: Hands-on training in professional cooking techniques, emphasizing farm-to-table practices and Southern cuisine.
The Chef’s Academy
Associate Degree in Culinary Arts
Focus: Comprehensive culinary education covering global cuisines, kitchen management, and food safety.
James grew up surrounded by the smells of cast-iron skillets and slow-cooked Southern meals in Asheville, North Carolina.
He sharpened his skills with a Certificate in Culinary Arts from Asheville-Buncombe Technical Community College, and later leveled up with an Associate Degree from The Chef’s Academy.
James’s philosophy is simple: the best meals don’t need fancy tricks, just fresh ingredients, a hot pan, and a little bit of heart. His favorite days are spent testing one-pan wonders, chasing bold flavors, and creating recipes that feel easy, even on a busy night.