
Fluffy Chocolate Meringue Easter Nests Recipe: A Joyful Treat
Sweet chocolate meringue easter nests might just become your newest spring obsession.
Crisp egg-shaped treats sparkle with delicate charm and whimsy.
Delightful confections whisper memories of childhood celebrations and pastel-colored joy.
Light as air and rich with cocoa, these miniature nests promise pure delight.
Delicate peaks of meringue cradle tiny chocolate eggs with elegant simplicity.
Each bite transports you to a world of sugary magic.
Craving a dessert that looks stunning and tastes incredible?
Dive into this playful recipe and create something truly special.
Chocolate Meringue Nests That Make Easter Extra Sweet

Chocolate Meringue Easter Nests Ingredient Set
Main Ingredients:Flavor Enhancers:Decoration and Finishing:Chocolate Meringue Easter Nest Guide
Step 1: Whip Up Magical Meringue
Warm your oven to a gentle 250°F and line a baking sheet with parchment paper.
Grab a sparkling clean mixing bowl and start beating egg whites with an electric mixer.
Watch them transform from liquid to foamy goodness.
Sprinkle in cream of tartar, then slowly rain sugar into the mixture, one tablespoon at a time.
Keep beating until the mixture stands up in glossy, stiff peaks that look like silky clouds.
Gently fold in:Blend carefully to keep that beautiful airiness intact.
Step 2: Shape Chocolate Nests
Carefully transfer your meringue mixture into a piping bag with a large star tip (or use a spoon for a rustic touch).
Create delicate nest circles about 3 inches wide on your prepared baking sheet.
Use the back of a spoon to press a gentle hollow in the center of each nest, creating a cozy spot for your sweet surprises.
Step 3: Bake with Patience
Slide the baking sheet into the oven and bake for one full hour.
After the timer dings, turn off the oven and let the meringues rest inside for another 30 minutes.
This slow cooling prevents unsightly cracks and ensures perfect texture.
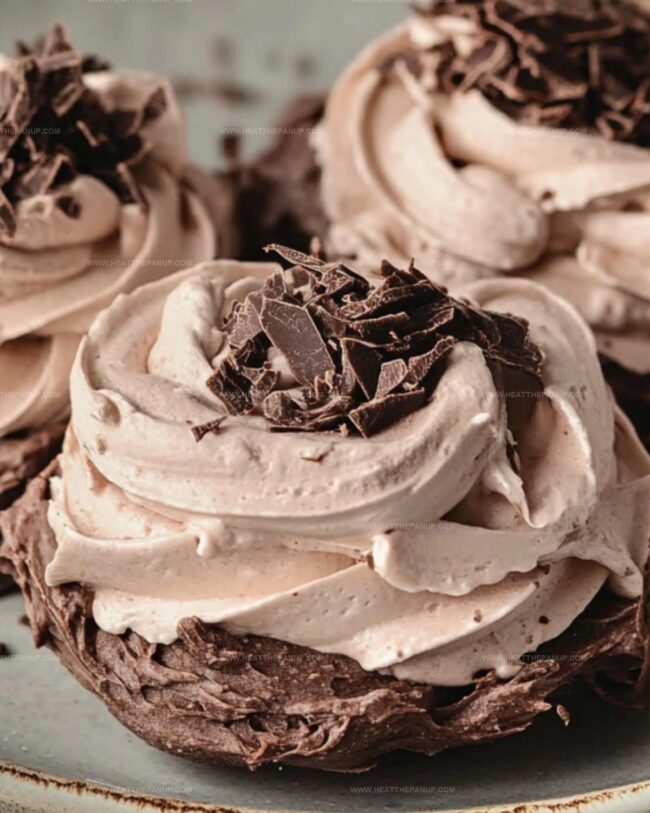
Step 4: Decorate and Delight
Fill each nest’s center with:Top with a playful assortment of:Finish with a sprinkle of chocolate shavings for an extra touch of decadence.
Your chocolate meringue Easter nests are ready to dazzle and delight!
Meringue Nest Tips That Make Easter Extra Sweet

Store Chocolate Meringue Easter Nests
Chocolate Meringue Easter Nests Complements
Meringue Nests in Chocolate Easter Themes
FAQs
The meringue is ready when stiff, glossy peaks form and hold their shape. When you lift the beater, the peaks should stand straight up without falling over, which typically takes 5-6 minutes of beating.
Yes, but cream of tartar helps stabilize the egg whites and create a more consistent texture. If you don’t have it, you can substitute with a few drops of lemon juice or white vinegar.
Cracking usually happens when meringues cool too quickly. Always let them cool slowly in the turned-off oven to prevent sudden temperature changes that cause cracking.
Ensure your mixing bowl and beaters are completely clean and free from any oil or grease. Even a small amount of fat can prevent egg whites from forming stiff peaks.
Print
Chocolate Meringue Easter Nests Recipe
- Total Time: 1 hour 15 minutes
- Yield: 12 1x
Description
Sweet chocolate meringue easter nests bring playful springtime charm to dessert tables. Delicate chocolate swirls nestled with pastel egg candies offer delightful crunch and whimsy you can savor in each delectable bite.
Ingredients
Meringue Base:
- 4 large egg whites (room temperature)
- 1 cup (200 grams) granulated sugar
- 1/4 teaspoon cream of tartar
- 1/4 cup (25 grams) unsweetened cocoa powder
- 1 teaspoon vanilla extract
- 1 ounce (28 grams) melted dark chocolate
Decoration Toppings:
- 1 cup whipped cream or chocolate ganache
- Mini chocolate eggs
- Jelly beans
- Malted milk eggs
- Chocolate shavings
Instructions
- Prepare the workspace by sanitizing all utensils and ensuring a pristine, moisture-free environment for crafting delicate meringue structures.
- Whip egg whites using an electric mixer on medium speed until they transform into a frothy, airy texture with soft bubbles forming.
- Gradually incorporate cream of tartar to stabilize the egg whites, then slowly introduce sugar, one tablespoon at a time, while continuously whisking.
- Continue beating until the mixture develops glossy, stiff peaks that hold their shape distinctly when the whisk is lifted, approximately 5-6 minutes of consistent mixing.
- Gently fold cocoa powder, vanilla extract, and melted chocolate into the meringue, using a delicate folding technique to maintain the mixture’s voluminous structure.
- Transfer the chocolate meringue into a piping bag fitted with a large star tip, or carefully spoon the mixture onto a parchment-lined baking sheet.
- Create circular nest formations approximately 3 inches in diameter, using gentle piping or careful spooning techniques.
- Use the back of a spoon to create a subtle indentation in the center of each meringue nest, forming a delicate cradle for future decorations.
- Position the baking sheet in a preheated oven set at 250°F (120°C) and bake for one hour to achieve a crisp, delicate texture.
- After baking, turn off the oven and allow meringues to cool slowly inside for an additional 30 minutes, preventing potential cracking.
- Once completely cooled, delicately fill the nest centers with luxurious whipped cream or rich chocolate ganache.
- Embellish the nests with an assortment of chocolate eggs, colorful jelly beans, or malted milk eggs for a festive presentation.
- Finish by sprinkling fine chocolate shavings over the nests, adding a final touch of decadent elegance to these chocolate meringue creations.
Notes
- Ensure your mixing bowl is completely grease-free and dry to help egg whites whip properly and achieve maximum volume.
- Use room temperature egg whites for faster and more stable meringue peaks that hold their shape better during baking.
- Low and slow baking prevents cracking and creates a crisp, delicate meringue texture with a soft marshmallow-like center.
- Customize these nests for dietary needs by using alternative sweeteners like stevia or monk fruit for a lower-sugar version, and swap chocolate eggs with nuts or dried fruit for vegan options.
- Prep Time: 15 minutes
- Cook Time: 1 hour
- Category: Desserts
- Method: Baking
- Cuisine: British
Nutrition
- Serving Size: 12
- Calories: 120
- Sugar: 10 g
- Sodium: 5 mg
- Fat: 2 g
- Saturated Fat: 1 g
- Unsaturated Fat: 1 g
- Trans Fat: 0 g
- Carbohydrates: 28 g
- Fiber: 0 g
- Protein: 2 g
- Cholesterol: 0 mg
Angelina Wiles
Content Editor & Culinary Enthusiast
Expertise
Food Writing and Editing, Vegetarian and Vegan Cuisine, Baking and Pastry Arts, Sustainable Cooking Practices
Education
Portland Community College
Certificate in Culinary Arts
Focus: Emphasis on sustainable cooking practices, vegetarian cuisine, and food writing.
Oregon Culinary Institute
Diploma in Baking and Pastry Arts
Focus: Specialized training in artisanal baking, pastry techniques, and dessert presentation.
Angelina’s love for cooking started with handwritten family recipes and weekend trips to farmers’ markets around Portland. She followed her passion with a Certificate in Culinary Arts from Portland Community College, then perfected her sweet side with a Diploma in Baking and Pastry Arts at Oregon Culinary Institute.
Angelina believes recipes should feel like a conversation, not a science project. She’s all about helping readers trust themselves in the kitchen with simple steps, fresh ideas, and easy twists on classic meals.
When she’s not editing recipes, she’s baking bread, sipping coffee, or getting inspired by the changing seasons.