
The Perfect Butterfinger Balls Recipe for Sweet Tooth Joy
Whipping up these delectable butterfinger balls sparks pure joy in any kitchen adventure.
Sweet cravings meet playful creativity with this simple dessert delight.
Chocolate lovers understand the magnetic pull of crushed candy and creamy textures.
Childhood memories dance through each bite of these irresistible treats.
Small gatherings become magical moments when you share these bite-sized confections.
Nobody can resist the combination of peanut butter and crispy candy crunch.
Prepare to surprise everyone with this wickedly easy no-bake sensation that promises smiles all around.
Why Butterfinger Balls Are So Addictive

Ingredients in Crunchy Butterfinger Balls
Base Ingredients:Coating Ingredients:Optional Decorative Ingredients:How to Make These No-Bake Candy Balls

Step 1: Blend Flavor Foundations
In a spacious mixing bowl, combine the delightful ingredients:Stir everything together until the mixture forms a cohesive and smooth consistency.
Step 2: Shape Delectable Spheres
Gently roll the mixture into small, bite-sized balls using your hands.
Each ball should be approximately one inch in diameter.
Place the formed balls on a clean baking sheet.
Step 3: Chill and Firm
Transfer the baking sheet with the balls to the refrigerator.
Allow them to cool and firm up for about 30 minutes.
This chilling process helps the balls maintain their shape during the chocolate coating.
Step 4: Prepare Chocolate Coating
Melt the chocolate almond bark following the package instructions.
You can use a double boiler or microwave, stirring carefully to ensure smooth melting.
Step 5: Chocolate Dipping Technique
Remove the chilled balls from the refrigerator.
Using a fork or dipping tool, carefully submerge each ball into the melted chocolate, ensuring complete coverage.
Gently tap off excess chocolate.
Step 6: Final Resting and Setting
Place the chocolate-coated balls on parchment or wax paper.
Let them sit at room temperature until the chocolate completely sets and hardens.
Tips to Shape and Coat Butterfinger Balls
Store Butterfinger Balls to Keep Fresh
What to Serve with Butterfinger Treats
Different Styles for Making Butterfinger Balls
FAQs
Yes, you can substitute Butterfinger with other candy bars like Reese’s or Crunch bars for a similar crunchy texture and flavor profile.
These treats can be stored in an airtight container in the refrigerator for up to 5-7 days, maintaining their texture and taste.
No, the recipe includes graham cracker crumbs which contain gluten. To make them gluten-free, use gluten-free graham cracker alternatives or crushed gluten-free cookies.
Absolutely! You can freeze these balls in a sealed container for up to 3 months. Thaw them in the refrigerator before serving for the best texture.
Print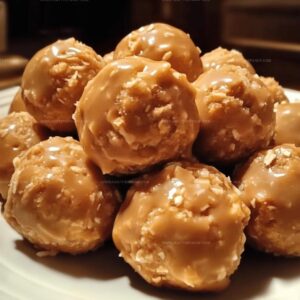
Chippy Butterfinger Balls Recipe
- Total Time: 20 minutes
- Yield: 24 1x
Description
Irresistible Butterfinger balls deliver a crunchy, chocolatey sensation that melts in your mouth with pure indulgence. Sweet peanut butter centers coated in rich chocolate create a delightful treat sure to satisfy chocolate and candy cravings.
Ingredients
Main Ingredients:
- 2 cups (473 ml) crushed Butterfinger candy bars
- 8 ounces (226 grams) cream cheese, softened
- 2 cups (340 grams) semi-sweet chocolate chips
Binding/Coating Ingredients:
- 1 tablespoon (15 ml) vegetable shortening (optional, for smoother dipping)
Decorative Ingredients:
- Butterfinger or chocolate sprinkles (optional)
Instructions
- Thoroughly pulverize Butterfinger candies into fine, uniform crumbs to ensure smooth textural consistency throughout the confection.
- Combine powdered sugar, pulverized graham crackers, crushed Butterfinger fragments, smooth peanut butter, and liquefied butter in a generous mixing vessel.
- Thoroughly incorporate all ingredients until a cohesive, moldable mixture forms with no dry pockets.
- Craft compact, uniform spheres approximately one inch in diameter using gentle, consistent pressure to maintain structural integrity.
- Transfer prepared confections onto a chilled tray and nestle in refrigerator for precisely 30 minutes to firm the interior and facilitate smooth chocolate coating.
- Gently melt chocolate almond bark using recommended tempering techniques, maintaining a silky, glossy consistency.
- Extract chilled spheres and rapidly immerse each one completely in molten chocolate, ensuring total coverage with minimal dripping.
- Delicately position chocolate-enrobed spheres onto parchment-lined surface, allowing excess chocolate to cascade gracefully.
- Allow confections to rest at room temperature until chocolate shell solidifies completely, creating a glossy, crisp exterior.
- Optional: Embellish with decorative sprinkles or additional crushed Butterfinger fragments while chocolate remains slightly tacky for enhanced visual appeal.
Notes
- Crush Butterfinger bars completely to avoid large chunks that might disrupt smooth ball formation.
- Chill mixture before shaping helps maintain perfect round shape and prevents sticky hands during rolling.
- For gluten-free version, replace graham cracker crumbs with gluten-free cookie crumbs or ground almonds.
- Store Butterfinger Balls in refrigerator for up to one week in airtight container to maintain freshness and texture.
- Prep Time: 20 minutes
- Cook Time: 0 minutes
- Category: Desserts, Snacks
- Method: Blending
- Cuisine: American
Nutrition
- Serving Size: 24
- Calories: 180
- Sugar: 14 g
- Sodium: 50 mg
- Fat: 10 g
- Saturated Fat: 5 g
- Unsaturated Fat: 4 g
- Trans Fat: 0 g
- Carbohydrates: 21 g
- Fiber: 1 g
- Protein: 2 g
- Cholesterol: 15 mg
Angelina Wiles
Content Editor & Culinary Enthusiast
Expertise
Food Writing and Editing, Vegetarian and Vegan Cuisine, Baking and Pastry Arts, Sustainable Cooking Practices
Education
Portland Community College
Certificate in Culinary Arts
Focus: Emphasis on sustainable cooking practices, vegetarian cuisine, and food writing.
Oregon Culinary Institute
Diploma in Baking and Pastry Arts
Focus: Specialized training in artisanal baking, pastry techniques, and dessert presentation.
Angelina’s love for cooking started with handwritten family recipes and weekend trips to farmers’ markets around Portland. She followed her passion with a Certificate in Culinary Arts from Portland Community College, then perfected her sweet side with a Diploma in Baking and Pastry Arts at Oregon Culinary Institute.
Angelina believes recipes should feel like a conversation, not a science project. She’s all about helping readers trust themselves in the kitchen with simple steps, fresh ideas, and easy twists on classic meals.
When she’s not editing recipes, she’s baking bread, sipping coffee, or getting inspired by the changing seasons.