The Cutest Carrot Patch Cupcakes Recipe for Spring Baking Fun
Whipping up these delightful carrot patch cupcakes will transport you straight into a whimsical garden of sweet surprises.
Soft, moist crumbs carry hints of warm spices and earthy carrots.
Kids absolutely adore decorating these playful treats with chocolate cookie “dirt” and adorable candy vegetable decorations.
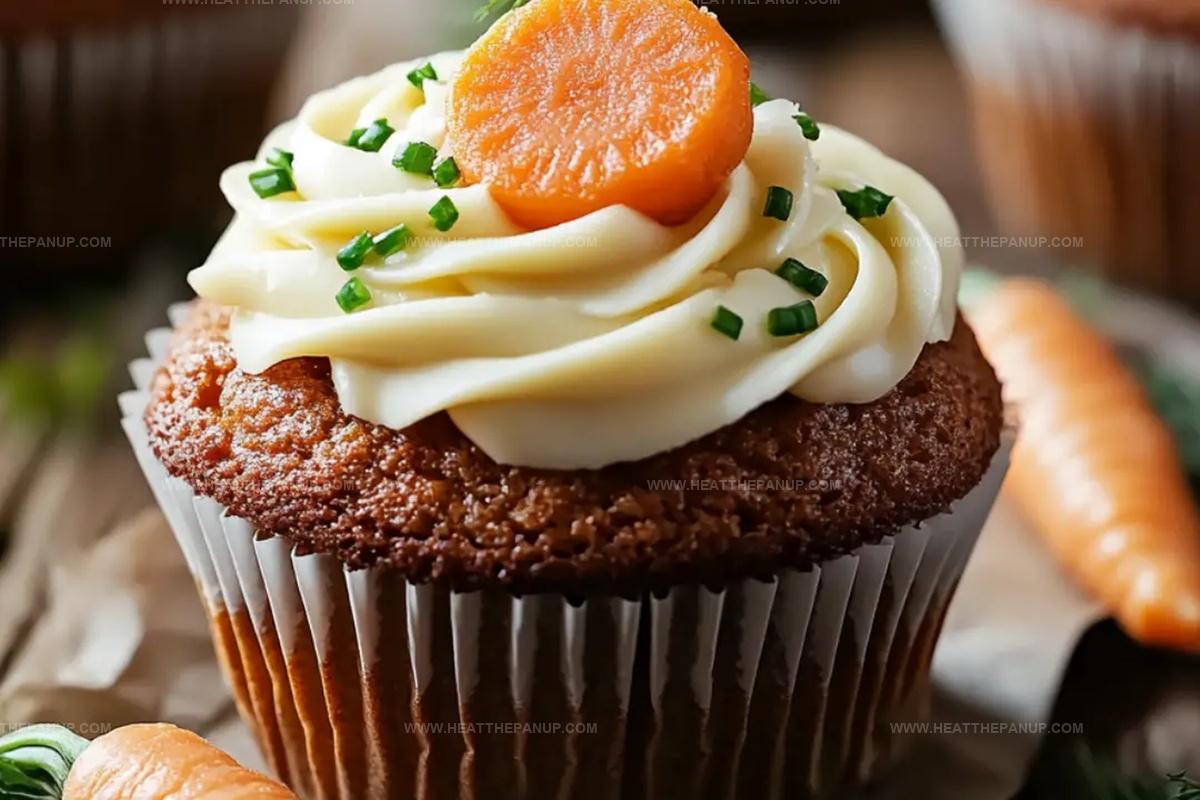
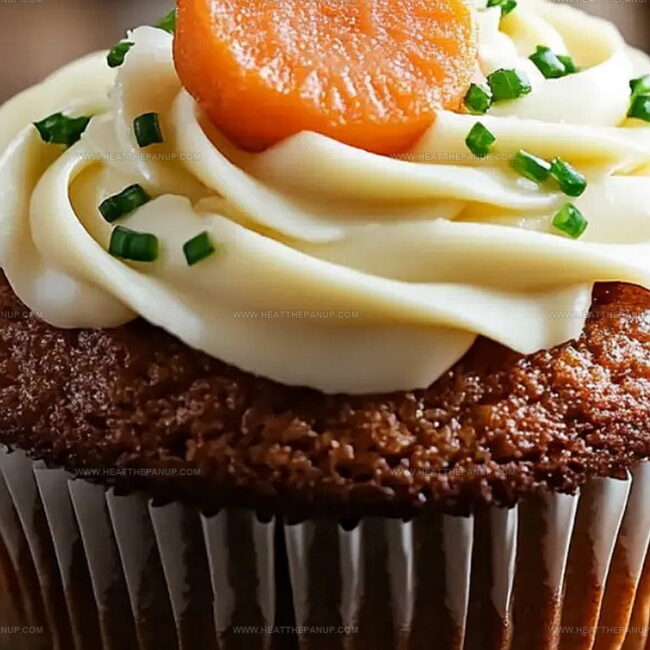
Cream cheese frosting adds a luxurious tang that balances the cake’s natural sweetness.
Baking together becomes an adventure of creativity and delicious memories.
Small hands love pressing gummy carrots into the frosted landscape.
Every bite promises a magical journey through a delectable miniature garden that sparks imagination and joy.
Carrot Patch Cupcakes That Look as Good as They Taste
Effortless Baking Adventure: Perfect for Bakers of All Skill Levels
Delightful Family Fun Project
Time-Efficient Dessert Solution
Versatile Seasonal Celebration Treat
Carrot Patch Cupcakes Ingredient Collection
Main Ingredients:
Cupcake Base:Liquid Components:Leavening Agents:Frosting Components:Decorative Ingredients:Flavoring and Coloring:Carrot Patch Cupcake Instructions
Step 1: Bake Chocolate Cupcake Base
Warm up the oven to 350°F and prepare a muffin tin with cupcake liners.
Combine dry ingredients in one bowl:In a separate bowl, whisk together wet ingredients:Add milk to the wet mixture and gently fold in dry ingredients until just combined.
Pour in hot coffee or water to create a smooth, slightly thin batter.
Fill cupcake liners about three-quarters full.
Slide the tin into the oven and bake for 18-20 minutes.
Check doneness by inserting a toothpick – it should come out clean.
Allow cupcakes to cool completely before decorating.
Step 2: Whip Up Creamy Buttercream
Cream butter until it becomes fluffy and light.
Gradually incorporate powdered sugar and mix thoroughly.
Pour in heavy cream and vanilla extract, beating until the frosting becomes silky and smooth.
Separate the frosting into two bowls.
Step 3: Add Vibrant Colors
Transform one frosting bowl into a bright orange for carrot shapes.
Convert the other bowl into a fresh green for carrot tops.
Transfer orange frosting to a piping bag with a round tip.
Fill the green frosting into a piping bag with a grass or leaf tip.
Step 4: Create Edible Garden Scene
Spread a thin layer of chocolate buttercream over each cupcake.
Sprinkle crushed Oreo cookies to mimic soil.
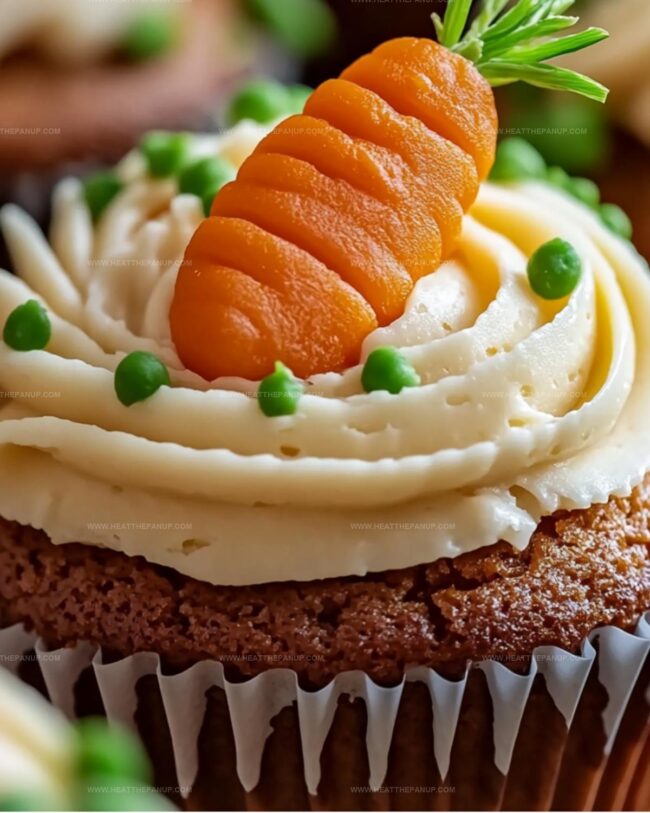
Pipe orange frosting in small cone-like shapes to represent carrots.
Add green leafy tops to each carrot using the green-tinted frosting.
Arrange the cupcakes to look like a charming miniature garden.
Cupcake Tricks That Bloom into a Carrot Patch Look

Add hot coffee or water to create a smooth, thin batter that enhances chocolate’s rich flavor without overwhelming the cupcake’s texture.
Mix ingredients just until combined, avoiding overmixing to maintain a moist, tender crumb that melts in your mouth.
Use different pastry tips for realistic carrot decorations – round tip for orange carrot body and grass/leaf tip for green carrot tops.
Beat butter thoroughly until fluffy, ensuring a light, creamy buttercream that spreads smoothly and tastes decadent.
Sprinkle crushed Oreos as “dirt” to add a crunchy element that complements the soft cupcake and smooth frosting.
Chill Carrot Patch Cupcakes
Carrot Patch Cupcakes Matches
Cupcakes with Carrot Patch Custom Designs
FAQs
The recipe uses melted butter, hot coffee or water, and a combination of cocoa powder and flour to create a rich, moist chocolate cupcake with deep flavor and tender crumb.
Beat butter until fluffy first, then gradually add powdered sugar. Add heavy cream and vanilla extract last, and beat until light and creamy. This ensures a smooth, spreadable buttercream that pipes easily.
Absolutely! While this recipe uses orange and green for the carrot design, you can customize food coloring to match any theme or preference. Use gel food coloring for more vibrant, concentrated colors without changing frosting texture.
Not at all! The carrot design is simple: use a round tip for orange “carrots” with short, cone-shaped strokes, and a grass or leaf tip for green leafy tops. Practice makes perfect, but even beginners can create a cute design.
Print
Carrot Patch Cupcakes Recipe
- Total Time: 40 minutes
- Yield: 12 1x
Description
Carrot patch cupcakes offer a whimsical garden-inspired dessert that delights with hidden chocolate “dirt” and adorable carrot decorations. Sweet cream cheese frosting and playful toppings make these treats a charming centerpiece for spring celebrations.
Ingredients
Carrot Patch Cupcakes Ingredients:
Main Ingredients:
- 3/4 cup granulated sugar
- 1/2 cup unsalted butter, melted
- 2 large eggs
- 1/2 cup whole milk
- 1/2 cup hot coffee or hot water
Dry Ingredients:
- 1 cup all-purpose flour
- 1/2 cup unsweetened cocoa powder
- 1 teaspoon baking powder
- 1/2 teaspoon baking soda
- 1/4 teaspoon salt
Flavoring and Decorative Ingredients:
- 1 teaspoon vanilla extract
- 10 Oreo cookies, crushed
- 1 cup unsalted butter, softened
- 2 cups powdered sugar
- 2 tablespoons heavy cream or milk
- 1/2 teaspoon vanilla extract
- Orange food coloring
- Green food coloring
Instructions
- Preheat the oven to 350°F (175°C) and prepare a 12-cup muffin tin with cupcake liners, ensuring even spacing.
- In a mixing bowl, combine the dry ingredients: flour, cocoa powder, baking powder, baking soda, and salt, whisking thoroughly to eliminate any lumps.
- In a separate large bowl, blend melted butter, sugar, eggs, and vanilla extract until the mixture becomes smooth and uniform.
- Gradually incorporate milk into the wet ingredients, then fold in the dry ingredient mixture, stirring until just combined to avoid overmixing.
- Gently stir in hot coffee or water, creating a smooth, slightly thin batter with a rich chocolate consistency.
- Carefully distribute the batter evenly among the cupcake liners, filling each approximately three-quarters full to allow room for rising.
- Bake in the preheated oven for 18-20 minutes, checking doneness by inserting a toothpick into the center—it should come out clean.
- Remove cupcakes from the oven and allow them to cool completely on a wire rack before proceeding with decoration.
- Cream the butter until light and fluffy, then gradually add powdered sugar, mixing until well incorporated.
- Pour in heavy cream and vanilla extract, beating the frosting until it becomes smooth and creamy.
- Divide the frosting into two separate bowls, using food coloring to create vibrant orange and green hues.
- Transfer the orange frosting to a piping bag fitted with a round tip, and the green frosting to a bag with a grass or leaf tip.
- Apply a thin layer of chocolate buttercream to each cupcake as a base.
- Sprinkle crushed Oreo cookies over the frosting to create a realistic “dirt” texture.
- Pipe small, tapered orange shapes to resemble carrots, using short, rounded strokes in a cone-like pattern.
- Finish by adding green leafy tops to each carrot using the leaf-tipped piping bag, creating a whimsical garden-inspired design.
Notes
- Customize coffee intensity by adjusting hot coffee strength or using hot water for milder chocolate flavor.
- Prevent dry cupcakes by precisely measuring flour and not overmixing batter to maintain moisture.
- Achieve smooth buttercream by ensuring butter is room temperature and sifting powdered sugar to eliminate lumps.
- Create gluten-free version by substituting all-purpose flour with almond or gluten-free flour blend.
- Prep Time: 20 minutes
- Cook Time: 20 minutes
- Category: Desserts
- Method: Baking
- Cuisine: American
Nutrition
- Serving Size: 12
- Calories: 300
- Sugar: 20 g
- Sodium: 200 mg
- Fat: 15 g
- Saturated Fat: 9 g
- Unsaturated Fat: 4 g
- Trans Fat: 0 g
- Carbohydrates: 40 g
- Fiber: 2 g
- Protein: 3 g
- Cholesterol: 50 mg
Angelina Wiles
Content Editor & Culinary Enthusiast
Expertise
Food Writing and Editing, Vegetarian and Vegan Cuisine, Baking and Pastry Arts, Sustainable Cooking Practices
Education
Portland Community College
Certificate in Culinary Arts
Focus: Emphasis on sustainable cooking practices, vegetarian cuisine, and food writing.
Oregon Culinary Institute
Diploma in Baking and Pastry Arts
Focus: Specialized training in artisanal baking, pastry techniques, and dessert presentation.
Angelina’s love for cooking started with handwritten family recipes and weekend trips to farmers’ markets around Portland. She followed her passion with a Certificate in Culinary Arts from Portland Community College, then perfected her sweet side with a Diploma in Baking and Pastry Arts at Oregon Culinary Institute.
Angelina believes recipes should feel like a conversation, not a science project. She’s all about helping readers trust themselves in the kitchen with simple steps, fresh ideas, and easy twists on classic meals.
When she’s not editing recipes, she’s baking bread, sipping coffee, or getting inspired by the changing seasons.