
The Ultimate Brownie Recipe: Fudgy Chocolate Bliss in Every Bite
Decadent chocolate brownies have been a sweet companion through countless cozy afternoons.
Memories of rich, fudgy squares often drift back to childhood kitchens.
Baking these treats connects us to moments of pure joy and comfort.
Chocolate lovers appreciate the deep, intense flavors that melt on your tongue.
Each bite promises a luxurious experience that goes beyond simple dessert.
Delicate yet robust, these brownies blend simplicity with indulgence.
Prepare to savor a classic recipe that never disappoints.
Why These Brownies Are Always a Favorite
What You’ll Need for Brownies
Dry Ingredients:Wet Ingredients:Chocolate and Sweet Components:Baking Instructions for Brownies
Step 1: Warm Up the Oven
Crank your oven to a toasty 350°F.
Grab a 9×13 inch baking pan and give it a quick spray with cooking oil.
Line the pan with parchment paper, letting the edges hang over the sides so you can easily lift out your delicious creation later.
Step 2: Create the Chocolate Chip Cookie Base
In a large mixing bowl, combine:Cream these ingredients together until they’re smooth and fluffy.
In a separate bowl, whisk:Gently fold the dry ingredients into the wet mixture.
Press this cookie dough evenly across the bottom of your prepared pan, creating a golden foundation for your decadent treat.
Step 3: Layer the Oreo Magic
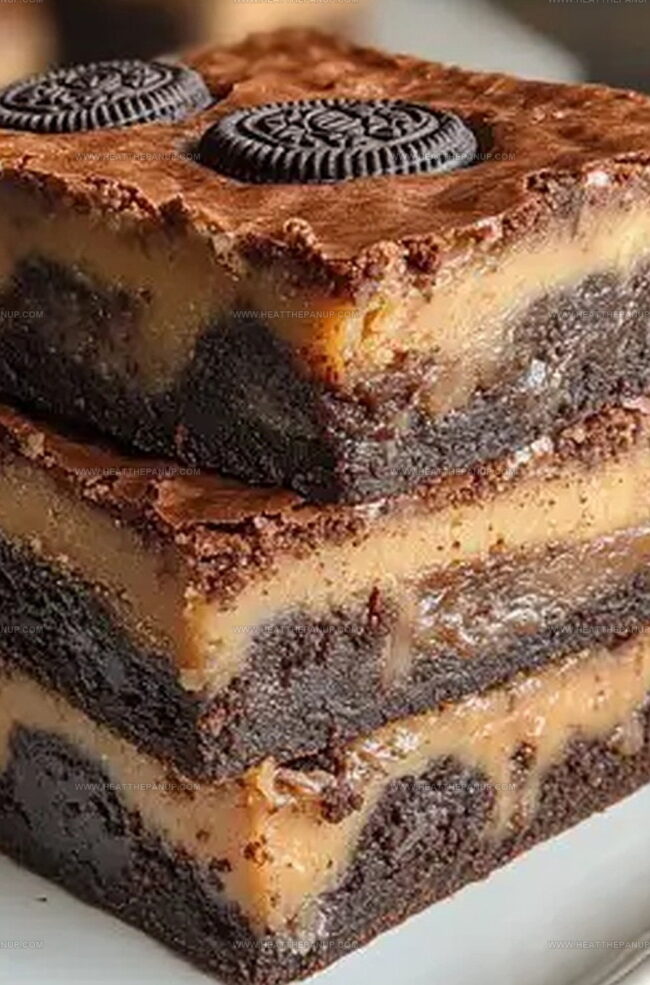
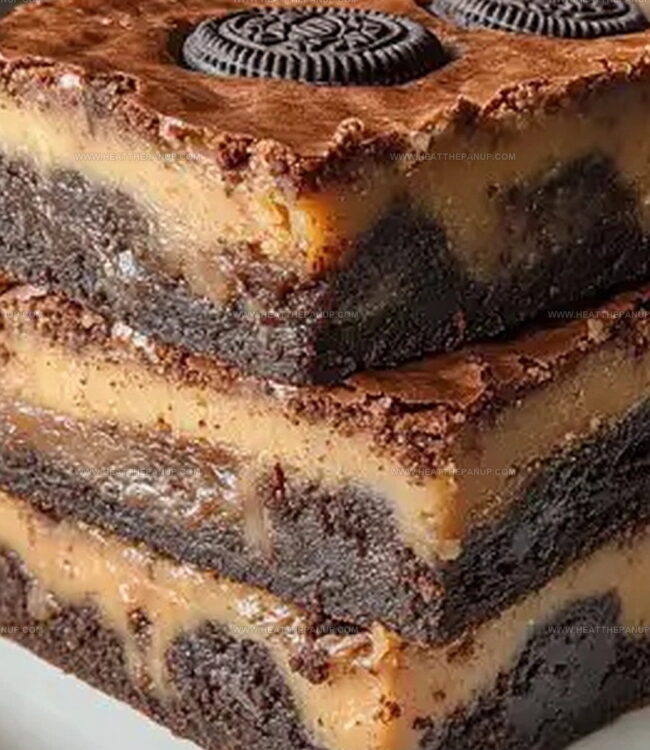
Carefully arrange a single layer of Oreo cookies directly on top of the cookie dough.
Cover the entire surface, breaking cookies if needed to fill any gaps.
Step 4: Craft the Brownie Topping
In a fresh bowl, melt together:Whisk in:In another bowl, mix:Combine wet and dry brownie ingredients, stirring until just mixed.
Pour this rich chocolate batter over the Oreo layer, making sure to cover everything completely.
Step 5: Bake to Perfection
Slide the pan into the preheated oven.
Bake for 35-40 minutes.
The top should look set and a toothpick inserted near the center should come out with a few moist crumbs.
Step 6: Cool and Slice
Remove from the oven and let cool completely in the pan.
Use the parchment paper overhang to lift the entire dessert out.
Cut into squares and serve.
Watch everyone’s eyes light up with pure dessert joy!
Brownie Tips for Fudgy Perfection
How to Store and Rewarm Brownies
What Goes Well with Brownies
Pair Decadent Chocolate Delight with Complementary Beverages and Sides
Fun Brownie Variations
FAQs
Yes, you can substitute dark chocolate for semi-sweet chocolate. Dark chocolate will create a richer, more intense chocolate flavor in your brownies. Just ensure you use the same weight or volume of chocolate called for in the original recipe.
Insert a toothpick into the center of the brownies. If it comes out with a few moist crumbs (not wet batter), the brownies are done. They should look set around the edges but slightly soft in the middle. Avoid overbaking to maintain a fudgy texture.
Use aluminum foil instead, greasing it lightly with butter or cooking spray. The foil should hang over the edges to help you lift the brownies out easily after baking. If you have neither parchment nor foil, generously grease the pan with butter or cooking spray.
Absolutely! Wrap the cooled brownies tightly in plastic wrap, then in aluminum foil. They can be frozen for up to 3 months. Thaw at room temperature for about 1-2 hours before serving.
Print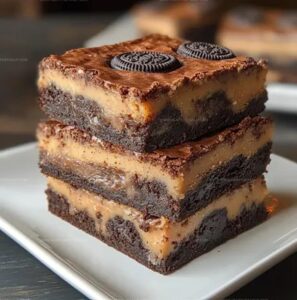
Brownies Recipe
- Total Time: 1 hour 10 minutes
- Yield: 12 1x
Description
Rich chocolate Brownies melt hearts with their irresistible fudgy goodness. Indulgent layers of intense cocoa and smooth texture invite chocolate enthusiasts to savor each heavenly bite.
Ingredients
Chocolate Base:
- 2/3 cups (120 grams) chocolate chips
- 1 1/2 cups (188 grams) all-purpose flour
- 3/4 cup (168 grams) unsalted butter, softened
Sweeteners and Binding:
- 1/2 cup (105 grams) brown sugar
- 1/2 cup (100 grams) white sugar
- 1 large egg
- 1 large egg yolk
Flavor Enhancers and Seasoning:
- 1 teaspoon vanilla extract
- 1/4 teaspoon salt
Instructions
- Prepare the baking vessel by coating a 9×13 inch pan with a light layer of grease and draping parchment paper across the surface, ensuring extended edges for effortless extraction.
- Craft the chocolate chip cookie foundation by thoroughly blending softened butter with white and brown sugars until the mixture achieves a smooth, creamy consistency.
- Incorporate eggs and vanilla extract into the cookie base, mixing until the ingredients are uniformly integrated and the texture appears light and fluffy.
- Gradually fold in flour, salt, and chocolate chips, stirring gently to create a cohesive cookie dough without overmixing.
- Press the cookie dough evenly across the bottom of the prepared pan, establishing a uniform base layer.
- Arrange a complete layer of Oreo cookies directly atop the cookie foundation, covering the entire surface with minimal gaps.
- Prepare the brownie mixture by melting chocolate and butter together, creating a rich, glossy liquid.
- Whisk sugar, eggs, and vanilla into the chocolate mixture, blending until the batter becomes silky and well-combined.
- Gently fold in cocoa powder, flour, and salt, stirring until just incorporated to maintain a dense, fudgy texture.
- Carefully pour the brownie batter over the Oreo layer, ensuring complete and even coverage.
- Transfer the pan to the preheated oven at 350°F and bake for approximately 35-40 minutes, watching for a slightly firm center and crackling surface.
- Remove from oven and allow the dessert to cool completely within the pan before lifting out using parchment paper edges.
- Slice into precise squares, revealing the delectable layers of cookie, Oreo, and brownie.
Notes
- Ensure your butter and chocolate are melted smoothly for a rich, silky brownie texture that prevents graininess.
- Avoid overmixing the batter to keep brownies tender and prevent a tough, dense result.
- Chill the brownies completely before cutting for clean, precise slices that showcase beautiful layers.
- For gluten-free version, swap regular flour with almond or gluten-free flour blend and use gluten-free Oreo-style cookies.
- Prep Time: 30 minutes
- Cook Time: 40 minutes
- Category: Desserts, Snacks
- Method: Baking
- Cuisine: American
Nutrition
- Serving Size: 12
- Calories: 250
- Sugar: 12 g
- Sodium: 50 mg
- Fat: 14 g
- Saturated Fat: 8 g
- Unsaturated Fat: 6 g
- Trans Fat: 0 g
- Carbohydrates: 33 g
- Fiber: 1 g
- Protein: 3 g
- Cholesterol: 30 mg
Angelina Wiles
Content Editor & Culinary Enthusiast
Expertise
Food Writing and Editing, Vegetarian and Vegan Cuisine, Baking and Pastry Arts, Sustainable Cooking Practices
Education
Portland Community College
Certificate in Culinary Arts
Focus: Emphasis on sustainable cooking practices, vegetarian cuisine, and food writing.
Oregon Culinary Institute
Diploma in Baking and Pastry Arts
Focus: Specialized training in artisanal baking, pastry techniques, and dessert presentation.
Angelina’s love for cooking started with handwritten family recipes and weekend trips to farmers’ markets around Portland. She followed her passion with a Certificate in Culinary Arts from Portland Community College, then perfected her sweet side with a Diploma in Baking and Pastry Arts at Oregon Culinary Institute.
Angelina believes recipes should feel like a conversation, not a science project. She’s all about helping readers trust themselves in the kitchen with simple steps, fresh ideas, and easy twists on classic meals.
When she’s not editing recipes, she’s baking bread, sipping coffee, or getting inspired by the changing seasons.