
Sweet & Fluffy Bisquick Cinnamon Rolls Recipe – Homemade Joy
Warm and gooey bisquick cinnamon rolls have been my weekend morning obsession lately.
Soft dough comes together quickly with a few simple ingredients from your pantry.
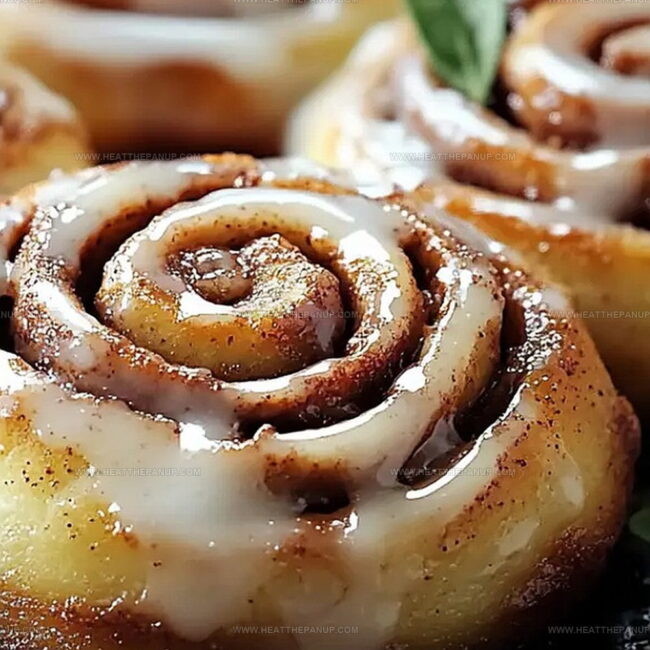
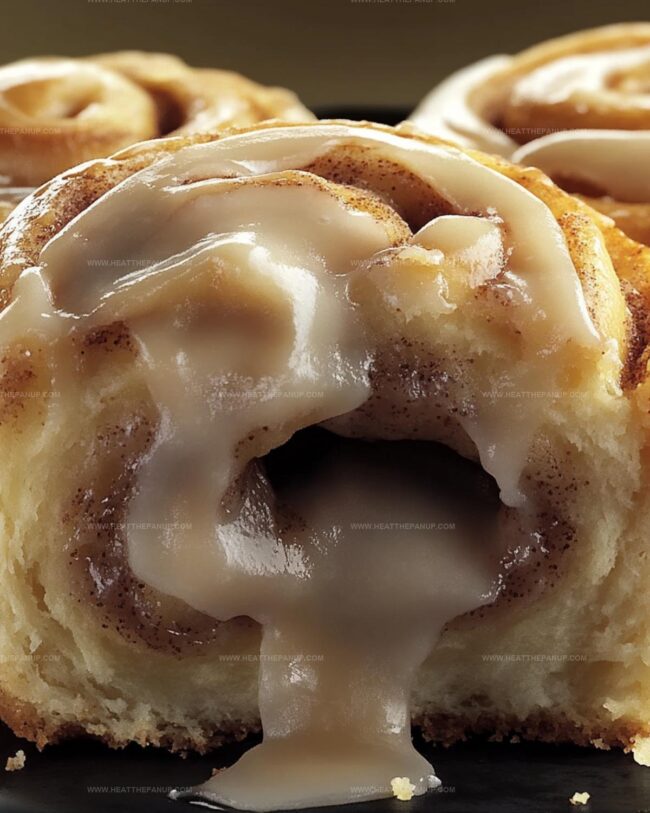
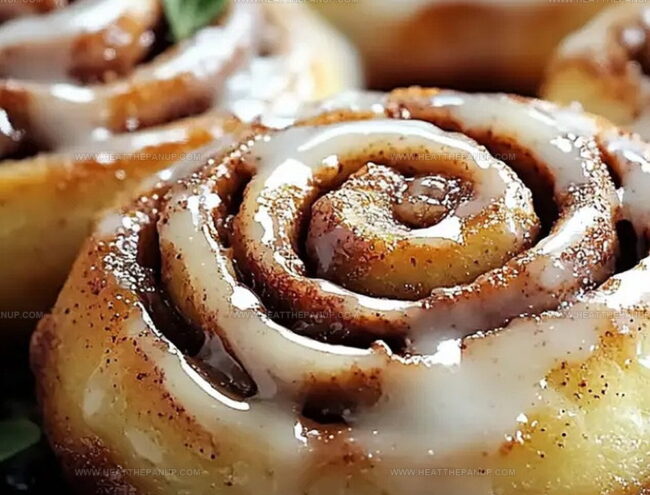
Sweet cinnamon swirls promise comfort in every delectable bite.
Comfort food doesn’t get much easier than this shortcut recipe.
Mornings feel magical when these rolls emerge from the oven, filling your kitchen with irresistible aromas.
Weekend breakfast just reached a whole new level of deliciousness.
You won’t believe how simple these rolls are to create from scratch.
Let’s turn an ordinary morning into something extraordinary with these mouthwatering treats.
Bisquick Cinnamon Rolls That Bake Up Fast
Ingredients for Bisquick Cinnamon Rolls
Main Ingredients:
Baking Base:Sweeteners and Spices:Binding and Richness:Filling Enhancers:
Liquid Ingredients:Thickening and Flavor Agents:Flavor Boosters:Optional Preparation Aids:
Coating and Prevention:How to Bake Bisquick Cinnamon Rolls at Home
Step 1: Warm Up The Oven
Crank the oven to a toasty 375°F.
This sets the stage for some serious cinnamon roll magic.
Step 2: Mix The Dough
Grab a big mixing bowl and toss in:Stir everything together until you’ve got a soft, pillowy dough that’s begging to be rolled out.
Step 3: Spread The Dough
Dust your countertop with a light sprinkle of flour.
Roll out the dough into a rectangle that’s about as thin as a quarter inch.
Make it look smooth and even.
Step 4: Create The Flavor Explosion
Slather the dough with melted butter from edge to edge.
In a separate bowl, blend:Shower this sweet-spicy mixture all over the buttered surface.
Step 5: Roll And Slice
Starting from the long side, gently roll the dough into a tight log.
Pinch the edges to seal in all that deliciousness.
Slice the log into 12 perfect rounds.
Step 6: Bake To Perfection
Nestle the rolls in a greased baking dish.
Pop them into the oven for 15-20 minutes until they turn a gorgeous golden brown.
Step 7: Drizzle With Glaze
Whisk together:Once the rolls are out and slightly cooled, shower them with the silky smooth glaze.
Enjoy your homemade treat!
Shortcut Cinnamon Roll Tips Using Bisquick
Store Bisquick Cinnamon Rolls
Hot Drinks for Bisquick Cinnamon Rolls
Bisquick Cinnamon Rolls with Topping Options
FAQs
No, this recipe is specifically designed for Bisquick mix. Substituting with all-purpose flour will change the texture and rise of the cinnamon rolls.
Look for a golden brown color on top and a firm, but soft texture when gently pressed. The edges should be slightly crispy and the center should not look doughy.
Yes, you can prepare the rolls up to the point of cutting and place them in the refrigerator overnight. In the morning, let them sit at room temperature for 30 minutes before baking.
Dust your work surface and hands with a bit more Bisquick mix or flour. If the dough remains too wet, add a small amount of Bisquick mix until it becomes manageable.
Print
Bisquick Cinnamon Rolls Recipe
- Total Time: 25 minutes
- Yield: 8 1x
Description
Homemade Bisquick cinnamon rolls bring sweet comfort straight from your kitchen to the breakfast table. Rich cinnamon swirls and delicate dough promise a delightful morning treat you cannot resist.
Ingredients
Main Ingredients:
- 2 cups (480 ml) Bisquick mix
- 1 egg
- 1/2 cup (120 ml) milk
Filling Ingredients:
- 1/4 cup (60 ml) melted butter
- 1/2 cup (100 g) brown sugar
- 1 tablespoon ground cinnamon
Glaze Ingredients:
- 1 cup (120 g) powdered sugar
- 2 tablespoons milk
- 1/2 teaspoon vanilla extract
- 1/4 cup (60 ml) melted butter
- 1/4 cup (50 g) sugar
Instructions
- Transform the Bisquick mixture into a soft, pliable dough by thoroughly blending Bisquick mix, milk, melted butter, sugar, and egg in a spacious mixing vessel until a cohesive texture emerges.
- Dust a clean work surface with flour and carefully manipulate the dough into a thin, uniform rectangular shape approximately ¼ inch thick, ensuring an even surface for filling.
- Generously coat the rolled dough with melted butter, creating a rich foundation for the sweet cinnamon layer.
- Craft a fragrant mixture of brown sugar and ground cinnamon, then meticulously distribute the blend across the buttered dough surface, ensuring comprehensive coverage.
- Expertly roll the dough from the longest edge, creating a tight cylindrical form, and delicately seal the edges to prevent filling escape.
- Slice the rolled dough into 12 harmonious segments, positioning each piece strategically within a well-greased baking vessel.
- Transfer the assembled rolls into a preheated 375°F oven, allowing them to transform into golden-brown delicacies over 15-20 minutes.
- Meanwhile, whisk powdered sugar, milk, and vanilla extract into a silky, smooth glaze.
- After removing the rolls from the oven, permit a brief cooling period before adorning them with the luxurious vanilla glaze, creating a decadent finishing touch.
Notes
- Swap regular milk with almond or oat milk for a dairy-free version that still maintains the rich, creamy texture of the rolls.
- Use coconut sugar instead of brown sugar to create a lower glycemic index option with a deeper caramel-like flavor.
- Enhance the dough’s moisture by adding a tablespoon of Greek yogurt, which helps create a softer, more tender cinnamon roll.
- Customize the spice blend by mixing ground cardamom or nutmeg with cinnamon for a more complex and aromatic filling that elevates the traditional recipe.
- Prep Time: 10 minutes
- Cook Time: 15 minutes
- Category: Breakfast, Snacks, Desserts
- Method: Baking
- Cuisine: American
Nutrition
- Serving Size: 8
- Calories: 250
- Sugar: 18 g
- Sodium: 300 mg
- Fat: 10 g
- Saturated Fat: 6 g
- Unsaturated Fat: 4 g
- Trans Fat: 0 g
- Carbohydrates: 36 g
- Fiber: 1 g
- Protein: 3 g
- Cholesterol: 40 mg
Angelina Wiles
Content Editor & Culinary Enthusiast
Expertise
Food Writing and Editing, Vegetarian and Vegan Cuisine, Baking and Pastry Arts, Sustainable Cooking Practices
Education
Portland Community College
Certificate in Culinary Arts
Focus: Emphasis on sustainable cooking practices, vegetarian cuisine, and food writing.
Oregon Culinary Institute
Diploma in Baking and Pastry Arts
Focus: Specialized training in artisanal baking, pastry techniques, and dessert presentation.
Angelina’s love for cooking started with handwritten family recipes and weekend trips to farmers’ markets around Portland. She followed her passion with a Certificate in Culinary Arts from Portland Community College, then perfected her sweet side with a Diploma in Baking and Pastry Arts at Oregon Culinary Institute.
Angelina believes recipes should feel like a conversation, not a science project. She’s all about helping readers trust themselves in the kitchen with simple steps, fresh ideas, and easy twists on classic meals.
When she’s not editing recipes, she’s baking bread, sipping coffee, or getting inspired by the changing seasons.