
Top Baked Chicken Taquitos Recipe: Crispy Homemade Goodness
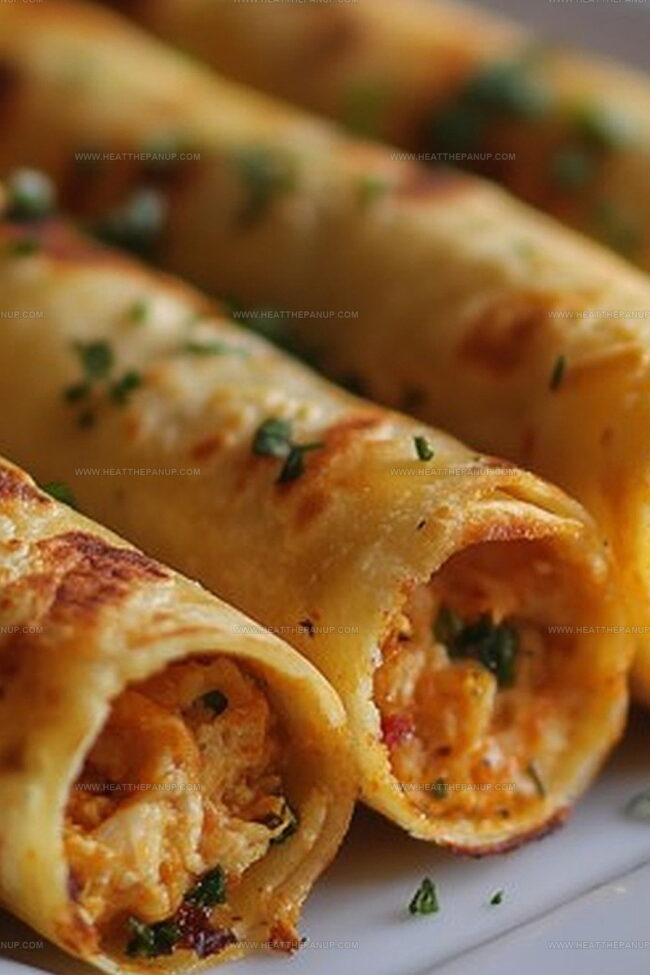
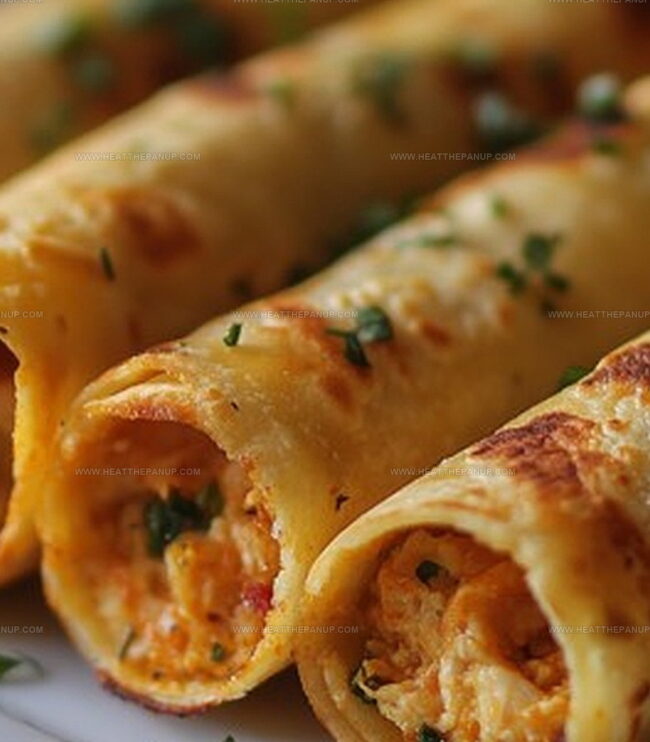
Everyone craves these crispy baked chicken taquitos that bring serious flavor to your dinner table.
Packed with zesty seasonings, they emerge golden and irresistible from the oven.
Tender shredded chicken nestles inside corn tortillas, creating a mouthwatering crunch in every bite.
Simple ingredients make this recipe a weeknight champion for busy home cooks.
Minimal prep work means you can whip these up faster than ordering takeout.
Cheese melts beautifully throughout, adding that perfect gooey texture everyone loves.
Let’s roll into this delicious adventure that will have everyone asking for seconds!
Why Baked Chicken Taquitos Are a Must-Try
What Goes into Baked Chicken Taquitos
Main Protein:Tortilla and Filling Base:Seasoning and Flavor Enhancers:Herbs and Garnish:Preparation Extras:Serving Suggestions:Step-by-Step Chicken Taquitos Recipe
Step 1: Fire Up the Oven
Crank the oven to 425 degrees Fahrenheit.
This superhot temperature will transform your taquitos into crispy, golden delights.
Step 2: Create Flavor Magic
Grab a large mixing bowl and combine these tasty ingredients:Whisk everything until smooth, then fold in shredded chicken and pepperjack cheese.
Mix until the chicken is completely coated with the zesty mixture.
Step 3: Warm the Tortillas
Make your tortillas flexible and ready to roll by:Step 4: Roll and Prepare
Scoop about 3 tablespoons of chicken mixture onto the lower third of each tortilla.
Roll tightly from the bottom, tucking in the sides to keep the filling secure.
Place each taquito seam-side down on a parchment-lined baking sheet.
Step 5: Crisp and Shine
Spritz the taquitos with cooking spray and sprinkle with kosher salt.
This creates a gorgeous golden exterior.
Slide the baking sheet into the preheated oven and bake for 15-20 minutes until they’re perfectly crisp and golden brown.
Step 6: Serve and Enjoy
Plate these sizzling taquitos hot and serve with your favorite dipping sauces like salsa, sour cream, or creamy guacamole.
Handy Tips for Chicken Taquitos
Reheating and Storing Chicken Taquitos
Sides That Pair with Chicken Taquitos
Creative Chicken Taquito Takes
FAQs
Both corn and flour tortillas work well. Corn tortillas provide a more traditional flavor and crispier texture, while flour tortillas are more pliable and softer. Choose based on your preference.
After rolling, place the taquitos seam-side down on the baking sheet. This helps seal the edge and prevents them from opening during baking. You can also use a toothpick to secure them if needed.
Yes, you can prepare the taquitos in advance and refrigerate them uncooked for up to 24 hours. When ready to bake, place them directly in the preheated oven and add 2-3 extra minutes to the cooking time.
Shredded rotisserie chicken is excellent for quick preparation. You can also use leftover roasted chicken, boiled chicken, or poached chicken breasts. Ensure the chicken is finely shredded for the best texture.
Print
Baked Chicken Taquitos Recipe
- Total Time: 40 minutes
- Yield: 6 1x
Description
Crispy golden baked chicken taquitos deliver a zesty Mexican-inspired delight packed with tender shredded chicken and melted cheese. Rolled tight and perfectly seasoned, these irresistible appetizers promise a crowd-pleasing crunch you’ll savor with every delicious bite.
Ingredients
Proteins:
- 2 cups shredded cooked chicken
- 1 cup pepperjack cheese, shredded
Seasonings and Flavor Enhancers:
- 3 ounces (85 grams) cream cheese, softened
- 1/4 cup (60 milliliters) salsa (red or green)
- 1 tablespoon (15 milliliters) lime juice
- 1/2 teaspoon cumin
- 1/2 teaspoon chili powder
- 1/2 teaspoon onion powder
- 2 cloves garlic, minced
- 3 tablespoons (45 milliliters) chopped cilantro or parsley
- 2 small scallions, diced
Additional Ingredients:
- 12 6-inch flour tortillas (see note below for corn tortillas)
- Cooking spray
- Kosher salt
Instructions
- Prepare the oven environment by heating to 425 degrees Fahrenheit, creating an ideal baking temperature for achieving crispy, golden taquitos.
- Create a flavor-packed filling by combining cream cheese, salsa, lime juice, cumin, chili powder, onion powder, garlic, cilantro, and scallions in a mixing bowl until smooth and uniform.
- Gently incorporate shredded chicken and pepperjack cheese into the seasoned mixture, ensuring even distribution of ingredients.
- Soften tortillas using a microwave method with damp paper towels or quickly warm them on a dry skillet to enhance flexibility and prevent cracking.
- Position each tortilla and carefully spread the chicken mixture along the lower third of the surface, leaving adequate margin for rolling.
- Roll the tortillas tightly and securely, tucking in edges to prevent filling from escaping during baking.
- Arrange rolled taquitos seam-side down on a parchment-lined baking sheet, maintaining slight separation between each roll.
- Lightly mist the taquito surfaces with cooking spray and sprinkle kosher salt to enhance crispiness and flavor profile.
- Transfer the baking sheet to the preheated oven and bake for 15-20 minutes, monitoring until the exterior turns golden brown and crisp.
- Remove from oven and let rest briefly before serving alongside complementary dips like salsa, sour cream, or guacamole.
Notes
- Prevent tortilla cracking by warming them slightly before rolling, which increases flexibility and reduces breakage.
- Experiment with different cheese varieties like cheddar or monterey jack for unique flavor profiles that suit personal taste preferences.
- Ensure even cooking by placing taquitos seam-side down and spacing them slightly apart on the baking sheet to allow hot air circulation.
- Create healthier versions by using whole wheat tortillas, adding extra vegetables like diced bell peppers, or using Greek yogurt instead of cream cheese for reduced fat content.
- Prep Time: 20 minutes
- Cook Time: 20 minutes
- Category: Lunch, Dinner, Appetizer
- Method: Baking
- Cuisine: Mexican
Nutrition
- Serving Size: 6
- Calories: 350
- Sugar: 1 g
- Sodium: 600 mg
- Fat: 18 g
- Saturated Fat: 9 g
- Unsaturated Fat: 7 g
- Trans Fat: 0 g
- Carbohydrates: 30 g
- Fiber: 2 g
- Protein: 20 g
- Cholesterol: 75 mg
Angelina Wiles
Content Editor & Culinary Enthusiast
Expertise
Food Writing and Editing, Vegetarian and Vegan Cuisine, Baking and Pastry Arts, Sustainable Cooking Practices
Education
Portland Community College
Certificate in Culinary Arts
Focus: Emphasis on sustainable cooking practices, vegetarian cuisine, and food writing.
Oregon Culinary Institute
Diploma in Baking and Pastry Arts
Focus: Specialized training in artisanal baking, pastry techniques, and dessert presentation.
Angelina’s love for cooking started with handwritten family recipes and weekend trips to farmers’ markets around Portland. She followed her passion with a Certificate in Culinary Arts from Portland Community College, then perfected her sweet side with a Diploma in Baking and Pastry Arts at Oregon Culinary Institute.
Angelina believes recipes should feel like a conversation, not a science project. She’s all about helping readers trust themselves in the kitchen with simple steps, fresh ideas, and easy twists on classic meals.
When she’s not editing recipes, she’s baking bread, sipping coffee, or getting inspired by the changing seasons.