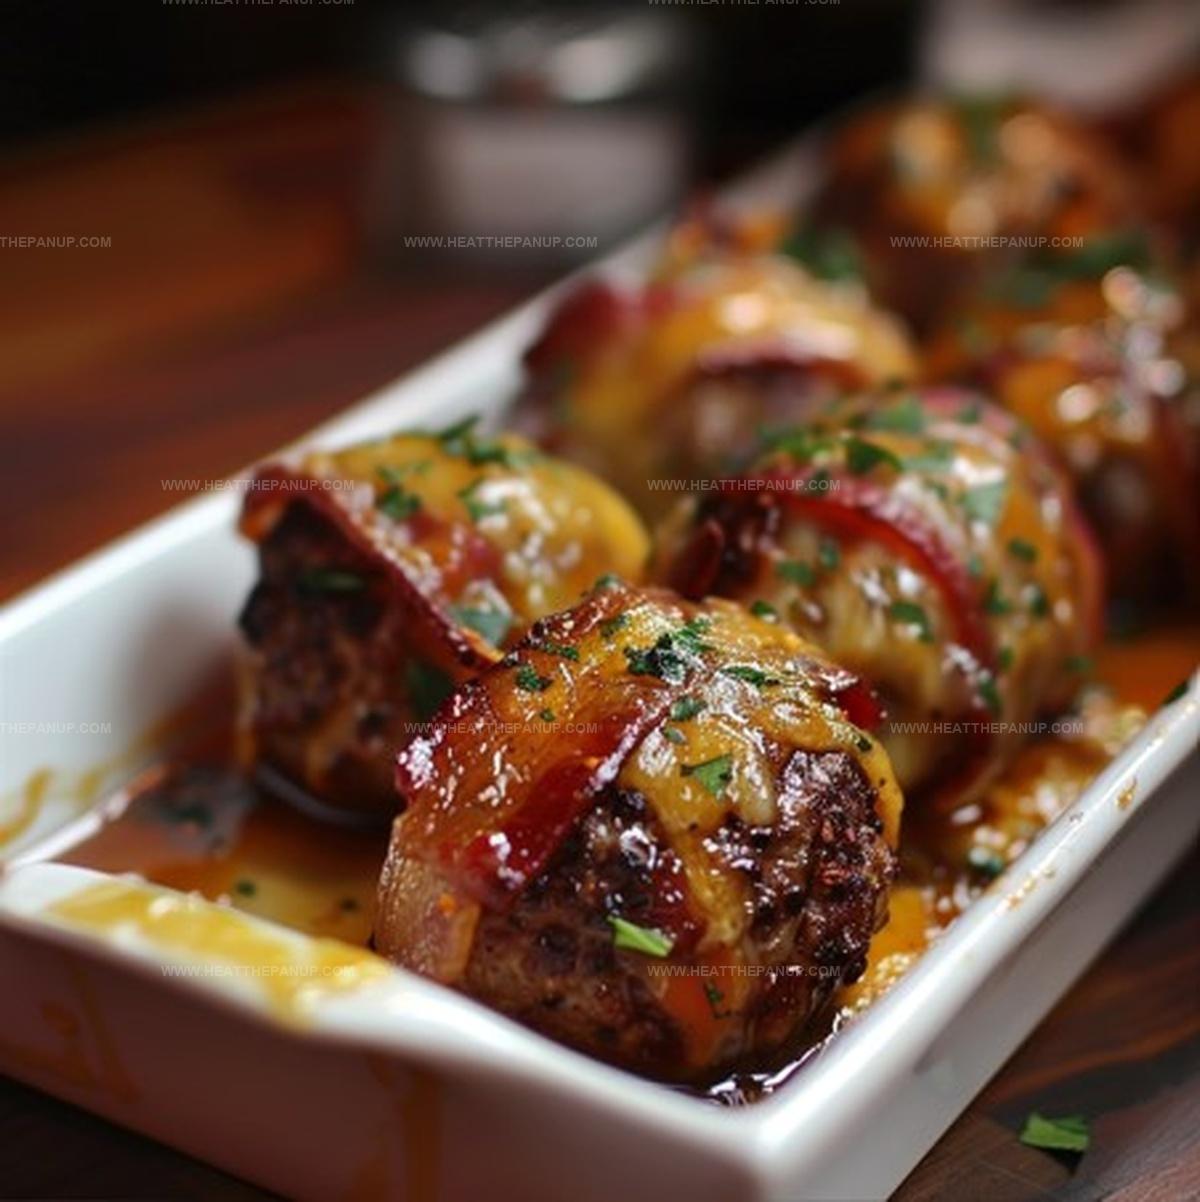
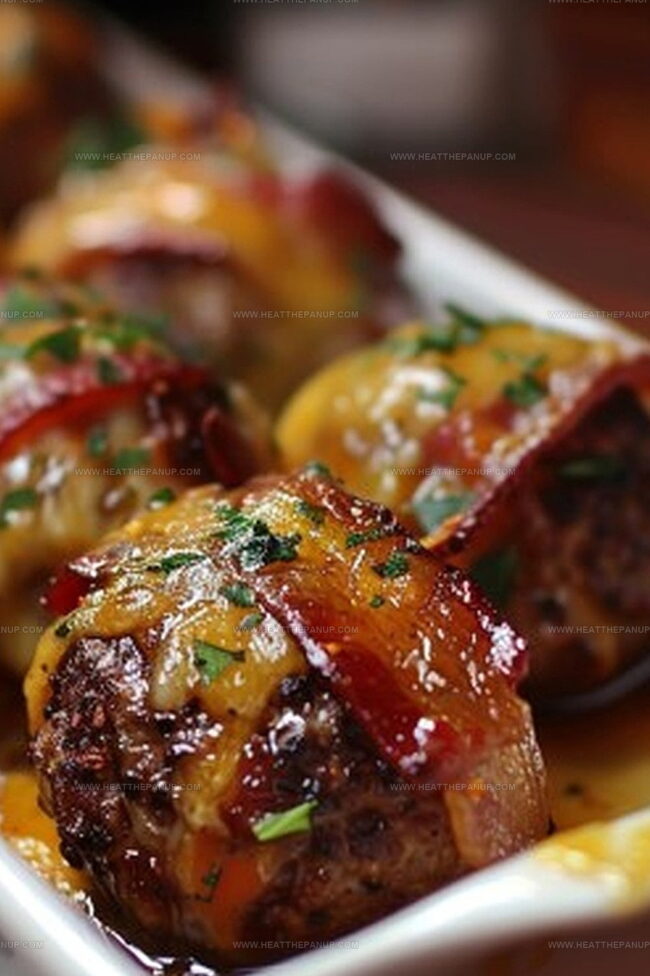
The Juiciest Bacon Cheeseburger Bombs Recipe Ever Made
Who doesn’t love a delectable bacon cheeseburger bomb that explodes with flavor in your mouth?
Crispy outer shells hide creamy, melted cheese and savory ground beef inside.
Packed with rich ingredients, these handheld treats deliver maximum satisfaction in every single bite.
Unexpected textures create a delightful contrast between crunchy exterior and molten center.
Casual gatherings and game days call for something special that disappears faster than you can serve them.
Weekend cooking becomes an adventure when we craft these irresistible morsels that spark instant excitement.
One taste will convince you these aren’t just another appetizer – they’re a culinary experience worth mastering.
Why Bacon Cheeseburger Bombs Are Crowd-Pleasers
Ingredients for Bacon Cheeseburger Bombs
Meat Base:Cheese and Binders:Aromatics and Seasonings:How to Bake Bacon Cheeseburger Bombs at Home

Step 1: Prepare Flavorful Meat Mixture
In a spacious mixing bowl, combine these delightful ingredients:Gently blend the ingredients using your hands or a sturdy spoon.
Mix until just combined, being careful not to overwork the meat mixture, which can make the bombs tough.
Step 2: Shape Meaty Treasures
Divide the meat mixture into 12 equal portions.
Roll each portion into a perfect round ball.
Carefully wrap each meat ball with a slice of bacon, securing with a toothpick if needed to keep the bacon in place.
Step 3: Bake to Golden Perfection
Fire up your oven to 400°F.
Line a baking sheet with parchment paper.
Arrange the bacon-wrapped bombs with some breathing room between them.
Slide the tray into the oven and bake for 15-20 minutes.
Look for crispy, golden-brown bacon and fully cooked meat.
Pull out these sizzling bombs and serve immediately with your favorite condiments like ketchup, mustard, or ranch dressing.
Enjoy the explosion of flavors in every bite!
Pro Tips for Gooey Cheeseburger Bombs
How to Reheat and Store Cheeseburger Bombs
Favorite Sides for Bacon Cheeseburger Bombs
Pair Savory Sides with Bacon Cheeseburger Bombs:Tasty Twists on Cheeseburger Bomb
FAQs
No, they’re super easy! You just mix ingredients, shape into balls, wrap with bacon, and bake. Even beginner cooks can make these delicious appetizers quickly.
Absolutely! Ground turkey or chicken work great. Just make sure the meat is lean and well-seasoned for best results.
Use fresh breadcrumbs and an egg as a binder. Mix ingredients gently without overmixing, which helps keep the mixture compact and stable during baking.
Cheddar and Parmesan are perfect! They melt beautifully and add rich, tangy flavor. Shredded cheese helps create that gooey, delicious center everyone loves.
Print
Bacon Cheeseburger Bombs Recipe
- Total Time: 35 minutes
- Yield: 4 1x
Description
Hearty bacon cheeseburger bombs deliver classic American comfort in one irresistible bite. Melted cheese and crispy bacon wrapped in golden pastry create an explosion of flavor that will satisfy hungry crowds with minimal effort.
Ingredients
Meat and Protein:
- 1 lb (454 grams) ground beef
- 6 slices bacon
- 1 egg
Cheese and Dairy:
- 1/2 cup (120 milliliters) shredded cheddar cheese
- 1/4 cup (60 milliliters) grated Parmesan cheese
Seasonings and Binders:
- 1/4 cup (60 milliliters) finely chopped onion
- 2 cloves garlic, minced
- 1/2 cup (120 milliliters) breadcrumbs
- Salt and pepper to taste
Instructions
- In a spacious mixing vessel, thoroughly amalgamate ground beef with shredded cheese, Parmesan, finely diced onion, minced garlic, beaten egg, breadcrumbs, salt, and pepper using gentle hand motions to ensure even distribution without compressing the meat excessively.
- Portion the seasoned meat mixture into 12 uniform spherical shapes, ensuring consistent size and compact formation.
- Carefully encase each meat sphere with a bacon slice, strategically wrapping to completely cover the meat ball and secure the bacon’s edges with a slender toothpick if necessary.
- Heat the oven to a precise 400°F, preparing a parchment-lined baking sheet to accommodate the bacon-wrapped delicacies with adequate spacing between each bomb.
- Position the bacon-wrapped meat bombs in the preheated oven, allowing them to roast and transform for approximately 15-20 minutes until the bacon achieves a deep golden-brown crispness and the internal meat reaches optimal doneness.
- Remove from the oven and let the bombs rest momentarily to stabilize their structure before transferring to a serving platter accompanied by preferred condiments and garnishes.
Notes
- Check meat mixture consistency by gently pressing a small portion; it should hold together without crumbling or becoming too dense.
- Opt for high-quality thick-cut bacon to ensure a crispy exterior and prevent burning during baking.
- Experiment with different cheese blends like sharp cheddar or smoked gouda for unique flavor profiles.
- For a low-carb version, replace breadcrumbs with almond flour or crushed pork rinds to maintain texture while reducing carbohydrates.
- Prep Time: 15 minutes
- Cook Time: 20 minutes
- Category: Lunch, Dinner, Appetizer, Snacks
- Method: Baking
- Cuisine: American
Nutrition
- Serving Size: 4
- Calories: 450
- Sugar: 1 g
- Sodium: 800 mg
- Fat: 30 g
- Saturated Fat: 12 g
- Unsaturated Fat: 18 g
- Trans Fat: 0 g
- Carbohydrates: 20 g
- Fiber: 1 g
- Protein: 25 g
- Cholesterol: 100 mg
Angelina Wiles
Content Editor & Culinary Enthusiast
Expertise
Food Writing and Editing, Vegetarian and Vegan Cuisine, Baking and Pastry Arts, Sustainable Cooking Practices
Education
Portland Community College
Certificate in Culinary Arts
Focus: Emphasis on sustainable cooking practices, vegetarian cuisine, and food writing.
Oregon Culinary Institute
Diploma in Baking and Pastry Arts
Focus: Specialized training in artisanal baking, pastry techniques, and dessert presentation.
Angelina’s love for cooking started with handwritten family recipes and weekend trips to farmers’ markets around Portland. She followed her passion with a Certificate in Culinary Arts from Portland Community College, then perfected her sweet side with a Diploma in Baking and Pastry Arts at Oregon Culinary Institute.
Angelina believes recipes should feel like a conversation, not a science project. She’s all about helping readers trust themselves in the kitchen with simple steps, fresh ideas, and easy twists on classic meals.
When she’s not editing recipes, she’s baking bread, sipping coffee, or getting inspired by the changing seasons.